Compact Slayer Exciter For Your High Voltage Needs

Tesla coils are incredible pieces of hardware, but they can be tricky to build. Between the spark gap, capacitors, and finely tuned coils, it’s not exactly a beginners project. Luckily, there’s hope for anyone looking for a less complex way to shoot some sparks: the Slayer Exciter. This device can be thought of as the little cousin to the Tesla coil, and can be used for many of the same high voltage experiments while being far easier to assemble.

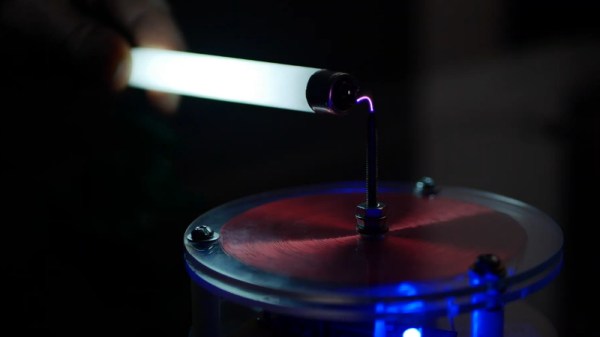
Now [Jay Bowles] is obviously no stranger to building his own Tesla coils, but since so many of his fans wanted to see his take on this less complex option, he recently built his own Slayer Exciter. After putting on a few of his own unique touches, the end result looks very promising. It might not be able to throw sparks as far as some of the other creations featured on his YouTube channel, but it’s still impressive for something so simple.

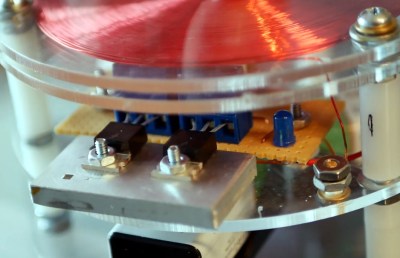
[Jay] uses two transistors in parallel for reliability
When we say simple, we mean it. Building a bare-bones Slayer Exciter takes only takes five components: the two coils, a transistor, a diode, and a resistor. For this build, power is provided by a trio of rechargeable 9 V batteries in the base of the unit which can be easily swapped out as needed.

In the video, [Jay] does a great job explaining and illustrating how this basic circuit creates exceptionally high frequency energy. In fact, the frequency is so high that the human ear can’t hear it; unfortunate news for fans of the Tesla coil’s characteristic buzz.

Generally speaking Slayer Exciters would have the same sort of vertical coils that you’d see used on a traditional Tesla coil, but in this case, [Jay] has swapped that out for a pancake coil held in the upper level of the device. This makes for a very compact unit that would be perfect for your desk, if it wasn’t for the fact that the arcs produced by this gadget are hot enough to instantly vaporize human skin. Just something to keep in mind.

We’ve seen Slayer builds in the past, but none as well designed as this one. Incidentally, if you’re wondering about the array of neon indicator lights that [Jay] uses to visualize the electrical field, we covered that project as well.

Continue reading “Compact Slayer Exciter For Your High Voltage Needs”

Visualizing Energy Fields With A Neon Bulb Array

Everyone knows that one of the coolest things to do with a Tesla coil is to light up neon or fluorescent tubes at a distance. It’s an easy and very visual way to conceptualize how much energy is being pumped out, making it a favorite trick at science museums all over the world. But what would it look like if you took that same concept and increased the resolution? Replace that single large tube with an array of smaller ones. That’s exactly what [Jay Bowles] did in his latest video, and the results are impressive to say the least.

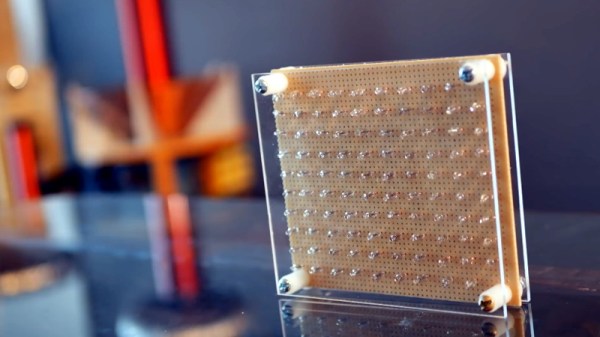
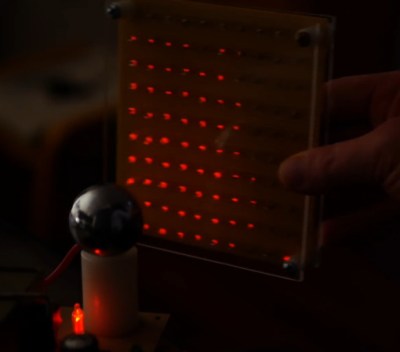
From a hardware standpoint, it doesn’t get much simpler. [Jay] knew from experience that if you bring a small neon indicator close to a Tesla coil, it will start to glow when approximately 80 volts is going through it. The higher the voltage, the brighter the glow. So he took 100 of these little neon bulbs and arranged them in a 10×10 grid on a piece of perfboard. There’s nothing fancy around the backside either, just all the legs wired up in parallel.

When [Jay] brings the device close to his various high-voltage toys, the neon bulbs still glow like they did before. But the trick is, they don’t all glow at the same brightness or time. As the panel is moved around, the user can actually see the shape and relative strength of the field by looking at the “picture” created by the neon bulbs.

The device isn’t just a cool visual either, it has legitimate applications. In the video, [Jay] explains how it allowed him to observe an anomalous energy field that collapsed when he touched the base of his recently completed Tesla coil; an indication that there was a grounding issue. He’s also observed some dead spots while using what he’s come to call his “High-Voltage Lite-Bright” and is interested in hearing possible explanations for what he’s seeing.

We’ve been fans of [Jay] and the impressively produced videos he makes about his high-voltage projects for years now, and we’re always excited when he’s got something new. Most hardware hackers start getting sweaty palms once the meter starts indicating more than about 24 VDC, so we’ve got a lot of respect for anyone who can build this kind of hardware and effectively communicate how it works to others.

Continue reading “Visualizing Energy Fields With A Neon Bulb Array”

Simple Acrylic Plates Make Kirlian Photography A Breeze

We know, we know – “Kirlian photography” is a term loaded with pseudoscientific baggage. Paranormal researchers have longed claimed that Kirlian photography can explore the mood or emotional state of a subject through the “aura”, an energy field said to surround and emanate from all living things. It’s straight-up nonsense, of course, but that doesn’t detract from the beauty of plasma aficionado [Jay Bowles]’ images produced by capacitive coupling and corona discharge.

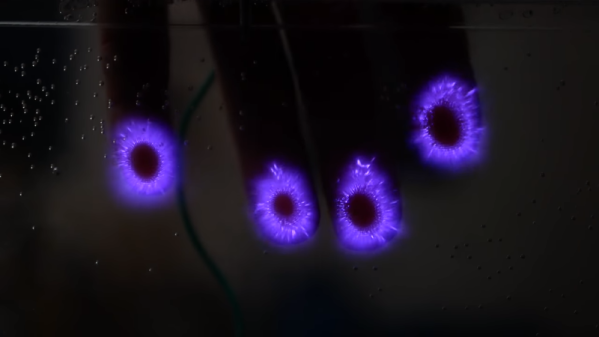
Technically, what [Jay] is doing here is not quite Kirlian photography. The classic setup for “electrophotography” is a sandwich of photographic film, a glass plate, and a metal ground plate. An object with a high-voltage, high-frequency power supply attached is placed on top of the sandwich, and the resulting corona discharge exposes the film. [Jay]’s version is a thin chamber made of two pieces of solvent-welded acrylic and filled with water. A bolt between the acrylic panes conducts current from a Tesla coil – perhaps this one that we’ve featured before – into the water. When something is placed on the acrylic, a beautiful purple corona discharge streams out from the object.

It’s an eerie effect, and it’s easy to see how people can see an aura and attribute mystical properties to it. In the end, though, it’s not much different than touching a plasma globe, and just about as safe. Feeling a bit more destructive? Corona discharge is a great way to make art, both in wood and in acrylic.

Continue reading “Simple Acrylic Plates Make Kirlian Photography A Breeze”

Because Conventional Laser Harps Aren’t Dangerous Enough

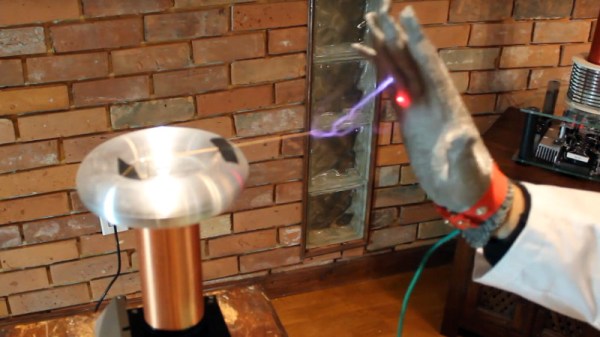
In the late 1980s, the French musician [Jean-Michel Jarre] famously toured with a laser harp. The word among teenage fans was that he had to wear special gloves to stop his hands getting burned, because 1980s teens were both impressionable and didn’t know much about lasers. In fact we’re told by a member of our community who was part of his road crew that the glove was a matter of reflectivity, so laser harps remain relatively harmless and French harpists retain their fingers. To add a bit of spice to the laser harp experience, [James Cochrane] hooked up a laser rangefinder to a Tesla coil to make an instrument with a bit more crackling energy in its performance than the [Jarre] model.

It starts with a laser tape measure modified to serve as an Arduino rangefinder, coupled to custom MIDI code to make a laser harp MIDI controller. The Tesla coil in question happens also to be a MIDI instrument, so the one can control the other with ease. The addition of an earthed chain mail glove allows it to be played in close proximity to the coil, and he rewards us with a rendition of the Star Trek theme. Tesla fun and games behind us, he then gives us a demonstration with a more conventional MIDI instrument.

We’ve had innumerable Tesla coil projects here over the years, if you’re hungry for more we suggest starting with this unusual planar PCB coil design. Meanwhile you can see the laser harp coil in the video below the break.

Continue reading “Because Conventional Laser Harps Aren’t Dangerous Enough”

Fablab Saigon Celebrates A Belated Arduino Day

Okay, we’ve just left May and stepped into June, why are we talking about Arduino Day — traditionally a March 16th event where makers congregate and share projects? I live in Ho Chi Minh City, and the event tends to take place in mid-May, but the enthusiasm and collaborative spirit are just as strong. Organized by the awesome local maker group Fablab Saigon with the venue provided by Intek Institute, there were some neat projects on display along with some talks from local companies.

The first thing that struck me about the event was how young the maker movement is here – most attendees were still in high school or early university. By contrast, I was 23 when I first learned to use AVR microcontrollers with assembly language (by the time Arduino started to get traction the boat effectively missed me). I couldn’t help but feel like a bit of a relic, at least until we all started talking excitedly about robots (I had brought a couple). It seems that geeking out about electronics is the great equalizer which knows no age limits.

Continue reading “Fablab Saigon Celebrates A Belated Arduino Day”

A Tesla Coil From PCBs

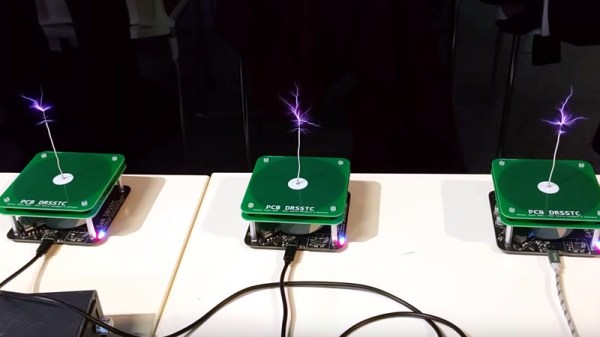
While at the Hacker Hotel camp in the Netherlands back in February, our attention was diverted to an unusual project. [Niklas Fauth] had bought along a Tesla coil, but it was no ordinary Tesla coil. Instead of the usual tall coil and doughnut-shaped capacity hat it took the form of a stack of PCBs with spacers between them, and because Tesla coils are simply cooler that way, he had it playing music as an impromptu MIDI-driven plasma-ball lousdpeaker. Now he’s been able to write up the project we can take a closer look, and it makes for a fascinating intro not only to double-resonant Tesla coils but also to Galium Nitride transistors.

The limiting factor on Tesla coils comes from the abilities of a transistor to efficiently switch at higher frequencies. Few designs make it above the tens of kHz switching frequencies, and thus they rely on the large coils we’re used to. A PCB coil can not practically have enough inductance for these lower frequencies, thus Niklas’ design employs a very high frequency indeed for a Tesla coil design, 2.6 MHz with both primary and secondary coils being resonant. His write-up sets out in detail the shortcomings of conventional MOSFETS and bipolar transistors in this application, and sets out his design choices in using the GaN FETs. The device he’s using is the TI LMG5200 GaN half-bridge driver, that includes all the necessary circuitry to produce the GaN FET’s demanding drive requirements.

The design files can be found in a GitHub repository, and you can see a chorus of three of them in action in the video below. Meanwhile [Niklas] is a prolific hardware hacker whose work has appeared on these pages in the past, so take a look at his ultrasonic phased array and his x-ray image sensor work.

Continue reading “A Tesla Coil From PCBs”

Here’s A Tesla Coil You Can Wear

It’s badgelife season, and if you need an idea for a killer piece of wearable electronics, look no further than this PCB Tesla coil. Yes, it’s killer, doubly so if you’re wearing a pacemaker.

This project was inspired by an earlier Tesla coil on a PCB project that used 160 turns of 6 mil traces on a circuit board as the secondary. All the electronics are there, and it’s powered by USB. Plug this thing in, and you have a pocket full of lightning that’s approximately 30kV. It probably won’t kill you if you touch it, but let’s not test that too much. [Bobricious] took this idea and ran with it, stripping the circuit down to its bare minimum. Now it’s just a single transistor, with all the other parts printed on a circuit board.

There is one problem with making a Tesla Coil on a PCB, and that’s the number of turns on the coil. Any Tesla coil you’ll find is really just the clever application of a single thin wire wrapped around itself a few hundred or thousands of times. This Tesla coil is no different, and in this case it’s 240 turns of a single trace wrapping around a PCB that is 150mm square. [Bobricius] is one of the kings of putting tiny coils on a PCB, and his fiberglass brushless motor is a testament to that. We also just covered his circular linear motor raceway which also uses PCB coils.

The circuit is simple, just a power jack that accepts something around 20 Volts, a single BD243 transistor, an LED, and an 82k resistor. With that, you can lay a small neon tube on the PCB and watch it light up. With another PCB and another neon tube, this circuit board can transfer wireless power. It’s a fun toy, and it’s all PCB tech.