Hacklet 104 – Test Equipment Projects

Hardware hackers love their test equipment. There are entire forums dedicated to talking about multimeters, oscilloscopes, signal generators, and other common bench tools. At times it seems we spend more time talking about our tools than actually using them. For some, off the shelf equipment is never quite good enough. These hackers, makers and engineers design and build their own test equipment. This week’s Hacklet is dedicated to some of the best test equipment projects on Hackaday.io!

test-tool-1We start with [Roman] and Handheld Electronic Test And Measurement Lab. [Roman] travels a lot, and often needs to bring a lab’s worth of tools with him. After suffering through several ‘random’ searches, he decided to design a simple tool that would cut down his packing, and not get him strip searched. The handheld lab packs a multimeter, low-frequency oscilloscope, data logger, waveform generator, and several other tools into a small package. The tool can be connected to a PC to display data and update settings. The on-board PIC24 handles all the hard work of taking measurements. Some careful analog design gives this tool 10 megohm of input impedance.

test-2
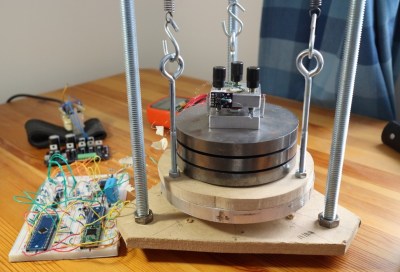
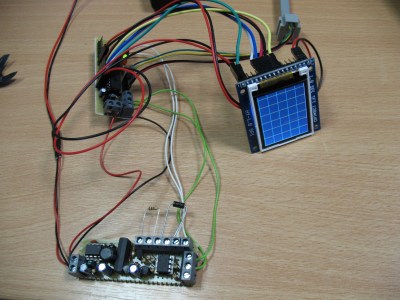
Next up is [Jaromir Sukuba] with 10$ curve tracer. The only way to find out of that a transistor or diode really works as well as the data sheet suggests is to pull out your semiconductor curve tracer. Curve tracers are also perfect for matching transistors for projects like analog synthesizers. [Jaromir] built this quick and dirty tracer over the course of just two evenings. A dsPIC microcontroller runs the show, generating an IV curve by sending pulses through the device under test. Once the curve has been traced, the PIC displays the results on a TFT LCD module. The tracer is a bit limited with a max of 35V at 0.5 amps. Knowing [Jaromir] though, extending the range would only take another evening or two of work.

vlabtool
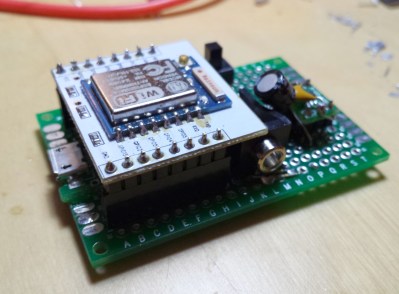
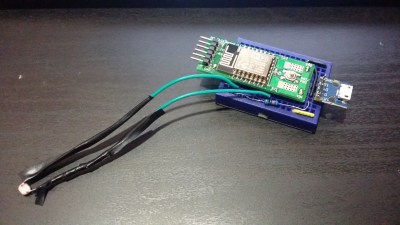
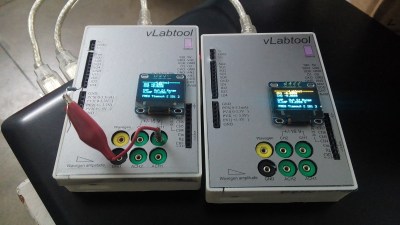
Next we have [Jithin] with A Versatile Labtool. This tool can do just about everything you could want – all in one box. From oscilloscope to frequency counter to multimeter to current source, and much more. Much like [Roman] up above, [Jithin] chose a Microchip PIC24 MCU as processing heart of his design. The Versatile Labtool connects to a PC via USB. If you’re not close to your PC, an ESP8266 module allows the unit to connect over WiFi. A PC isn’t required though. The on-board OLED is always available for quick measurements.

emt
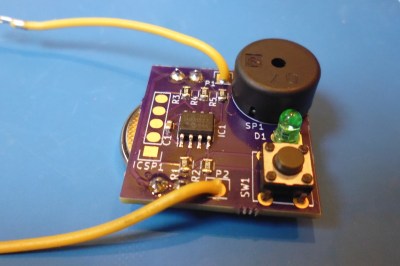
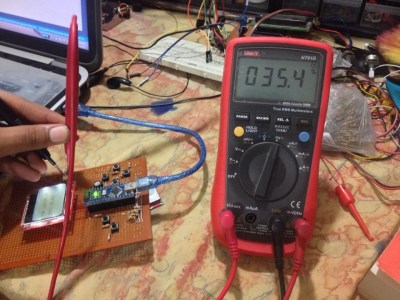
Finally we have [ZaidPirwani] with Engineer’s Multi Tool, his entry in the 2015 Hackaday Prize. [Zaid] started with the popular transistor tester codebase. He ported the code to his own hardware, an Arduino Nano and Nokia LCD. Making the port function required quite a bit more work than [Zaid] expected. He ended up going with a fresh repository and adding a bit of code at a time. Once everything was working, [Zaid] verified that his hardware design operated as expected with a good old-fashioned multimeter. Now that everything is working, [Zaid] is just about out of space on the little ATmega328. Next stop is a Teensy 3.2!


A special thank you goes out to [Jaromir Sukuba] for suggesting test equipment as the theme for this week’s Hacklet. You can find his projects and more on the new test equipment project list! If I missed your project, or if you have a suggestion for a future Hacklet theme, don’t be shy! Drop me a message on Hackaday.io. That’s it for this week’s Hacklet. As always, see you next week. Same hack time, same hack channel, bringing you the best of Hackaday.io!

Hacklet 103 – Piezo Projects

The piezoelectric effect is simple in its rules: Apply mechanical stress to a material and you generate an electric charge. The inverse is also true: Apply a voltage to a material, and it changes shape. This doesn’t work for everything, though. Only certain materials like crystals, some ceramics, and bone have piezoelectric properties. The piezoelectric effect is used quite a bit in electronics, so it’s no surprise that plenty of hacker projects explore this physical phenomena. This week’s Hacklet is all about some of the best projects utilizing the piezoelectric effect on Hackaday.io!

strumWe start with [miro2424] and StrumPad. Strumpad lets you play a MIDI instrument by strumming, just like a guitar. A music keyboard acts as the guitar fretboard here – keys can be pressed to choose notes, but no sound is generated. When the strumpad is strummed, six copper strips act as capacitive sensors. Touching the strips determines which notes will be played. A piezo disc hiding below the circuit board detects how hard the notes have been strummed or tapped. The ATmega328 running the strumpad then passes the velocity and note-on MIDI messages on to a synth.

stmNext up is [Dan Berard] with Scanning Tunneling Microscope. Inspired by a project from [John Alexander], [Dan] created his own Scanning Tunneling Microscope (STM). The key to an instrument like this is precise movement. [Dan] achieves that by using a normal piezo disk. These disks are used as speakers and buzzers in everything from smoke detectors to greeting cards, so they’re common and cheap. [Dan] cut his piezo disk electrode into quadrants. Carefully controlling the voltage applied to the quadrants allows [Dan] to move his STM tip in X, Y, and Z. Incredibly, this microscope is able to create images at the atomic scale.

touchboard[Thatcher Chamberlin] is next with Low-Cost Touchscreen Anywhere. [Thatcher] used a trio of Piezo disks to make any flat surface touch sensitive. The three sensors are placed at 3 corners of a rectangle. Touches with the rectangle will create vibrations in the surface that are transmitted to the piezo sensors. By measuring the vibration time of arrival, it should be possible to determine where the surface was touched. This kind of measurement requires a decent processor, so [Thatcher] is using the ARM Cortex-M0 in NXP’s LPC1114FN28. Initial tests were promising, but we haven’t heard much from [Thatcher] on this project. If you see him online, tell him to hurry up! We’re hoping to turn our parking lot into a giant electronic chess board!

contFinally, we have [Jose Ignacio Romero] with Low Power Continuity Tester. [Jose] used a Piezo element in a slightly more mundane way – as a buzzer. Who needs a whole multimeter when you’re just trying to check continuity on a few circuits? This continuity tester uses a PIC12LF1571 processor to find open and short circuits. The 5 10 bit ADC in the PIC is plenty of resolution for this sort of tester. In fact, [Jose] even included a diode test, which emits a short beep if the leads are placed across a working diode. The PIC processor uses so little power that this tester should run for around 800 hours on a CR2032 watch battery.


If you want to see more piezo projects check out our brand new piezo projects list! If I missed your project, don’t get buzzed! Drop me a message on Hackaday.io, and I’ll add it to the list. That’s it for this week’s Hacklet. As always, see you next week. Same hack time, same hack channel, bringing you the best of Hackaday.io!

Hacklet 102 – Laundry Projects

Ah laundry day. The washing machine, the dryer, the ironing, and the folding. No one is a fan of doing laundry, but we (I hope) are all fans of having clean clothing. Hackers, makers, and engineers are always looking for ways to make a tedious task a bit easier, and laundry definitely is one of those tedious tasks. This week we’re checking out some of the best laundry projects on Hackaday.io!

laundrifyWe start with [Professor Fartsparkles] and Laundrify. Anyone who’s shared a washer and dryer with house or apartment mates will tell you how frustrating it can be. You bring your dirty laundry downstairs only to find the machines are in use. Wait too long, and someone has jumped in front of you. Laundrify fixes all that. Using a current sensor, Laundrify can tell if a machine is running. An ESP8266 monitors the current sensor and sends data up to the cloud – or in this case a Raspberry Pi. Users access this laundry as a service system by opening up a webpage on the Pi. The page includes icons showing the current status of each machine. If everything is in use, the users can join a queue to be notified when a machine is free.


borgmachineNext up is [Jose Ignacio Romero] with Borg Washing Machine. [Jose] came upon a washer that mechanically was perfect. Electrically was a different story. The biggest issue was the failing mechanical timer, which kept leaving him with soapy wet clothing. Washing machine timers boil down to mechanically timed multipole switches. They’re also expensive to replace. [Jose] did something better – he built an electronic controller to revitalize his washer. The processor is a PIC16F887. Most of the mains level switching is handled by relays. [Jose] programmed the new system using LDmicro, which is a ladder logic implementation for microcontrollers. For the uninitiated, ladder logic is a programming language often used on industrial Programmable Logic Controller (PLC) systems. The newly dubbed borg machine is now up and running better than ever.


hackitgreen

Next we have [Michiel Spithoven] with Hot fill washing machine. In North America, most washing machines connect to hot and cold water supplies. Hot water comes from the home’s water heater. This isn’t the case in The Netherlands, where machines are designed to use electricity to heat cold water. [Michiel] knew his home’s water heater was more efficient than the electric heater built into his machine. [Michiel]  hacked his machine green by building an automated mixing manifold using two solenoid valves and a bit of copper pipe. The valves are controlled by a PIC microprocessor which monitors the temperature of the water entering the machine. The PIC modulates the valves to keep the water at just the right temperature for [Michiel’s] selected cycle. [Michiel] has been tracking the efficiency of the new system, and already has saved him €97!


laundrespFinally we have [Mark Kuhlmann] with LaundrEsp. [Mark’s] washing machine has a nasty habit of going off-balance and shutting down. This leaves him with soggy clothing and lost time re-running the load. [Mark] wanted to fix the problem without directly modifying his machine, so he came up with LaundrEsp. When the machine is running normally, a “door locked” light is illuminated on the control panel. As soon as the washer shuts down – due to a normal cycle ending or a fault, the door unlocks and the light goes out. [Mark] taped a CdS light detecting resistor over the light and connected it to an ESP8266. A bit of programming with Thinger.io, and [Mark’s] machine now let’s him know when it needs attention.

If you want to see more laundry projects check out our brand new laundry project list! If I missed your project, don’t take me to the cleaners! Drop me a message on Hackaday.io, and I’ll have your project washed, folded, and added to the list in a jiffy. That’s it for this week’s Hacklet. As always, see you next week. Same hack time, same hack channel, bringing you the best of Hackaday.io!

Hacklet 101 – Pinball Projects

There’s something about pinball that draws in hackers, makers, and engineers. Maybe it’s the flashing lights, the sounds, the complex mechanical movements. Could it be the subtle tactics required to master the game? Whatever the reason, everyone loves pinball, and more than a few hackers have dedicated their time and money toward building, restoring, and hacking pinball machines. This week’s Hacklet is all about the best pinball projects on Hackaday.io!

trekpinWe start with [zittware] and Star Trek: The Mirror Universe Pinball. [Zittware] worked with [clay], [fc2sw], and [steve] to create this awesome project. They took a 1978 Bally Star Trek pinball machine, and rebuilt an evil mirror universe version. The electronics include nixie tubes and a bulletproof power supply based upon an ATX computer setup. New play field elements and hardware were created on a CNC. Evil graphics were created with the help of Photoshop. The game is completely playable, and was a crowd favorite in the Hackaday Sci-Fi contest. The electronics and cabinet work are all open source. Unfortunately those pesky copyright laws prevent the team from sharing the artwork.

riiingpinNext up is [Erland Lewin] with RINNIG Pinball Simulator. Some hackers have the space for a few real pinball machines. For the rest of us, there is virtual pinball. [Erland Lewin] built this mini virtual pinball machine from plywood, some real pinball hardware, and a lot of ingenuity. The play field is a 24″ dell computer monitor, while the back glass is a 20″ monitor. A final 15″ monitor takes the place of the Dot Matrix Display (DMD) often found on pinball machines. The whole system is driven by an Intel i3 computer. [Erland] is going to try to use the on-board graphics. If he runs into trouble, he can always switch to a discrete graphics card. The machine has turned out great, and his sons love playing classic pinball machines on their own “kid sized” table.

pinboxIf virtual pinball is still a bit large for you, [Loyal J] has you covered with Pinbox Jr. Desktop computer virtual pinball has been a thing since the days of Windows XP. Somehow tapping keyboard keys isn’t quite the same as hitting real flipper buttons. Pinbox Jr. is a prototype pinball controller built inside a cardboard box. A Teensy 3.1 translates the buttons to USB keyboard inputs. Two large arcade buttons act as the flippers while two smaller buttons are available for game options and other functions.  [Loyal J] even added a triple axis accelerometer so pinbox responds to rough play with a tilt! All this project needs is a solenoid to replicate that real pinball feel.

optimusAt the top of the virtual pinball mountain stands [Randy Walker] with Optimus-Pin. Optimus is a full-sized virtual pinball cabinet. It’s a 3 screen affair, much like RINNIG Pinball up top. [Randy] took things to the next level with an absolutely gorgeous custom cabinet. The Transformers inspired artwork was created on commission by commercial artist [Javier Reyes]. Optimus really recreates the feel of playing pinball with 8 solenoids placed in strategic positions around the cabinet. Even the whirring of play-field motors is replicated by a hidden Volkswagen wiper motor. Optimus also comes with a complete light show including RGB LED strips, strobes, and a shaker to rattle the entire cabinet.

If you want to see more pinball projects check out our brand new pinball projects list! If I missed your project, don’t be shy! Just drop me a message on Hackaday.io. That’s it for this week’s Hacklet. As always, see you next week. Same hack time, same hack channel, bringing you the best of Hackaday.io!

Hacklet 100 – The 2016 Hackaday Prize

Welcome to the 100th Hacklet! This has been a huge week for Hackaday, as we launched The 2016 Hackaday Prize. We’ve invited you to change the world. Hackers, makers, and engineers have already answered the call, with nearly 200 entered projects! What better way to celebrate our 100th Hacklet than taking a look at a few of these early entrants?

rarmWe start with [Patrick Joyce] and Raimi’s Arm – Bionic Arm for Kids. Raimi was born with an arm which ends just below the elbow. She’s still a kid – and growing, which means she will quickly grow out of any prosthetic. This has placed bionic arms out of her reach. [Patrick] saw a plea from Raimi’s father for help. 3D printed arms for the disabled are a thing, but [Patrick] couldn’t find one which fit the bill for Raimi. So he’s set out to design one himself. This will be an open source project which anyone with the proper tools can replicate. [Patrick] has already created several test rigs, and is well on the way to building an arm for Raimi and others!

latheNext up is [castvee8] who has entered the 2016 Hackaday Prize with Building Simplified Machinery. Over the years, [Castvee8] has built a few 3D printers and CNC machines. These projects always start with buying the same parts over and over: ground rods, linear bearings, stepper motors, drivers, etc. [Castvee8] is trying to build 3D printed machines which use as few of these vitamins as possible, yet are still strong enough to work in wood, plastic, wax, foam, and other light maker-friendly materials. So far the simple, modular components and electronics have led to a mini mill, mini lathe, and a drill press for things like printed circuit boards. Keeping things low-cost will make these tools accessible to everyone.

turpump[Keegan Reilly] entered Everyman’s turbomolecular pump. Vacuum pumps are great, but everyone knows the real fun starts around 10^-7 Torr. Pulling things down this low requires a specialized pump. Two common designs are oil diffusion pumps and Turbomolecular pumps. Oil diffusion is cheap, but not everyone wants a hot vat of oil bubbling away in their vacuum chamber. Turbomolecular pumps are much cleaner, but very expensive. [Keegan] is attempting to design a low-cost version of a turbomolecular pump. He’s trying to use Tesla’s bladeless turbine design rather than the traditional bladed turbines used in commercial pumps. So far tests using a Dremel tool and paper discs have been promising – nothing has exploded yet!

commongroundFinally, we have [Samuel Bowman] with Seamless IoT Protocol Translation: Common Ground. Love it or hate it, the Internet of Things is going to be here for a while. Every device seems to speak a different language though . Z-wave, Zigbee, LoRa, WiFi, and a host of other protocols, all on different frequencies. Some are frequency hopping, some use mesh networks. [Samuel] is trying to design one device to translate between any of the emerging standards. Common Ground started as a science fair project connecting MQTT to Phillips Hue devices. Once [Samuel] achieved that goal, he realized how much potential there is in a universal translator box. We’re hoping [Samuel] achieves his goals quickly – it seems like new IoT standards are being introduced every day.

New projects are entering the 2016 Hackaday Prize every hour! You can see the full list right here. That’s it for the 100th Hacklet. As always, see you next week. Same hack time, same hack channel, bringing you the best of Hackaday.io!

Hacklet 99 – Soldering Tools

If there is one tool every hardware hacker needs, it’s a good soldering setup. Soldering irons, heat guns, reflow ovens and the like make up the tools of the trade for building electronic circuits. Spend enough time working with a tool, and you’ll find a way to improve it. It’s no surprise that hackers, makers, and engineers have been hacking their soldering tools for decades. This week’s Hacklet features some of the best soldering tool projects on Hackaday.io!

hakkoWe start with  [Kuro] a Hakko 907 based Soldering Station. Hakko 907 and 936 soldering station clones from the Far East are available all over the internet. While the heaters work, none of them have very good temperature controllers. [Kuro] turned a problem into a project by building his own soldering station. These irons are rated for 24 V. 24 volt power supplies are not very common, but it’s easy to find old 19 volt supplies from discarded laptops. [Kuro] found that the lower voltage works just fine. An Arduino nano controls the show, with user output displayed on a 2 line LCD. The finished controller works better than the original, and probably would give a real Hakko model a run for its money.

reflowNext up is [Sukasa] with Reflow Oven. When MakerSpace Nanaimo needed a reflow oven, [Sukasa] jumped in with this design. The idea was to create an oven that looked unmodified – just think of it as the toaster oven of the future, or the reflow oven of today. A Netduino plus 2 is the main controller. User information is displayed on a color TFT LCD. This oven is even internet connected, with an internally hosted web page and JSON data feed. The Netduino controls two beefy Solid State Relays (SSRs). The SSRs handle the dirty work of switching the oven’s heating elements. Two fans keep air moving to avoid hot spots. Precision temperature sensing is achieved through a pair of Adafruit MAX31855 breakout boards reading thermocouples.

plateNext we have [Jaromir Sukuba] with Soldering preheat plate. When soldering surface mount components, like QFN or BGA parts, it helps to pre-heat the whole board. There are commercial products to do this using hot air and other techniques, but it really comes down to making a hotplate. [Jaromir] figured he could do a pretty good job at this, so he built his own with a 3mm aluminum plate. Heat comes from 6 resistors in TO-220 cases. A Microchip PIC18 monitors a thermocouple and keeps things from getting too hot. For power, [Jaromir] had the same idea as [Kuro] did, and used a 19V power brick from an old laptop.

gooseFinally we have [Alex Rich] with Locking ball and socket gooseneck system. [Alex] came up with the Stickvise, so it’s fitting that he comes up with an awesome upgrade for it. We’ve all fought with “helping hands” while soldering. You never get them at quite the right angle. This system fixes that with a simple ball and gooseneck setup. [Alex] saw a similar design and printed it out. While it worked, the pieces popped apart too easily. [Alex] redesigned the system, adding a threaded locking ring. These new goosenecks stay put, holding your work exactly where you want it.

If you want to see more soldering tool projects, check out our brand new soldering tools list! If I missed your project, don’t be shy! Just drop me a message on Hackaday.io. That’s it for this week’s Hacklet. As always, see you next week. Same hack time, same hack channel, bringing you the best of Hackaday.io!

Hacklet 98 – Underwater ROVs

A few motors, propellers, a camera, maybe a wire tether, and some waterproof electronics. Throw it all together and baby you’ve got an underwater Remotely Operated Vehicle (ROV) cooking! It all sounds simple on the surface, but underwater ROVs are a tough challenge. We’ve all seen deep-sea ROVs searching the wreck of the Titanic, or working to stop the flow of oil below the Deepwater Horizon. Plenty of hackers, makers, and engineers have been inspired to build their own underwater ROVs. This week on the Hacklet, we’re spotlighting at some of the best ROV projects on Hackaday.io!

borgcubeWe start with [Tim Wilkinson] and BorgCube ROV. [Tim] has jumped into the world of underwater ROVs with both feet. BorgCube is designed to operate in the unforgiving salt waters of the Pacific Ocean. This ROV can see in stereo, as [Tim] plans to use a head mounted VR display like the Oculus Rift to control it. [Tim] wanted to use a Raspberry Pi as the brains of this robot. Since the Pi Compute module can handle two cameras, it was a natural fit. The electronic speed controls are all low-cost Hobby King R/C car units. [Tim] created a custom circuit board to hold all 12 ESCs. This modular design allows individual controllers to be swapped out if one meets an untimely doom. BorgCube is just getting wet, but with 37 project logs and counting, we’re sure [Tim] will keep us posted on all the latest action!


lunaNext up is [MrCullDog] with Luna I ROV. Inspired by a professional underwater ROV, [MrCullDog] decided to build a deep diving unmanned vehicle of his very own. Like BorgCube above, many of Luna I’s motors and drive components come from radio controlled hobby electronics. [MrCullDog] is bringing some 3D printed parts into the mix as well. He’s already shown off some incredibly well modeled and printed thruster mounts and ducts. The brains of this robot will be an Arduino. Control is via wired Ethernet tether. [MrCullDog] is just getting started on this project, so click the follow button to see updates in your Hackaday.io Feed.

cavepearlNext up is [Edward Mallon] with The Cave Pearl Project. Not every underwater system needs motors – or even a human watching over it. The Cave Pearl Project is a series of long duration underwater data loggers which measure sea conditions like temperature and water flow. [Edward’s] goal is to have a device which can run for a year on just three AA batteries. An Arduino Pro Mini captures data from the sensors, time stamps it, and stores it to a micro SD card. If the PVC pipe enclosure keeps everything dry, the data will be waiting for [Edward] to collect months later. [Edward] isn’t just testing in a swimming pool, he’s been refining his designs in open water for a couple of years now.


If you want to see more under (and above) water projects, check out our updated waterborne projects list! If I missed your project, don’t be shy! Just drop me a message on Hackaday.io. That’s it for this week’s Hacklet. As always, see you next week. Same hack time, same hack channel, bringing you the best of Hackaday.io!