Pinephone Gets Thermal Imaging Backpack

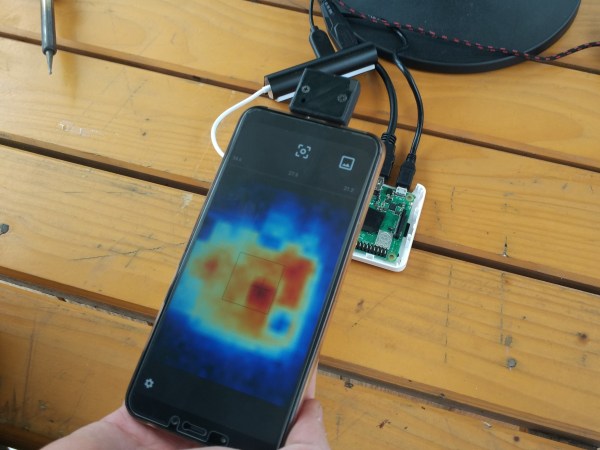
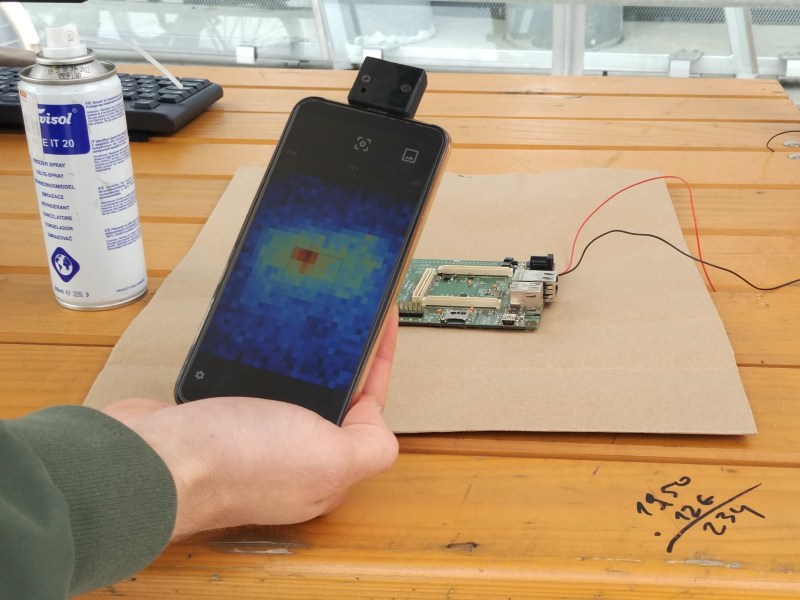
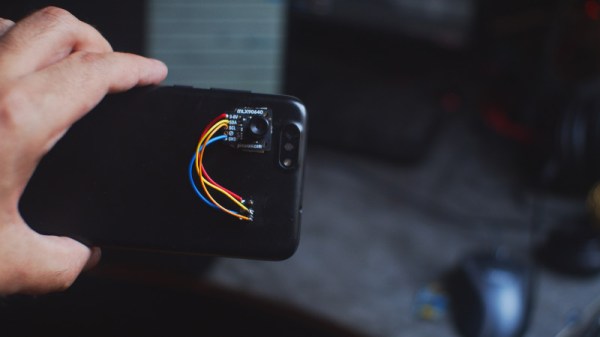
When you buy a mass-market mobile phone, you’re making the decision to trust a long list of companies with your private data. While it’s difficult for any one consumer to fully audit even a single piece of consumer technology, there have been efforts to solve this problem to a degree. The Pinephone is one such example, with a focus on openness and allowing users to have full control over the hardware. [Martijn Braam] is a proud owner of such a device, and took advantage of this attitude to add a thermal imager to the handset.

The build is not a difficult one, thanks to the expansion-friendly nature of the Pinephone hardware. The rear of the phone sports six pogo pins carrying an I2C bus as well as power. [Martin] started by modifying the back cover of the phone with contacts to interface with the pogo pins. With this done, the MLX90640 thermal imager was attached to the case with double-sided tape and wired up to the interface.

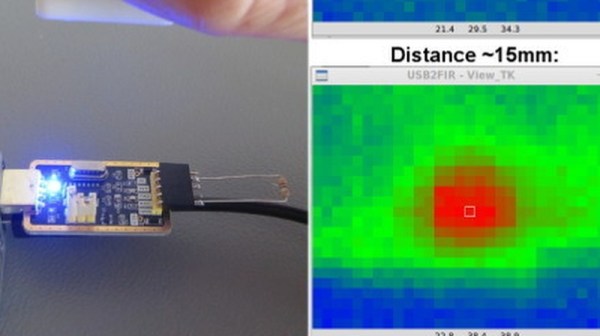
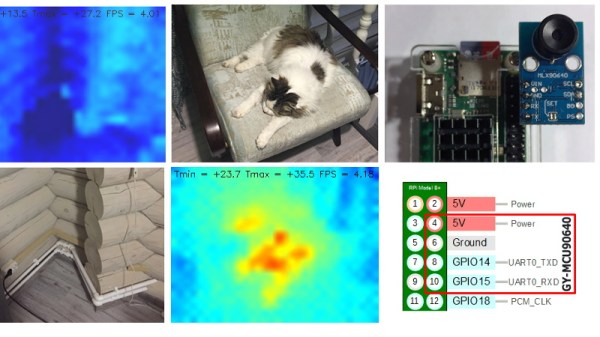
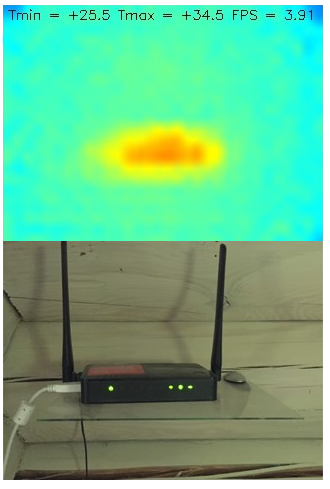
While the 32×24 output from the sensor isn’t going to help you build cutting edge heat-seeking missiles, it’s an affordable sensor with good performance for low-end thermal imaging tasks. We’ve featured teardowns of thermal imaging hardware before, too.

A Thermal Camera With A Vintage Twist

Nowadays we often value the superb design of vintage technology. It is, therefore, laudable when a broken piece of old electronics is given a new purpose. These types of builds are exactly [Martin Mander’s] cup of tea as he confirmed by turning a 1979 Apollo microwave monitor into a thermal camera (video embedded below).

Intrigued by its unique design, [Martin Mander] picked up the original microwave monitor at a secondhand sale, although the device was not exactly in mint condition. Supposedly this type of detector was used to monitor the exposure of personnel to microwave radiation in an industrial environment.

After removing all the guts, he replaced them with a Raspberry Pi Zero W, Adafruit thermal camera, 1.3″ TFT display, and a USB battery pack. It is especially nice that [Martin Mander] was able to mount all the components without relying on 3D prints but instead, he hand-carved some custom panels and brackets from waste plastic.

The software is based on Python and automatically uploads the captured images to an Adafruit.IO dashboard. With 8 x 8 pixels the resolution of the sensor is not great but by using bicubic interpolation he was able to convert it to a 32 x 32 image which was enough to take some interesting pictures of his cat and other household items.

It is also worthwhile to check out some of [Martin Manders] other retro-tech mods like his cassette Pi IoT scroller.

Continue reading “A Thermal Camera With A Vintage Twist”

Giant LEDs, Ruby Lasers, Hologram Displays, And Other Cool Stuff Seen At Maker Faire Rome

Hackers from all over Europe descended upon Rome last weekend for the Maker Faire that calls itself the “European Edition”. This three-day event is one of the largest Maker Faires in the world — they had 27,000 school students from all over Italy and Europe attend on Friday alone.

This was held at Fiera Roma, a gigantic conference complex two train stops south of the Rome airport — kind of in the middle of nowhere. I was told anecdotally that this is the largest event the complex hosts but have no data to back up that claim. One thing’s for certain, three days just wasn’t enough for me to enjoy everything at the show. There was a huge concentration of really talented hardware hackers on hand, many who you’ll recognize as creators of awesome projects regularly seen around Hackaday.

Here’s a whirlwind tour of some of my favorites. On that list are a POV holographic display, giant cast-resin LEDs, an optical-pump ruby laser built out of parts from AliExpress, blinky goodness in cube-form, and the Italian audience’s appreciation for science lectures (in this case space-related). Let’s take a look.

Continue reading “Giant LEDs, Ruby Lasers, Hologram Displays, And Other Cool Stuff Seen At Maker Faire Rome”

A Visual Infrared Thermometer That Runs Off Your Laptop

A common measurement for circuits is heat dissipation inspection. While single point thermometers do the trick, they can be quite annoying to use. Meanwhile, a thermal imaging camera is often out of the budget for hobbyists. How about building your own visual thermometer for cheap? That’s what [Thomas Fischl] decided to do, using an infrared thermal sensor array (MLX90640) connected through a PIC16LF1455 to a host computer. The computer handles the temperature calculation and visualization of hot spots, gathered from data collected by the IR pixel.

The interface board, USB2FIR, has full access to MLX90640 memory and can handle bulk transfer for faster data transmission of the raw sensor data collected by the pixel. A USB driver is needed to access the board – once the data is fetched, the visualizations can be created from a Matplotlib and TKinter GUI showing frame data and a real time heat map with minimum, maximum, and central temperature.

The hardware isn’t complicated, since the board relies on several ICs for processing the sensor data and immediately sends over the data to be processed externally. With some modifications – a 3D-printed enclosure, for instance – this can easily be made into a discreet tool for heat detection.

Hackaday Podcast 037: Two Flavors Of Robot Dog, Hacks That Start As Fitness Trackers, Clocks That Wound Themselves, And Helicopter Chainsaws

Hackaday Editors Mike Szczys and Elliot Williams take a look at the latest hacks from the past week. We keep seeing awesome stuff and find ourselves wanting to buy cheap welders, thermal camera sensors, and CNC parts. There was a meeting of the dog-shaped robots at ICRA and at least one of them has super-fluid movements. We dish on 3D printed meat, locking up the smartphones, asynchronous C routines, and synchronized clocks.

Take a look at the links below if you want to follow along, and as always tell us what you think about this episode in the comments!

Take a look at the links below if you want to follow along, and as always, tell us what you think about this episode in the comments!

Direct download (60 MB or so.)

Continue reading “Hackaday Podcast 037: Two Flavors Of Robot Dog, Hacks That Start As Fitness Trackers, Clocks That Wound Themselves, And Helicopter Chainsaws”

Getting The Heat On With A Thermal Camera

Need a quick way to tell your temperature before work tomorrow? Student maker [The Marpe] recently fashioned a sleek home-use thermal camera that even looks like a point and shoot. It works as an Android hardware add-on by integrating the readings from a MLX90640 far-infrared (FIR) thermal sensor with a STM32F042F6Px microcontroller. All this connects to an Android application via USB (MicroUSB or Type C).

On the app, users are able to view, take photos, and display the resulting thermal images from the open thermal camera. The code for the open Android application is also available on his GitHub.

The FIR sensors contain a small array of IR pixels, integrated to measure the ambient temperature of the internal chip, and supply sensor to measure the VDD. Each pixel on the sensor array responds to the IR energy focused on it to produce an electronic signal, which is processed by the camera processor to create a map of the apparent temperature of the object. The outputs of the sensors and VDD are stored in an internal RAM and are accessible through 3.3V I2C. They’re not only low-cost and fairly high resolution, but also available by order on Digi-Key.

The microcontroller is based on the STM32 platform, with 32-bit performance, low-power operation (at 2V to 3.6V and 48 MHz) and is fairly low-cost. The custom-designed PCBs are fitted inside a 3D-printed casing with M2.5 inserts to ease assembly. [The Marpe] used an Esra soldering iron to create a heat insert tool for easier assembly and more consistent results with the heat inserts, which made for a nicer overall finish.

The project has since been presented at the Ljublana Mini Maker Faire in Slovenia and the Trieste Mini Maker Faire in Italy. Here, the open thermal camera is being tested out on a faulty PCB with a shorted component, showing the location of the short on the Android application’s thermal camera display.

Other uses for the camera could be home insulation inspection, water leakage detection, wildlife observation, or even figuring out if your soldering iron is hot enough to use. We’ll say it’s a pretty useful DIY project!

The Easiest Thermal Camera Build You’ll Ever See

Thermal cameras are one of those tools that we all want, but just can’t justify actually buying. You don’t really know what you would do with one, and when even the cheap ones are a couple hundred dollars, it’s a bit out of the impulse buy territory. So you just keeping waiting and hoping that eventually they’ll drop to the price that you can actually own one yourself.

Well, today might be the day you were waiting for. While it might not be the prettiest build, we think you’ll agree it can’t get much easier than what [vvkuryshev] has put together. His build only has two components: a Raspberry Pi and a thermal camera module he picked up online for about $80 USD. There isn’t even any wiring involved, the camera fits right on the Pi’s GPIO header.

Of course, you probably wouldn’t be seeing this on Hackaday if all he had to do was just buy a module and solder it to the Pi’s header. As with most cheap imported gadgets, the GY-MCU90640 module that [vvkuryshev] bought came with some crusty Windows software which wasn’t going to do him much good on the Raspberry Pi. But after going back and forth a bit with the seller, he was able to get some documentation for the device that put him on the right track to writing a Python script which got it working under Linux.

The surprisingly simple Python script reads a frame from the camera four times a second over serial and run it through OpenCV. It even adds some useful data like the minimum and maximum temperatures in the frame to the top of the image. Normally the script would output to the Pi’s primary display, but if you want to use it remotely, [vvkuryshev] says he’s had pretty good luck running it over VNC. In fact, he says that with a VNC application on your phone you could even use this setup on the go, though the setup is a bit awkward for that in its current incarnation.

This isn’t the first DIY thermal camera build we’ve seen, and it isn’t even the first one we’ve seen that leveraged a commercially available imaging module. But short of buying a turn-key camera, we don’t see how it could get any easier to add heat vision to your bag of tricks.