The triode vacuum tube might be nearly obsolete today, but it was a technology critical to making radio practical over 100 years ago. [Kathy] has put together a video that tells the story and explains the physics of the device.
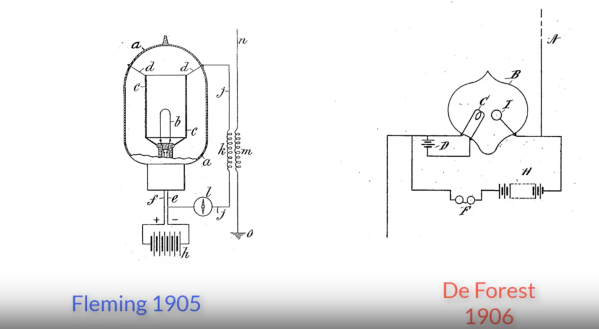
The first radio receivers used a device called a Coherer as a detector, relying on two tiny filaments that would stick together when RF was applied, allowing current to pass through. It was a device that worked, but not reliably. It was in 1906 that Lee De Forest came up with a detector device for radios using a vacuum tube containing a plate and a heated filament. This device so strongly resembled the Fleming Valve which John Fleming had patented a year before, that Fleming sued De Forest for patent infringement.
After a bunch of attempts to get around the patent, De Forest decided to add a third element to the tube: the grid. The grid is a piece of metal that sits between the filament and the plate. A signal applied to the grid will control the flow of electrons, allowing this device to operate as an amplifier. The modification created the triode, and got around Fleming’s patent.
[Kathy]’s video does a great job of taking you through the creation of the device, which you can watch after the break. She also has a whole series on the history of electricity, including a video on the Arc Transmitter which we featured previously.
Continue reading “The History And Physics Of Triode Vacuum Tubes”