Karma Controller Makes Reddit A Game

karma-controller-reddit

[Will] likes Reddit so much he built this dedicated controller that lets him play the social website like a video game.

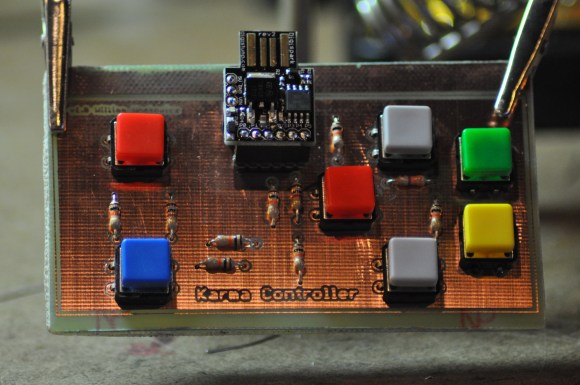
He calls it he Karma Controller. In this case, ‘Karma’ refers to ability to accumulate a large number of net up-votes on a Reddit post. The device features seven buttons which are all it takes to up and down vote, navigate up and down on the Reddit listings, toggle images, as well as open and close new tabs for the comments section. We’re wondering if it allows you to follow a link to the post source too?

One of the reasons that we’re featuring this is that it’s only [Will’s] second electronics project. If you’re still reluctant to get your hands dirty we hope this acts as inspiration. He started by building the first version on a hunk of protoboard. The Digispark microcontroller seen at the top reads from his button network and communicates with the computer via USB. Once the design was proven he had some help etching this circuit board which is version 2. He shows it off in the clip after the jump.

If you just want some buttons for voting you should take a look at this project which includes a 3D printed enclosure and button covers.

Continue reading “Karma Controller Makes Reddit A Game”

Sega Controller Houses Auto-launch Emulator

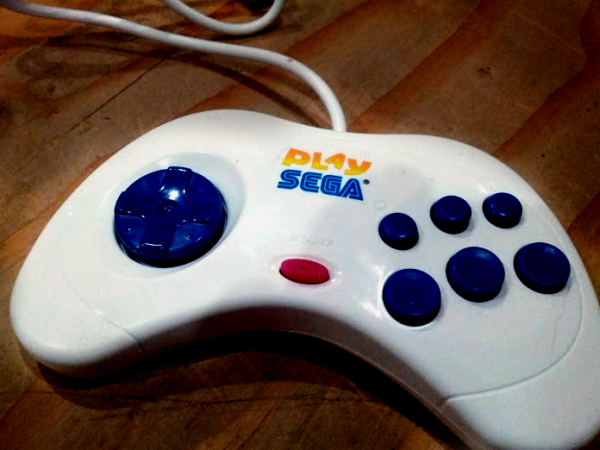
[Joe’s] wife grew up playing Sega games and he wanted to help her unwind by reliving the experience. Since the work computer she uses when travelling isn’t a good place to install emulators he built this plug-and-play emulator inside of a Sega controller.

We’ve seen this type of thing a few times before (even with XBMC in a SNES controller) but there is one thing we hadn’t thought of lately. Newer versions of Windows have auto-launch disabled for USB drives. But [Joe] knew that there were still some USB sticks that manage to auto-launch anyway so he researched how those work. It turns out that they have two partitions, one is formatted as a CDFS which looks like a CD-ROM to Windows and allows auto-launch. He used this method of partitioning a USB stick, storing the ROMs on the mass storage partition and the emulator and the CDFS partition. To finish the hack he cracked open the controller and found room for a USB hub and the PCB from the thumb drive.

If you still have cartridges lying around you can pull the ROMs off of them over USB.

Hand Placing Flash Die To Make USB Drives

SONY DSC

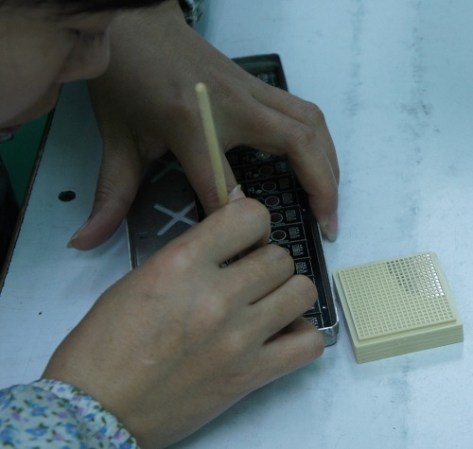
It’s a stretch to call this one a hack, but USB thumb drives are around us constantly and we always assumed that the boards inside were machine populated (like with a pick and place machine). [Bunnie] tells us otherwise. He recently had the chance to tour a factory where USB flash drives are made.

The image above shows a worker populating a set of boards with the flash memory dies. The waffle-grid to the right holds the dies. Each is a tiny glint of a component. The worker is not in a clean room, and is using a bamboo tool to pick up the pieces. [Bunnie] explains that he’s seen the tools before but doesn’t fully comprehend how they work. He figures that the hand-cut manipulator has just the right amount of grab to pick up the die, but will also release it when it touches down on the dot of glue applied to the landing zone on the board.

If you’re into this sort of thing you should check out the PCB factory tour we saw a couple of years back. The article link is dead but the embedded tour video still works.

[Thanks pl]

OTM-02 Is A 3D Printed Wristwatch

3d-printed-wristwatch

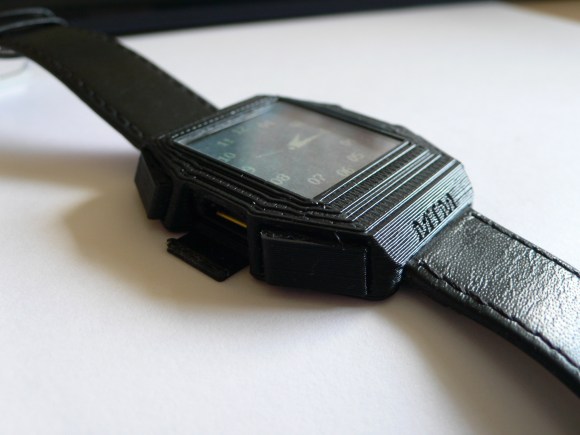
We love looking at roll-your-own wristwatch projects. Getting a project small enough to carry around on your wrist is a real challenge. But we think the OTM-02 wristwatch really hit the form factor right on the mark.

OTM stands for Open source Time Machine. It’s the work of [Hairy Kiwi] and he managed to bring the guts of the watch in at a thickness between 6.5 and 7mm. That includes the LCD, PCB, piezo diaphragm, and the battery. The PCB itself is a four-layer board built on 1mm thick substrate. It’s running an EFM32 (ARM) microcontroller which comes with hardware USB support. The little door sitting open on the side of the 3D printed enclosure provides access to the micro USB connector which can be used to charge the 150 mAh battery inside. That may not sound like much juice, but if you set the display to show minutes only [Hairy] calculates a battery life approaching 175 days. If you just have to have the seconds displayed you can expect about two weeks between charges.

Like the name says, this project is Open Source.

[Thanks Liam]

Drop-in Pcb Makes Nintendo Four Score A USB Joystick

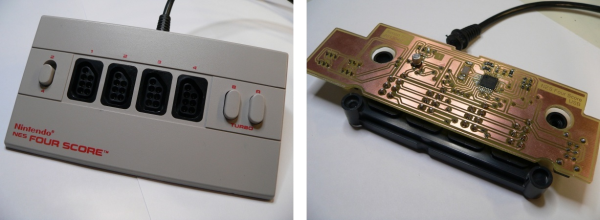
The Nintendo Four Score was a controller attachment for the original Nintendo Entertainment System which allowed you to use four controllers at one time. [Simon Inns] wanted to use some original NES controllers on his computer so he developed a drop-in replacement board that converts the device to USB.

As we’ve seen with other NES controller hacks, the hardware uses a simple parallel to serial shift register to deliver key-presses to the console. This means that reading four controllers at a time is no different than shifting in data to a microcontroller from the four different sources. The remaining portion of the problem is providing a USB connection that enumerates the device as a joystick. We’ve seen a bunch of USB projects from [Simon] so it’s no surprise that he was able to pull it off.

He went with the ATmega16U2 which has built-in support for USB. [Simon] wrote the code so that although there is only one USB cable, each of the four controller ports will appear as a separate USB joystick on the computer. To button up the project he carefully measured the original board and laid out his own version so that it fits the footprint of all the original components as well as the mounting brackets on the case. Top notch [Simon]!

Horribly Complicated Electric Guitar Keyboard

the-email-gutar

Gutarist, hacker, and mustache enthusiast [David Neevel] brought together way too many pieces of hardware in order to use his electric guitar as a computer keyboard.

So let’s dig into the house of cards he built for the project. It starts off with the guitar which has been fitted with an additional pickup to interface with a Roland GR-33 synthesizer pedal. That outputs a MIDI signal, which many hackers would have connected to the computer and parsed with a simple script. But not [David], he connected it to an Arduino via an optisolator. Well that’s not too ridiculous, right? Don’t you think he’ll just parse the MIDI signals and push them to the computer via the Arduino’s USB port? Wrong! He translates the MIDI signals into combinations for a big relay board which is emulating the key matrix of an old USB keyboard. But as you can see in the demo video after the jump it works quite well.

If you’re more of the drumming sort there’s an electric drum set version of this hack too.

Continue reading “Horribly Complicated Electric Guitar Keyboard”

Wall Wart Computer Mouse

SAMSUNG

This rather bulky looking wall wart is actually a computer mouse. Sure, it may cause your hand to cramp horribly if used for any length of time. But some would say it’s worth that for the hipster value of the thing.

The rather odd shape is somewhat explained by the fact that this was sourced from Ikea. After gutting the transformer found inside the plastic case he had plenty of room to work with. He drilled a hole so that the sensor from a Logitech USB optical mouse can pick up the movement of the mouse. He also got pretty creative when it came to the buttons. The two prongs of the wall plug pivot horizontally to affect the momentary press switches inside.

After the break you can see a quick demo of the project. [Alec] doesn’t consider it to be complete. He wants to make a couple of improvements which include adding weight to make it feel more like the original wall wart, and finding a way to hide the hole he drilled for the sensor.

Continue reading “Wall Wart Computer Mouse”