[Alessandro] is an unlucky VoIP PBX administrator that frequently has to deal with very, very dumb network policies. Often times, he’ll have to change something on his setup which requires him to go out to his client’s location, or ask a client to use Teamviewer so the appropriate change can be made from behind a firewall.
This isn’t the solution to the problem. It will, however, fix the problem. To get around these firewalls, [Alessandro] is using the voice channels he already has access to for changing configurations on his VoIP boxes.
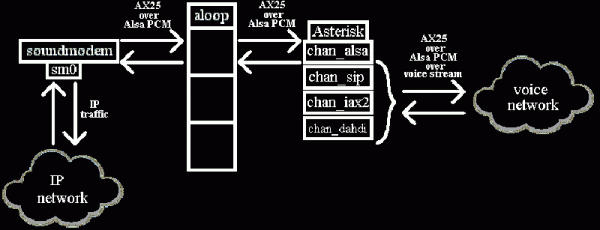
The implementation of this uses the AX.25 amateur radio modules that can be found in just about every Linux distro. This, and an Alsa loopback device, allows [Alessandro] to access a terminal over a voice-only network. Is it a hackey kludge? Yep. Is it just a little bit dumb? So are the network policies that don’t allow [Alessandro] to do his job.
This build isn’t too dissimilar than a bunch of modems from the old BBS days, albeit with vastly more powerful software. [Alessandro] says you’re only going to get about 38400bps out of this setup, but it beats begging for help for remote access.