Audiobook Player Used Only NFC Tags For Control

no-button-nfc-audiobook-reader

[Martynas Mickevičius] has a Grandmother who is visually impaired. She enjoys listening to audiobooks and has been doing so using a DVD player for quite some time. The problem is that there is no way for her to save her position in between listening session. He set out to help by building a dedicated audiobook reader that doesn’t have any buttons.

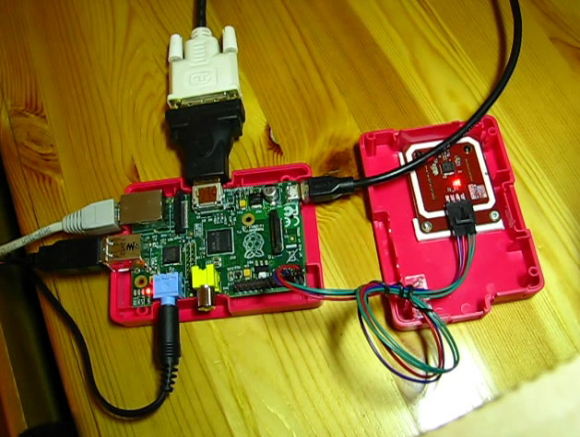
The project was inspired by a one-button reader we featured back in November. Like that project, [Martynas] chose to use the inexpensive, yet powerful Raspberry Pi. The main difference comes in the control method. He’s using an NFC tag reader, which is mounted in the top portion of the RPi case. The image above shows the rig during prototyping, but his final version is all bundled up in the pink enclosure and only needs the power and audio cables connected to it. See for yourself in the demo after the jump.

Each book has its own NFC tag. When she’s done reading she can simply cut the power and it will resume in the same place the next time it is plugged in. The tag setup is a vast improvement since it allows an entire library to be stored on the SD card and chosen using a different tag. With this hardware in place it should be trivial to code extensions to the system, like a script that uses text-to-speech to announce which book is being played before playback starts.

Continue reading “Audiobook Player Used Only NFC Tags For Control”

[Fran’s] PCB Etching Techniques

frantronics-pcb-tutorials

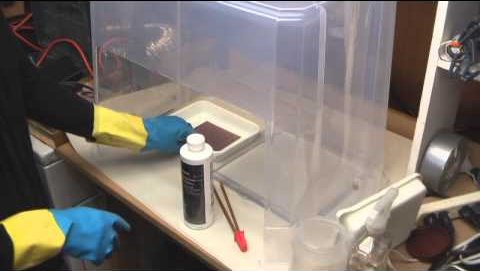
We think that anyone who’s done at-home PCB fabrication will appreciate the tidiness that [Fran] maintains throughout her etching process. She recently posted a three-part video tutorial which showcases her techniques. As you can see in the screenshot above, her habits reek of top-notch laboratory skills.

Regular readers can probably guess what circuit she’s etching. It’s the test boards for her LVDC reverse engineering. She is using the toner transfer method, but in a bit different way than most home-etchers do. She uses the blue transfer paper made for the job, but before transferring it to the copper clad she uses a light box (kind of like the X-ray film viewer at the doctor’s office) to inspect for any gaps where toner did not adhere. From there she uses a heat press to apply the resist. This is a heck of a lot easier than using a clothes iron, but of course you’ve got to have one of these things on hand to do it this way.

The second part of the tutorial is embedded after the break. We chose this segment because it shows off how [Fran] built her own chemical hood. It’s a clear plastic storage container lying upside down. A work window has been cut out of the front side, and a 4-inch exhaust hose added to the top. [Fran’s] lab has a high volume low velocity fan to which it connects to whisk the fumes outside.

Continue reading “[Fran’s] PCB Etching Techniques”

Wireless Pinball Controller For Tablet Gaming

wireless-pinball-controller

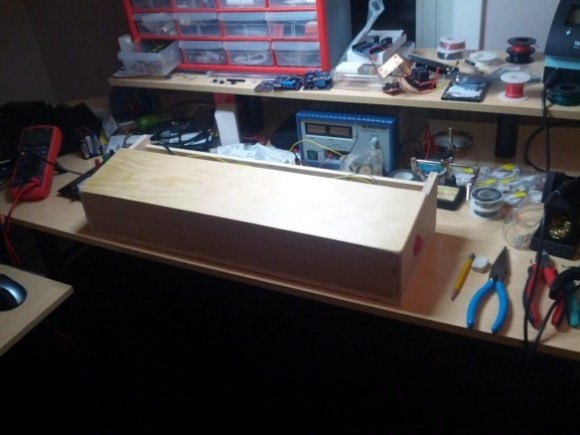
This wooden box is a wireless pinball controller and tablet stand. The idea is to set it on a workbench to give you some of the thrill of standing and playing the real thing. [Jeff] has been rather addicted to playing a pinball app on Android lately, and started the journey because he needed a way to give his thumbs some relief.

An Arduino monitors buttons on either side of this wooden controller. [Jeff] is new to working with hardware (he’s a Linux Kernel developer by trade) and was immediately struck with button debouncing issues. Rather than handle this in software (we’ve got a super-messy thread on that issue with our favorite at the bottom) he chose a hardware solution by building an SR latch out of two NAND gates.

With the inputs sorted out he added a BlueSMiRF board to the project which allowed him to connect a Nexus 7 tablet via Bluetooth. At this point he ran into some problems getting the device to respond to his control as if it were an external keyboard. His stop-gap solution was to switch to a Galaxy Tab 10.1 which wasn’t throwing cryptic errors. Hopefully he’ll fix this in the next iteration which will also include adding a plunger to launch the pinball, a part which just arrived in the mail as he was writing up this success.

We’ve embedded his quick demo video after the break.

Continue reading “Wireless Pinball Controller For Tablet Gaming”

A Longboard Speed And Distance Computer

longboard-speed-distance-comptuer

Why should cyclists have all of the fancy toys? Bicycle computers are very common these days but you won’t find similar hardware for skateboards and longboards. [KobraX22] isn’t taking it lying down. He built this speed and distance computer for his longboard. It doesn’t use very many components and should be easy to install.

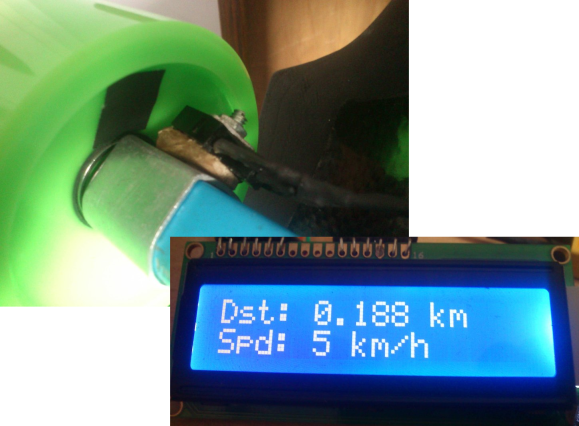
The device monitors the rotation of one of the wheels by mounting a reflectance sensor on one of the trucks. It points toward the inside of a wheel which has a piece of black tape on it. Every time the tape passes it prevents the IR led from reflecting back at its paired receiver. This lets the Arduino count the revolutions, which are then paired with the wheel diameter to calculate speed as well as distance traveled. Of course the wheels wear down over time to so frequent riders will have to take new measurements at regular intervals.

[KobraX22] went with a QRB1114 sensor. It costs less than $2 and doesn’t require him to embed a magnet in the wheel like a hall effect sensor setup would have. It also shouldn’t interfere with any other fancy wheel hacks you’ve done, like adding a POV display.

[via Reddit]

Retrotechtacular: Donner 3500 Portable Analog Computer

What if we told you we had a computer you can take with you? What if it only weighed 28 pounds? This is a pretty hard sell when today you can get a 1.5 GHz quad-core processor packing computer to carry in your pocket which weighs less than 5 ounces. But back in the day the Donner 3500 was something to raise an eyebrow at, especially for tinkerers like us.

The machine was unveiled in 1959 as an analog computer. Instead of accepting programs via a terminal, or punch cards, it worked more like a breadboard. The top of the case features a grid of connectors (they look like banana plugs to us but we’re not sure). The kit came with components which the user could plug into the top to make the machine function (or compute) in different ways.

We’re skeptical as to how portable this actually was. It used vacuum tubes which are not fans of being jostled. Still, coming during the days when most computers were taking up entire buildings we guess the marketing claim holds up. If you’d like to see a bit more about the machine’s internals check out this forum post.

Preserving Locomotives With 3D Laser Scanning And 3D Printing

[Chris Thorpe] is a model railroading aficionado, and from his earliest memories he was infatuated with the narrow gauge locomotives that plied their odd steel tracks in northern Wales. Of course [Chris] went on to create model railroads, but kit manufacturers such as Airfix and Hornby didn’t take much interest in the small strange trains of the Ffestiniog railway.

The days where manufacturing plastic models meant paying tens of thousands of dollars in tooling for injection molds are slowly coming to an end thanks to 3D printing, so [Chris] thought it would be a great idea to create his own models of these small locomotives with 3D laser scanners and high quality 3D printers.

[Chris] started a kickstarter to fund a 3D laser scanning expedition to the workshop where the four oldest locomotives of the Ffestiniog railway were being reconditioned for their 150th anniversary. The 3D printed models he’s able to produce with his data have amazing quality; with a bit of paint and a few bits of brass, these models would fit right in to any model railway.

Even better than providing scale narrow gauge engines to model railway enthusiasts around the world is the fact that [Chris] has demonstrated the feasibility of using modern technology to recreate both famous and underappreciated technological relics in plastic for future generations. There’s a lot that can be done with a laser scanner in a railway or air museum or [Jay Leno]’s garage, so we’d love to see more 3D printed models of engineering achievements make their way onto Kickstarter.

Using OpenCV With The Raspberry Pi

When we first heard of the Raspberry Pi we were elated that projects that once required a full-blown computer could now be done on a tiny, and cheap board running Linux. Unfortunately, we haven’t seen much in the way of using computer vision algorithms on the Raspi, but thanks to [Lentin] the world of OpenCV is now accessable to Raspberry Pi users everywhere.

[Lentin] didn’t feel like installing OpenCV from its source, a process that takes the better part of a day. Instead, he installed it using the synaptic package manager. After connecting a webcam, [Lentin] ssh’d into his Raspi and installed a face detection example script that comes with OpenCV.

It should be noted that [Lentin]’s install of OpenCV isn’t exactly fast, but for a lot of projects being able to update a face tracker five times a second is more than enough. Once the Raspberry Pi camera module is released the speed of face detection on a Raspi should increase dramatically, though, leading to even more useful computer vision builds with the Raspberry Pi.