Wireless Charging… Have A Heart

wireless heart charger

[Gal Naim] recently finished off an awesome Valentine’s day present for special someone. It’s a wireless charging heart for your phone!

He already had the Qi wireless charger but wasn’t much of a fan as it “looks so boring”. So he took it apart to salvage the charging circuit for his new project. As luck would have it, the Qi is very simple on the inside — all he had to do was lengthen the power wires to the coil. He then designed his heart in SolidWorks — Don’t forget to check out our 3D Printering tutorials on this — and printed it out in a nice candy apple red. To maximize the charging current he’s left the inductive loop on the outside so it can be as close to the phone as possible — he spray painted it red and it actually looks pretty cool!

The next step was adding the wireless charging capability to the phone, we’ve covered how to add this to any phone before, but for [Gal] it was as simple as cutting down the Qi Receiver card to fit in the phone.

Continue reading “Wireless Charging… Have A Heart”

Ridiculously Accurate Mission Control Panel

We are absolutely blown away by the level of detail that went into this amazing mission control panel that [Jeff Highsmith] made for his son.

His kid just started school and needed a desk to do homework on. They had recently visited the Kennedy Space Center, and his son found a new interest in all things space — So [Jeff] took the opportunity to make the desk into this mind-boggling control panel. 

We saw a similar project recently, but this one seems to take it to the next level. The desk itself is hand-made from MDF sheet and with oak boards making up the structural members. He’s cut out over a dozen individual control panels, added switches, LEDs and potentiometers, and printed the labels on transparencies which give the whole thing a very professional and finished look. An iPad sits in the middle which plays a curated collection of space videos.

Continue reading “Ridiculously Accurate Mission Control Panel”

Gamebuino: A Handheld Arduino Gaming Console Ready For Prime Time

[Rodot] wrote in to tell us about the Gamebuino, a very nicely designed and easily reproducible version of his handheld Arduino gaming console. We originally featured [Rodot’s] Arduino based gaming console over a year ago.

With the Gamebuino, you too can build your own games and gaming hardware around the Arduino. While there is a lot of information currently missing from the site’s Wiki, such as the layout and game code, [Rodot] plans on making everything open source. The console includes a rechargeable lithium battery, a micro SD card, and I2C expansion connectors. This is one project to keep an eye (and two hands) on, especially since a full game library is going to be provided, letting you easily create your own games. See what the console can do in the demo video after the break.

It would be amazing so see some old Game Boy games ported to run on the Arduino, or maybe one of our readers can make an Game Boy emulator for the Arduino!
Continue reading “Gamebuino: A Handheld Arduino Gaming Console Ready For Prime Time”

Sparkfun’s AVC 2014: Robots, Copters, And Red Balloons Of Death, Oh My!

SparkFunAVC2014

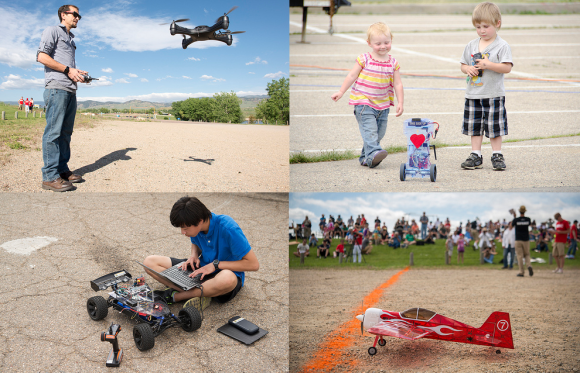
Registration is open for Sparkfun’s 2014 Autonomous Vehicle Competition (AVC)! Every year the fine folks at Sparkfun invite people to bring their robots, rovers, and drones  to Colorado to see who is the king of the hill – or reservoir as the case may be. We see plenty of robots here at Hackaday, but precious few of them are autonomous. To us that means capable of completing complex tasks without human intervention. Sparkfun has spent the last five years working toward changing that. Each year the robots get more complex and complete increasingly difficult tasks.

The competition is essentially a race through the Boulder reservoir. Time is key, though there are multiple ways to gain bonus points. For aerial vehicles there are two classes: fixed and rotary wing. Planes fall under the fixed wing category. Helicopters, gyrocopters, tricopters, quadcopters, and beyond fall into rotary wing. We’re holding out hope that e-volo shows up with their Octadecacopter. Ground vehicles have a few more class options. Micro/PBR class is for robots with a build cost less than $350 total, or small enough to fit into box that’s 10″x6″x4″. The doping class is unlimited. Sparkfun even mentions costs over $1kUSD+, and weights over 25LBS. Non-Traditional Locomotion class is for walkers, WildCats and the like. Peloton is Sparkfun’s class for robots that don’t fit into the other classes.

Sparkfun is also making a few changes to the course this year. A white chalk line will be drawn through the course, so robots don’t have to rely on GPS alone for navigation. We’re hoping to see at least a few vision systems using that chalk line. Aerial robots will have to contend with three “Red Balloons of Death”. Robots can navigate around the balloons without penalty. The balloons can be bumped or even popped for bonus points, but the robot must do this with its own body. Projectile weapons are not allowed. To say we’re excited about the AVC would be an understatement. As much as we enjoy watching the big players at competitions like the DARPA Robotics Challenge, we love seeing individuals and small teams of hobbyists compete every year at the AVC. Click on past the break for Sparkfun’s AVC 2013 wrap up video.

Continue reading “Sparkfun’s AVC 2014: Robots, Copters, And Red Balloons Of Death, Oh My!”

Persistence Of Vision Would Make A Great HUD

povtyp

[Eduardo Zola] has just put the finishing touches on this awesome real-time persistence of vision display which displays text as you type!

It looks like the display is mounted on a small DC fan, which [Eduardo] powers using a bench top power supply. This allows him to fine tune the speed manually, without adjusting the the actual POV controller. The display receives the characters from the keyboard via a small USB RF receiver, and it has got a pretty snappy response time.

There isn’t too much more info on the project, but it certainly gives us an idea — could persistence of vision be used to create a kind of heads up display in a vehicle? What do you think?
Continue reading “Persistence Of Vision Would Make A Great HUD”

Fail Of The Week: Reset Issues With 595 And HD44780

fotw-reset-issues-595-character-lcd

We really like to see hardware hackers stepping out of the safe and polished boundaries of available Arduino libraries. One example of this is a project which [Matteo] thought worked: using a shift register to drive a character LCD. This can be a desirable way to do things, because it takes the GPIO usage down from six to just three connections. If you don’t remember seeing that one earlier this month take another look. The gist of it is that [Matteo] hacked one function in the LiquidCrystal library to make it happen.

What makes this a truly great fail is that the problem was not immediately apparent, and is difficult to reliably reproduce. The LCD is unstable depending on how the Arduino board is reset. When connecting the Arduino to a computer the screen doesn’t work until you press the reset button. But press the reset button repeatedly and you get a non-functional screen plus the gibberish seen above.

There’s not much to go on here, but we think it’ll be a lot of fun to state your theory on the malfunction and suggesting for testing/fixing the issue. This could be a lot of things, the controller on the display getting mixed-up, the 595 missing an edge (or something along those lines). Do you fix this with hardware (ie: capacitor to avoid voltage dip), a software issue (need a longer delay after startup), or a combination of the two?


2013-09-05-Hackaday-Fail-tips-tileFail of the Week is a Hackaday column which runs every Wednesday. Help keep the fun rolling by writing about your past failures and sending us a link to the story — or sending in links to fail write ups you find in your Internet travels.

Mini Go Kart Built In A Day

kart

The crew at the MIT student-run shop MITERS love their go karts, and when sitting around a pile of parts in the middle of the night on Saturday, there was only one thing to do: build a mini electric go kart in a day.

The parts for this were all taken from the jumble of parts lying around the shop: a few scooter wheels, some aluminum tubing, a 1×4″ piece of extrusion, a huge motor, and a ton of A123 cells were enough to ge tthe project started. They began by bolting the back wheel and motor to the aluminum extrusion and machining a simple steering mechanism.

The real fun began when they realized they could fill the aluminum extrusion with batteries, creating a 6S5P pack with the balance connectors and – after a few tries – the proper insulation. Combine all the parts with a Kelly motor controller and an old Brooks saddle, and the MITERS have a fairly light mini go kart that can cruise around the halls at about 15mph. Not much, but it was built in a single sleep-deprived night.

Video of the kart in action below.

Continue reading “Mini Go Kart Built In A Day”