Hackaday Prize Entry: A Cheaper Soldering Solution

Everyone goes through a few phases during their exploration of electrons, and nowhere is this more apparent than the choice of soldering iron. The My First Soldering Iron™ is an iron that plugs directly into the wall, and doesn’t have temperature control. They’re cheap, and electronics isn’t for everyone, giving the quitters the opportunity to take up woodburning as a hobby. The next step up is a temperature controlled iron, probably an Aoyue or Hakko. The best soldering iron? You’re looking at a Metcal or Weller, and your wallet will become a few hundred dollars lighter.

Your My First Soldering Iron™ need not be terrible, though. For his project for The Hackaday Prize, [HP] is working on a soldering iron that is cheap, accurate, and uses the very nice Weller RT tips. No, it’s not as good as a Metcal or proper Weller, but it’s good enough for some fine soldering work and will give the Aoyues and Hakkos a run for their money.

If price is a reasonable measure of the quality of a soldering iron, the irons that use these Weller RT tips are the best irons around. The tips, though, are pretty cheap: about $30, which gets you a heater and thermistor and not much else. There have been numerous reverse engineering efforts for this iron ([1] and [2]), and even a few Arduino-based circuits that replicate the functionality of the Weller base unit.

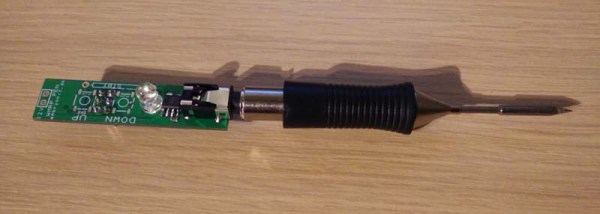
[HP] is going in a different direction to heat these iron tips. Instead of building a big box to hold the electronics, he’s building everything into the handle of the soldering iron. With brains donated from an ATMega168, a few op-amps, MOSFETS, and a single power jack, [HP] can heat up this soldering iron tip in a compact, hand-held unit.

For his Hackaday Prize entry, [HP] did a rundown of soldering pen in a video. You can check that out below.

Continue reading “Hackaday Prize Entry: A Cheaper Soldering Solution”

Raspberry Pi Balloon Goes Too High, Goes Boom, But Survives

Some people like to get high on a Wednesday afternoon. [Kevin Hubbard] of Black Mesa Labs likes to get really high. Even higher than intended: last month, he flew a helium balloon powered by a Raspberry Pi to 103,000 feet. It was only supposed to go to 90,000, but a fault in the code for the controller meant that it went higher, burst and plunged to the ground. All thanks to an extra hash mark in his code.

Continue reading “Raspberry Pi Balloon Goes Too High, Goes Boom, But Survives”

Thinking Of You: IoT Style

Do you have loved ones who live far away? Or do you just want an interesting starter ESP8266 project to get your feet wet? If the answer to either of these questions is “yes”, we’ve got just the project for you. [Craig Lindley] built a “thinking of you” button-and-LED display device that helps people keep in touch, in a very simple way.

We like the minimalism of the design. One party presses their button, electrons flow, WiFis WiFi, data travels through a set of tubes, and an LED far away glows a pre-arranged color. The other side can signal back to say “hi” as well. It’s a cute item to have on your desk, or wherever you spend the most time. If you’re new to all of this, you can hardly beat the circuit for its simplicity.

Yeah, you could totally just send the other person a text message or an e-mail. But then you don’t get an excuse to play around with NodeMCU, and it just lacks the personal hacker touch. The code is available in a zip file here, and if you want to stay in touch with someone other than [Craig]’s sisters, you’ll probably want to customize it a bit.

Single Photon Source For Quantum Computing And Experimentation

One challenge to building optical computing devices and some quantum computers is finding a source of single photons. There are a lot of different techniques, but many of them aren’t very practical, requiring lots of space and cryogenic cooling. Recently, researchers at the Hebrew University of Jerusalem developed a scalable photon source on a semiconductor die.

Using nanocrystals of semiconductor material, the new technique emits single photons, and in a predictable direction. The nanocrystals combine with circular nanoantennas made of metal and dielectric produced with conventional fabrication technology. The nanoantennas are concentric circles resembling a bullseye and is used to ensure that the photons travel the correct direction with little or no angular deviation.

A single IC could contain many photon sources and they operate at room temperature. We’ve talked about quantum tricks with photons before. Quantum mechanics is another popular topic.

Hacklet 106 – Robots That Teach

One of the best ways to teach electronics and programming is with hands-on learning. Get the concepts off the computer screen and out into the real world. Students of all ages have been learning with robots for decades. Many older Hackaday readers will remember the turtle robots. These little ‘bots would drive around drawing shapes created in the logo programming language. This week’s Hacklet is all about the next generation of robots that teach electronics, mechanics, programming, and of course, hacking. So let’s check out some of the best educational robot projects on Hackaday.io!

edubotWe start with [Tom Van den Bon] and Edubot Controller (Benny). Buying one or two robots can get expensive. Equipping a classroom full of them can break the bank. [Tom] is hoping to make robots cheaper and more accessible with Edubot, his entry in the 2016 Hackaday prize. Edubot rides on a 3D printed frame with low-cost gear motors for a drive system. Edubot’s brain is an STM32F042, a low-cost ARM processor from ST micro. The micro and motor drives are integrated into a custom board [Tom] designed. He’s has even begun creating lesson plans so students of various ages and skill levels can participate and learn.

microbotNext up is [Joshua Elsdon] with Micro Robots for Education. Big robots can be intimidating. They can also cause some damage when hardware and software created by budding engineers doesn’t operate as expected. Tiny robots though, are much easier to wrangle. [Joshua ] may have taken tiny to an extreme with these robots. Each robot is under 2 cm square. The goal is for each one to cost less than  £10 to produce. These micro bots have big brains with their ATmega328P micro controllers. [Joshua] is currently trying to figure out a low-cost way to produce wheels for these robots.

Next we have [shamylmansoor] with 3D printed mobile robot for STEM education. Robots are expensive, and international shipping can make them even more expensive. [Shamyl] is shooting for a robot which can be made locally in Pakistan. 3D printing is the answer. The robot’s chassis can be printed on any FDM printer. Wheels,and tires are low-cost units. Motors are RC servos modified for continuous rotation. The brains of the robot is an Arduino Mega 2560, which should provide plenty of inputs for sensors. [Shamyl] even included a solderless breadboard so students can prototype circuits and sensors right on the robot’s body.


plobotFinally we have [Rodolfo] with Plobot. Plobot is a robot designed for the youngest hackers – those from four to seven years old. [Rodolfo] designed Plobot to be programmed with RFID cards. Each card contains a command such as move forward, turn, start, and reset. Many of the language mechanics are inspired by the Scratch programming language. Plobot’s processor is a Sanguino, running [Rodolfo’s] custom code. An ESP8266 allows Plobot to be connected to the outside world via WiFi. [Rodolfo] has even created a custom over the air update system for Plobot’s firmware. Plobot has already been tested with students, where it made a great showing. We’re hoping both [Rodolfo] and Plobot do well in the 2016 Hackaday Prize!

If you want more mind hacking goodness, check out our brand new educational robot list! Did I miss your project? Don’t be shy, just drop me a message on Hackaday.io. That’s it for this week’s Hacklet, As always, see you next week. Same hack time, same hack channel, bringing you the best of Hackaday.io!

Chomper Antweight Robot Kraves Combat

Antweight combat robots are really lightweight. [Carter Hurd] used leftover materials to create a dustpan robot with a chomper (comically made from a Krave cereal box) to hold captured competitors in place. The main body is made of foam board. The only metal is in the front wedge which is lifted by a servo to help trap the other robot.

[Carter] fully expects the foam to be eaten by competitors during the match. This led him to position his electronics at the center of the robot to keep it from being damaged. We’ll have to see how well that works. He’s hoping for an advantage over vertical flip weapons since they may simply cut through the foam without getting enough purchase for a flip.

The electronics is on a modular board so it can be easily moved from one robot to another. All that is on the board is the RC receiver and two FingerTech Tiny Electronic Speed Controllers. A battery is slung underneath.

Best of luck for Krave ‘bot eating up the opposition. We’ve seen some other light weight designs in the cardboard competitors from the Columbia Gadget Works makerspace.

Continue reading “Chomper Antweight Robot Kraves Combat”

Super Massive Musical Instrument

Performing music in open spaces can be a real challenge. The acoustics of the space can play spoil-sport. Now imagine trying to play an instrument spread out over tens of kilometres. The folks at [LimbicMedia] wrote in to tell us about the project they worked on to build the The World’s Largest Musical Instrument.

The system consists of wirelessly controlled air horns deployed at remote locations. Each air horn is self contained, driven by a supply of compressed air from a scuba diving tank and battery powered electronics. The wireless link allows the air horns to be placed up to 10kms away from the base station. Each air horn is tuned to a specific note of the piano keyboard which, in turn, is configured to transmit its note data to the air horns.

HornsBeaconHill_02Currently, they have built 12 air horns, enough to let them play the Canadian and British anthems. The horns are built out of PVC piping and other off-the-shelf plastics with the dimensions of the horn determining its note. The setup was installed and performed at the Music by the Sea festival recently, by mounting the air horns on 12 boats which were stationed out at Sea in the Bamfield Inlet in Eastern Western Canada. But that was just a small trial. The eventual plan is to set up air horns all around Canada, and possibly other places around the world, and synchronise them to play music simultaneously, to commemorate the 150th Canada Day celebrations in 2017.

There aren’t many details shared about the hardware, but it’s not too difficult to make some guesses. A micro-controller to operate the air solenoid, long range radio link to connect all the air horns to the base station, and another controller to detect the key strokes on the Piano. The limiting issue to consider with this arrangement is the spatial separation between the individual air horns. Sound needs about 2.9 seconds to travel over a kilometer. As long as all the air horns are at approximately the same distance from the audience, this shouldn’t be a problem. See how they did in the video after the break. We do know of another project which handled that problem brilliantly, but we’ll leave the details for a future blog post.

This isn’t the first time [LimbicMedia] was commissioned to create audio-visual public installations. A couple of years back they built this Sound Reactive Christmas Tree in Victoria, British Columbia.

Continue reading “Super Massive Musical Instrument”