3D-Printed Strain Wave Gear Needs Your Help

In most mechanical systems, metal gears that bend are a bad thing. But not so for strain wave gearing, which is designed to take advantage of a metal gear flexing to achieve an action much like planetary gears. The fun isn’t limited to metal anymore, though, if you 3D print a strain wave gear like this.

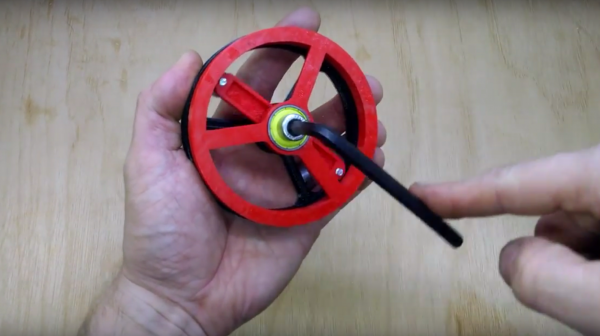
Strain-wave gearing is nothing new – it was invented in 1957 and has traveled to the moon on the lunar rover. And you may recall [Kristine Panos]’ recent article on a LEGO strain wave gear, which makes it easy to visualize how they work. She also has a great description of how the flex spline, wave generator, and circular spline interact, so we’ll spare those details here. [Simon Merret]’s interpretation of the strain wave gear is very simple and similar to other 3D-printed versions, except that he uses an inside-out timing belt as the flex spline. The wave generator is just an arm with a roller bearing at each end, and despite needing a few tweaks the gear does an admirable job.

Simon is reaching out for help in getting this gear ready for use where the industrial versions see frequent application – the first and second degrees of freedom of robotic arms. If you’ve got any ideas, head over to his project page on Hackaday.io and pitch in.

Continue reading “3D-Printed Strain Wave Gear Needs Your Help”

LED Strip Display Gives You Two Ways To See The Music

What to call this LED strip music visualizer is a puzzler. It lights up and pulsates in time with music similar to the light organs of 1970s psychedelia fame, but it’s more than that. Is it more like the Larson Scanner that graced the front of [David Hasselhoff]’s ride on Knight Rider? A little, but not quite.

description-croppedWhatever you decide to call this thing, it looks pretty cool, and [Scott Lawson] provides not one but two ways to build it. The business end is a simple strip of WS2812b addressable LEDs. It looks like the first incarnation of the project had an ESP8266 driving the LEDs in response to commands sent to it from a PC running the visualization code, written in Python. That setup keeps the computationally intensive visualization code separate from the display, but limits the display to 256 pixels and probably has to deal with network latency. The Raspberry Pi version both crunches the numbers and drives the display, but the Pi doesn’t have the oomph to run both the LEDs and the GUI, which is pretty interesting to look at by itself. The video below shows the different visualization modes available — we’re partial to the “energy effect” at the end.

Take your pick of hardware and throw a couple of these things together for your next rave. And if you need a little more background on the aforementioned Larson Scanner, we’ve got you covered.

Continue reading “LED Strip Display Gives You Two Ways To See The Music”

Sculptural Nixie Clock Has Shockingly Exposed Design

Single tube Nixie clocks? Been there, seen that. A single tube Nixie clock with sculptural wiring that exposes dangerous voltages? Now that’s something you don’t see every day.

[Andrew Moser]’s clock is clearly a case of aesthetic by anesthetic — he built it after surgery while under the influence of painkillers. That may explain the questionable judgment, but we won’t argue with the look. The boost converter for the Nixie lives near the base of the bent wire frame, with the ATmega 328 and DS1307 RTC supported in the midsection by the leads of attached passive components and jumper wires. A ring at the top of the frame supports the octal socket for the Nixie and a crown of driver transistors for each element.

In the video after the break, [Andrew] speaks of rebuilding this on a PCB. While we’ve seen single tube Nixie PCB clocks before, and we agree that the design needs to be safer, we wouldn’t ditch the dead bug style at all. Maybe just throw the whole thing in a glass bell jar or acrylic tube.

Continue reading “Sculptural Nixie Clock Has Shockingly Exposed Design”

New Caps And RAM Save Another Poly-1

1980s American teenagers, if they were lucky enough to attend a school with a computer lab, would have sat down in front of Apple IIs or maybe Commodore VIC20s. Similarly, their British cousins had BBC Micros. Solid and educational machines with all sorts of wholesome software, which of course the kids absolutely preferred to run in preference to playing computer games.

New Zealanders, at least a few of them, had the Poly-1. A footnote in the 8-bit microcomputer story, this was a home-grown computer with a built-in monitor clad in a futuristic one-piece plastic shell. Non-Kiwis never had the chance to encounter its 6809 processor and 64k of RAM, the global computer business being too great a challenge for a small New Zealand technology company, especially one whose government support had evaporated.

Decades after the end of Poly-1 production, some survive in the hands of enthusiasts. [Terry Stewart] has two of them, and has posted details of how he brought life back to one that was dead on arrival. It’s a story first of a failed electrolytic capacitor and tricky-to-dismantle PSU design, then of an almost-working computer whose random crashes were eventually traced to a faulty RAM chip. It seems swapping out that quantity of DIL RAM chips is rather tedious, and of course it had to be the final chip in the final bank that exhibited the problem.

Meanwhile it’s interesting to see the design of this unusual machine. A linear power supply contrasts with the switcher you’d have found in an Apple II at the time, and the motherboard is a huge affair. it’s easy to see why this was a relatively expensive machine.

We brought you [Terry]’s first Poly-1 last year, but so far he’s the only owner whose machine we’ve seen. More mainstream 8-bit machines are a common sight here, so for something else a bit esoteric read our coverage of home computers behind the Iron Curtain, and its companion piece on peripherals behind the Iron Curtain.

[via Hacker News]

This Tampon Gun Won’t Cramp Your Style

Finally, there’s a way to get rid of those applicator-less tampons that literally no one uses while also destroying a bunch of Axe body spray. Just use the Axe as the propellant in a 3D-printed, gas-powered tampon gun.

As you’ll see in the assembly and demonstration video after the break, most of the parts in [HarambesLabs]’ modular gun design are 3D-printed. Aside from those, you just need to add a PVC tube for a barrel, a bottle that fits the threading on the body, and a pair of o-rings to make a nice, tight seal. Snap in the piezo mechanism from a lighter, fill the bottle with an Axe cloud, and screw it on to the body. If the gas/air mixture is close enough, the compacted cotton bullet should fly. The gun is single-shot, but [HarambesLabs] is working on a mod to make it fully automatic.

We love a good gun build around here, be it mostly benign or downright terrifying. This build isn’t necessarily tampon-dependent but the size, weight, and plastic covering (reducing friction) make it ideal for this particular design. Nerf darts may be another option if you can find the correct fit for the barrel.

Continue reading “This Tampon Gun Won’t Cramp Your Style”

Understanding The Quartz Crystal Resonator

Accurate timing is one of the most basic requirements for so much of the technology we take for granted, yet how many of us pause to consider the component that enables us to have it? The quartz crystal is our go-to standard when we need an affordable, known, and stable clock frequency for our microprocessors and other digital circuits. Perhaps it’s time we took a closer look at it.

The first electronic oscillators at radio frequencies relied on the electrical properties of tuned circuits featuring inductors and capacitors to keep them on-frequency. Tuned circuits are cheap and easy to produce, however their frequency stability is extremely affected by external factors such as temperature and vibration. Thus an RF oscillator using a tuned circuit can drift by many kHz over the period of its operation, and its timing can not be relied upon. Long before accurate timing was needed for computers, the radio transmitters of the 1920s and 1930s needed to stay on frequency, and considerable effort had to be maintained to keep a tuned-circuit transmitter on-target. The quartz crystal was waiting to swoop in and save us this effort.

Continue reading “Understanding The Quartz Crystal Resonator”

Writing with a 3D printer

Good Penmanship With A 3D Printer

[Chris Mitchell] was going to make his own plotter for doing cursive writing for cards but realized he might be able to use his 3D printer to do the writing instead. But then he couldn’t find any suitable software so he did what you’re supposed to do in this situation, he wrote his own called 3DWriter. He even 3D printed a holder so he could attach a pen to the side of the extruder. When not in use as a plotter he simply retracts the pen tip.

The software is written in C# for Windows and is available on GitHub along with a detailed write-up. He clearly put a lot of thought into what features the software offers. After selecting the font, you type in whatever you want printed and then preview it to make sure it looks good. There’s also a bunch of G-Code settings you can fill in such as bed size, the horizontal and vertical offsets of the pen tip from the extruder tip, drawing speed and so on. There’s even an option to do a dry run with the pen raised so you can make sure it’ll draw on the bed where you expect it to.

The code itself is quite clean and easy to understand. If you’re curious like we were at what information is in the font files and how it’s translated into G-Code then download the source from the GitHub page and have a look. [Chris] settled on a font set called Hershey fonts since they’re primarily stroke based fonts as opposed to outline fonts which are what other programs he’d looked at used.

This makes us think of all those 3D printers with busted extruders we’ve seen collecting dust on hackerspace shelves or simply ones considered obsolete. Using them as a plotter gives them new life — even if just as a fun way to learn about writing code for CNC machines. It makes us wonder what other 2D uses they can be put to… cutting vinyl? laser printing? Ideas anyone?

In any case, have a look at the video below to see it in action as a 2D plotter. As a bonus, you’ll also see line art it drew using an Inkscape plugin.

Continue reading “Good Penmanship With A 3D Printer”