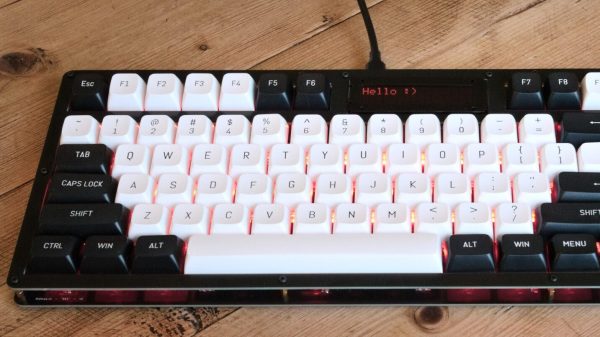
You might think [Thomas] would have started with a basic, barebones design, but he didn’t shy away from including some neat features. His keyboard has a “tenkeyless” layout, and uses Cherry MX-style switches, as has become the norm in the mechanical keyboard world. It has a 16×2 LCD display for user feedback, a rotary encoder, and it even has an RGB backlight for every key thanks to SK6812 addressable LEDs. Running the show is a Raspberry Pi Pico, equipped with the KMK firmware. The board actually uses twin PCBs as the enclosure, which is a nifty trick.
It’s remarkably fully featured for a first time build.
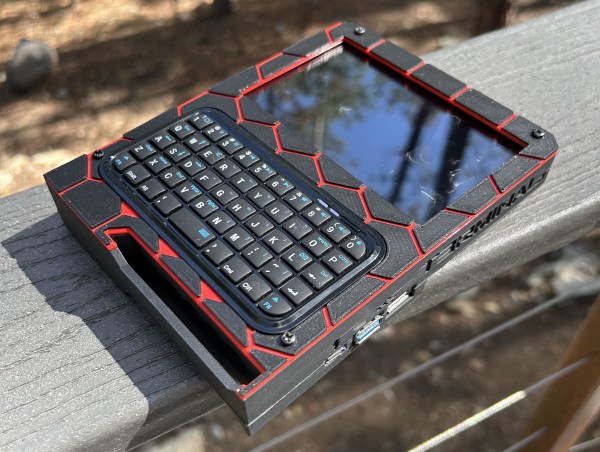
One of the greatest things about the hacker ecosystem is that whole standing-on-the-shoulders-of-giants thing. Somebody makes something and shares it, and then someone else takes that thing and remixes it, sometimes making it objectively better. For their T3rminal cyberdeck, [calebholloway08] was inspired by a number of projects and came up with something that looks simply fantastic.
Whether you want to call this beauty a cyberdeck or a mobile PC, the guts are what you might expect — a Raspberry Pi 4, an affordable mini keyboard, and a touch screen. But this one took some doing, as in [calebholloway08] had to do a little bit of surgery on the Pi 4, the PiSugar S plus power supply platform, and the display. But you shouldn’t let that stop you from standing on the shoulders of giants, as [calebholloway08] provides (or guides you towards) clear instructions for all three mods.
One thing [calebhollway08] would have done differently was to use something other than a 18650 battery for power, like a 21700. The question is, what will you do differently?
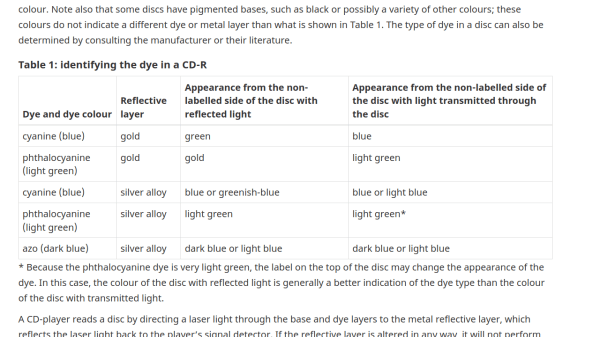
Picking a storage medium for data preservation can be a conflicting time. Sure, they say optical storage tends to last, but it can’t be as straightforward as just burning everything onto Blu-Rays, right? Here’s a paper from Canadian Conservation Institute, teaching you the basics of using compact disks for data storage, it appears, without missing a single detail, and taking about ten minutes to read.
Here, you will learn about the different kinds of disks available and how their manufacturing-inherent qualities affect their preservation capabilities. Are dual-layer DVDs better than single-layer ones, or is it the opposite? How do CDs compare? And what about Blu-Ray disks? Wonder no more, here you will get answers to questions you didn’t known to ask. Data preservation is a game of numbers to preserve numbers, and this paper also outlines how to properly record, store, and test your disks to raise your chances.
Whether you’re only looking to delve into data preservation, or trying to improve your own policies, this looks like is a perfect document for you. After all, if you’re not aware of the best practices, you might end up having to digitizeoldfloppies or even LaserDisks – not that those aren’t fun journeys to read about, of course, and we recommend it. Data preservation isn’t just about optical disks, of course – it’s a practice with a rich history.
This week Jonathan Bennett and Doc Searls sit down with Mathias Buus Madsen and Paolo Ardoino of Holepunch, to talk about the Pear Runtime and the Keet serverless peer-to-peer platform. What happens when you take the technology built for BitTorrent, and apply it to a messaging app? What else does that allow you to do? And what’s the secret to keeping the service running even after the servers go down?
Compared to through-hole construction, inspecting SMD construction is a whole other game. Things you thought were small before are almost invisible now, and making sure solder got where it’s supposed to go can be a real chore. Add some ball grid array (BGA) chips into the mix, where the solder joints are not visible by design, and inspection is more a leap of faith than objective proof of results.
How it works.
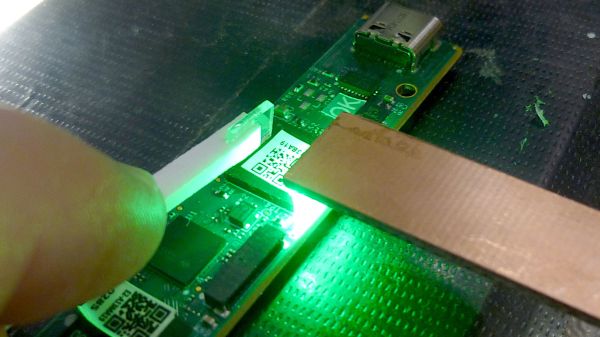
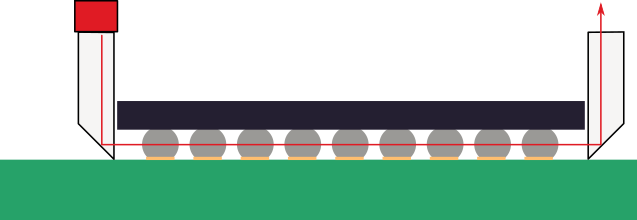
Unless, of course, you put the power of optics to work, as [Petteri Aimonen] does with this clever BGA inspection tool. It relies on a pair of tiny prisms to bounce light under one side of a BGA chip and back up the other. The prisms are made from thin sheets of acrylic; [Petteri] didn’t have any 1-mm acrylic sheet on hand, so he harvested material from a razor blade package. The edge of each piece was ground to a 45-degree angle and polished with successively finer grits until the surfaces were highly reflective. One prism was affixed to a small scrap of PCB with eleven SMD LEDs in a row, forming a light pipe that turns the light through 90 degrees. The light source is held along one edge of a BGA, shining light underneath to the other prism, bouncing light through the forest of solder balls and back toward the observer.
The results aren’t exactly crystal clear, which is understandable given the expedient nature of the materials and construction employed. But it’s certainly more than enough to see any gross problems lying below a BGA, like shorts or insufficiently melted solder. [Petteri] reports that flux can be a problem, too, as excess of the stuff can crystalize between pads under the BGA and obstruct the light. A little extra cleaning should help in such cases.
Haven’t tackled a BGA job yet? You might want to get up to speed on that.
We always can use more tools for FPGA debugging, and the Manta project by [Fischer Moseley] delivers without a shadow of a doubt. Manta lets you add a debug and data transfer channel between your computer and your FPGA, that you can easily access with helpfully included Python libraries.
With just a short configuration file as input, it gives you cores you add into your FPGA design, tapping the signals of interest as an FPGA-embedded logic analyzer, interacting with registers, and even letting you quickly transfer tons of data if you so desire.
Manta is easy to install, is developer-friendly, has been designed in Amaranth, and is fully open source as you would expect. At the moment, Manta supports both UART and Ethernet interfaces for data transfer. As for embedding the Manta cores into your project, they can be exported to both Amaranth and Verilog. You should check out the documentation website — it contains everything you might want to know to get started quick.
The Manta project has started out as our hacker’s MIT thesis, and we’re happy that we can cover it for you all. FPGA-embedded logic analyzers are a fascinating and much-needed tool, and we’ve had our own [Al Williams] tell you about his on-FPGA logic analysis journey!
In the previous installment in this series we looked at how to set up an Ada development environment, and how to compile and run a simple Ada application. Building upon this foundation, we will now look at how to create more complex applications, along with how to parse and use arguments passed to Ada applications on the command line (CLI). After all, passing flags and strings to CLI applications when we launch them is a crucial part of user interaction, as well as when automating systems as is the case with system services.
The way that a program is built-up is also essential, as well-organized code eases maintenance and promotes code reusability through e.g. modularity. In Ada you can organize subprograms (i.e. functions and procedures) in a declarative fashion as stand-alone units, as well as embed subprograms in other subprograms. Another option is packages, which roughly correspond to C++ namespaces, while tagged types are the equivalent of classes. In the previous article we already saw the use of a package, when we used the Ada.Text_IO package to output text to the CLI. In this article we’ll look at how to write our own alongside handling command line input, after a word about the role of the binding phase during the building of an Ada application.