Front Door Keys Hidden In Plain Sight

If there’s one thing about managing a bunch of keys, whether they’re for RSA, SSH, or a car, it’s that large amounts of them can be a hassle. In fact, anything that makes life even a little bit simpler is a concept we often see projects built on to of, and keys are no different. This project, for example, eliminates the need to consciously carry a house key around by hiding it in a piece of jewelry.

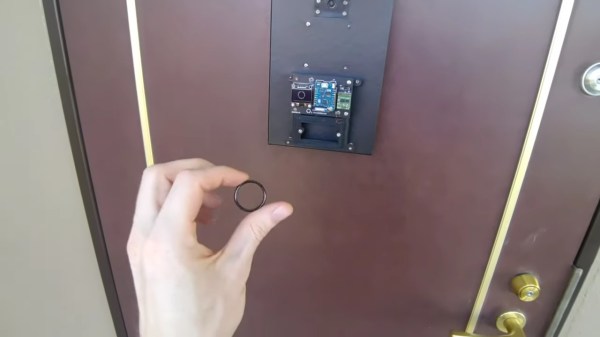
This project sprang from [Maxime]’s previous project, which allowed the front door to be unlocked with a smartphone or tablet. This isn’t much better than carrying a key, since the valuable piece of electronics must be toted along in place of one. Instead, this build eschews the smartphone for a ring which can be worn and used to unlock the door with the wave of a hand. The ring contains an RFID which is read by an antenna that’s monitored by a Wemos D1 Mini. When it sees the ring, a set of servos unlocks the door.

The entire device is mounted on the front of the door about where a peephole would normally be, with the mechanical actuators on the inside. It seems just as secure (if not more so) than carrying around a metal key, and we also appreciate the aesthetic of circuit boards shown off in this way, rather than hidden inside an enclosure. It’s an interesting build that reminds us of some other unique ways of unlocking a door.

Continue reading “Front Door Keys Hidden In Plain Sight”

Analog Tank Driving Simulator Patrols A Tiny Physical Landscape

How do you build a practical tank-driving simulator in the 1970s, when 3D computer-generated graphics are still just a fantasy of the future? If you’re a European tanker school, the solution is to use a large CNC machine to drive a camera around a miniature terrain model (German, translated). In the video after the break, [Tom Scott] takes it for a test drive.

The old computer was replaced with a Raspberry Pi
The original computer was replaced with a Raspberry Pi

Developed in France, the simulator provided a safer and more cost-effective way for teaching new trainees the basics of driving Centurion, Leopard 2, or Panzer 68 tanks. The trainee sits in a realistic “cockpit” mounted on a hydraulically-operated motion platform, with a TV screen in front of his face, which is connected to a camera mounted on a large gantry-style CNC platform.

The camera’s lens is mounted just above a pivoting metal foot which slides across the 12 m-long terrain model and sends its angle to the hydraulic system. It will even alter the tank’s handling based on its current position on the model to simulate different surfaces like dirt, snow, or asphalt.

The last of these systems remained in use until 2004 at the military training center in Thun, Switzerland, before being saved by the Swiss Military Museum from being scrapped. The original 70s computer, electronics, and hydraulics finally gave out, so the museum undertook a complete refurbishment of the system to return it to working order for museum visitors. It was kept as original as possible, but parts for the original computer could not be found, so it was replaced with a Raspberry Pi and custom interface board.

Over three decades, these simulators probably trained a few thousand tank drivers, and even with limited technology did an excellent job of preparing trainees for the real thing. Besides providing training for operators, drivers and pilots, simulators are also just plain fun. We’ve seen some impressive home built simulator including a  A-10 Warthog, an F-15 sim built from an actual wreckage, and even a starship’s bridge.

Continue reading “Analog Tank Driving Simulator Patrols A Tiny Physical Landscape”

If Only The Kids Knew About Pipes

Being a parent is hard work. You need to prepare your child to operate in the world. Reading, writing, arithmetic, and how to make good choices are just the beginning. They also ought to know regular expressions and Unix pipes. [Jackdoe] can help with that last one, thanks to their Unix pipe card game.

As an example, the task “print the most common line from a file” would require the answer:

cat 03.txt | sort | uniq -c | sort -n | tail -1

You can vary the rules to declare whoever has the smallest pipe or the largest pipe that accomplishes the task as the winner. We’d add a house rule that whoever has the fastest pipe ought to get something. We don’t, however, think this card game will make the Vegas tables, unfortunately.

You can print your own card deck and even the box. Or you can buy a nice set, if you don’t want to spend the time. You should probably know about cat, grep, tail, head, wc, sort, and uniq along with their options.

If you want some other esoteric kids’ learning activities, they also have “Programming Time” which teaches algorithms and Python, and “4917” to teach the basics of machine code.

If you want help with the other key skill — regular expressions — check out regexp golf or crosswords.

A small green circuit board with a tiny OLED display

An Oscilloscope Trigger For Vintage Video Processors

Working on retro computers is rarely straightforward, as [ukmaker] recently found out while designing a new display interface. Their oscilloscope was having trouble triggering on the video signal produced by older video circuitry, so they created the Video Trigger for Retrocomputers.

The Texas Instruments TMS9918 video display controller was used across a range of 1980s game consoles and home computers, from the well-known ColecoVision to Texas Instruments’ own TI-99/4. Substantial retro computing heritage notwithstanding, the video output from this chip was (for reasons unknown) not quite compatible with the Hantek DSO1502P oscilloscope. And without a better understanding of the video signal, it was difficult to use the chip with newer TFT displays, being designed for CRT televisions with more forgiving NTSC tolerances.

Maybe a different scope would have solved the problem, but [ukmaker] had a feeling that the ‘scope needed an external trigger signal. The Video Trigger project uses a LM1881 sync separator to tease out the horizontal and vertical sync signals from the vintage video chip, with the output piped into an ATmega 328P. Along with a smattering of discrete components, the ATmega aids the user in selecting which line to frame a trigger on, and the slope of the horizontal sync signal to align to. A tiny OLED display makes configuration easy.

If this has piqued your interest, [ukmaker] also has a great write-up over on GitHub with all the gory details. Maybe it will help you in your next vintage computing caper. Having the right tool can make all the difference, like this homebrew logic meter for hobby electronics troubleshooting. Or if you want to know more about the mystical properties of analog NTSC video, we’ve covered that, too.

Whip Up Some Homemade Artisanal Flux

You don’t think much about the power company until you flip the lights on and they don’t come on. The same can be said of soldering flux. You don’t think much about it, usually, until you try soldering without it. Flux has a cleaning action on metal surfaces that allows for a proper solder joint. The problem is, do you have any idea what’s in the flux you are using? We don’t either. [Catsndogs] has a recipe to make your own flux and then you’ll know.

At the heart of rosin flux is basically tree sap. If you live near pine trees, you can source it naturally. If not, you can find it at music instrument stores. Stringed instruments use rosin, so it is readily available. If you do source it yourself, [Catsndogs] reports that it doesn’t matter if it is old or clean.  You do want to pick out as much tree bark and dead ants as you can, though. You essentially dissolve it in alcohol (at least 80% isopropyl or ethanol). Then filter it through filter paper or a coffee filter.

You can adjust the viscosity by allowing the alcohol to evaporate to make the mixture thicker or by adding more alcohol to make it thinner. Thicker flux is good for tacking down SMD parts. As you might expect, this isn’t “no clean” flux. Also, the flux is very flammable, so be careful.

This isn’t the first time we’ve heard of this recipe. Or even the second time. But it is a good reminder that you can make your own free of whatever wacky chemicals are in the commercial preparations.

Art of 3D printer in the middle of printing a Hackaday Jolly Wrencher logo

3D Printering: Managing Multiple Printing Profiles

I know people who have 3D printers that are little more than appliances. They buy it, they print with it, and they don’t change much of anything. That doesn’t describe me and, I’m guessing, it doesn’t describe you either. This does lead to a problem, though, when it comes to slicers. You have to keep changing profiles and modifying them. It can be hard to keep things straight. For example, if you have profiles for different nozzles, you get to make a choice: keep one profile and edit the parts that change, or keep multiple profiles and any common changes have to be propagated to the other profiles.

Part of the reason I want to manage multiple profiles has to do with this mystery object…

I’ve long wanted to create a system that lets me have baseline profiles and then just use specific profiles that change a few items in the baseline. Turns out, I didn’t need to do it. Prusa Slicer and its fork, SuperSlicer, have the capability already. Both of these, of course, are based on Slic3r, but the scripting languages are different and what I’m doing does require G-code scripting. The problem is, this capability is not documented very well and the GUI doesn’t really support it directly, which requires a little sidestepping. I’ll show you how I have things set up and where the limitations are. If you want to try your hand at it, I highly suggest you backup your configuration directory or switch to a new one.

Continue reading “3D Printering: Managing Multiple Printing Profiles”

3D Printing With A Drone Swarm?

Even in technical disciplines such as engineering, there is much we can still learn from nature. After all, the endless experimentation and trials of life give rise to some of the most elegant solutions to problems. With that in mind, a large team of researchers took inspiration from the humble (if rather annoying) wasp, specifically its nest-building skills. The idea was to explore 3D printing of structures without the constraints of a framed machine, by mounting an extruder onto a drone.

As you might expect, one of the most obvious issues with this attempt is the tendency of the drone’s to drift around slightly. The solution the team came up with was to mount the effector onto a delta bot carrier hanging from the bottom of the drone, allowing it to compensate for its measured movement and cancel out the majority of the positional error.

The printing method relies upon the use of two kinds of drone. The first done operates as a scanner, measuring the print surface and any printing already completed. The second drone then approaches and lays down a single layer, before they swap places and repeat until the structure is complete.

Multiple drones can print simultaneously, by flying in formation. Prints were demonstrated using a custom cement-like material, as well as what appeared to be expanding foam, which was impressive feat to say the least.

The goal is to enable the printing of large, complex shaped structures, on any surface, using a swarm of drones, each depositing whatever material is required. It’s a bit like a swarm of wasps building a nest, into whatever little nook they come across, but on the wing.

We’ve been promised 3D printed buildings for some time now, and while we’re not sure this research is going to bring us any closer to living in an extruded house, we’re suckers for a good drone swarm here at Hackaday.

Continue reading “3D Printing With A Drone Swarm?”