Easily Add Link Cable Support To Your Homebrew GBA Game

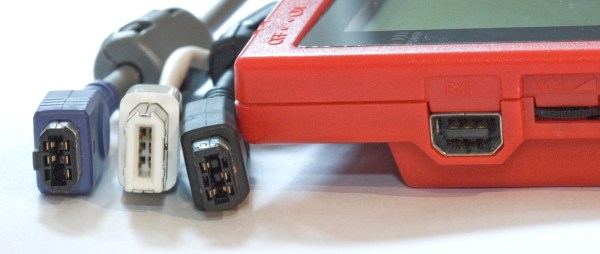
The Game Boy Advance (GBA) link cable is the third generation of this feature which originated with the Gameboy. It not only allows for peripherals to be connected, but also for multiplayer between GBAs – even with just one game copy – and item sharing and unlocking of features in specific games. This makes it an interesting feature to support in today’s homebrew GBA games and applications, made easy by libraries such as [Rodrigo Alfonso]’s gba-link-connection.

This C++  library can be used in a number of ways: either limited to just the physical link cable, just the wireless link option or both (universal link). These support either 4 (cable) or 5 (wireless) players to be connected simultaneously. As additional options there are the LinkGPIO.hpp and LinkSPI.hpp headers which allow the link port to be used either as a generic GPIO, or as an SPI link (up to 2 Mb/s). The multiboot feature where a single ROM image is shared among connected GBAs is supported with both wired and wireless links.

It’s heartening to see that a device which this year celebrates its 23rd birthday is still supported so well.

Thanks to [gudenau] for the tip.

Frog Boy Color Reimagines The Game Boy Color Hardware From The Ground Up

Sales figures suggest Nintendo did pretty well with the Game Boy Color during its original run, even if the hardware and visuals feel a tad archaic and limited today. [Chris Hackmann] has taken the Game Boy Color design and reworked it from the ground up as the Frog Boy Color, kitting it out with modern upgrades in a GBA-like form factor while retaining the original hardware underneath.

[Chris] went to the wide-style GBA layout for comfort, which he considers superior to the original rectangular Game Boy format. He iterated through over 50 3D-printed enclosure designs to get the design to work, ensuring that the final housing could be CNC machined. He then set out to trim down the original Game Boy Color circuit layout to cut out hardware he considered unnecessary. The original LCD driver could go, since the Q5 replacement LCD he intended to use didn’t need it, and he also considered the IR port to be surplus to requirements. He also set out to replace the original audio amp with his own stereo design.

The result is a wide-format Game Boy Color with a gorgeous modern LCD, USB-C charging, and excellent compatibility with original games and accessories. Files are on Github if you want to build one yourself. Of course, he’s not the only person working on building the best Game Boy ever, but we always love seeing new work in this space. Video after the break.

Continue reading “Frog Boy Color Reimagines The Game Boy Color Hardware From The Ground Up”

Why Game Boy IPS Screens Flicker

The Nintendo Game Boy was a very popular handheld in its time, but its display technology has not aged gracefully. Ripping out the original screen and dropping in a modern IPS LCD is a popular mod, but that often comes with a weird flicker now and then. [makho] is here to explain why.

The problem was that the Game Boy didn’t have any way to do transparency in the original hardware. Instead, sprites that were supposed to be a little bit transparent were instead flickered on and off rapidly. The original LCD was so slow that this flicker would be largely hidden, with the sprites in question looking suitably transparent. However, switch to a modern IPS LCD with its faster refresh rate, and the flickering will be readily visible. So it’s not a bug — it’s something that was intentionally done by developers that were designing for the screen technology of the 1980s, not the 2020s.

IPS screens have become the must-have upgrade for modern Game Boy users. Most would tell you the improved image quality and rich color is worth a little flicker here and there.

Continue reading “Why Game Boy IPS Screens Flicker”

Reverse-Engineered GBA Board Could Come In Handy

Retro gear is beloved, both for what it can do, and what it reminds us of. Nostalgia is a powerful thing, after all. But then, so is corrosion — and the latter has a habit of killing hardware and driving up prices for remaining units. Thankfully, hard workers like [NatalieTheNerd] are out there, creating reproduction PCBs to keep old hardware alive. Her Game Boy Advance (GBA) reproduction PCB is a great tool for the restoration and modding communities.

The board was reverse engineered, with [Natalie] sharing various scans and schematics of the GBA’s motherboard on the Modded Game Boy Club website. The project recreates the AGB-CPU-03 version of the GBA, and is designed to be produced on a 1 mm board with an ENIG process. You can combine the PCB with some salvaged parts and a new shell and build yourself a remarkably fresh GBA, if you so desire.

Beyond it’s intended use, [Natalie] points out the board outlines could be used as a basis for RetroPie or ESP32 projects that fit into a standard Game Boy Advance form factor. We love that idea. We’ve seen [Natalie’s] work before too, in the form of this neat little macropad. Nifty as always!

A Game Boy Camera, Without The Game Boy

We all know the Nintendo Game Boy camera peripheral, and we’ve seen plenty of hacks for it on these pages over the years. We like [Raphael Boichot]’s camera then, as instead of including a Game Boy or emulating one, it talks directly to the sensor from an RP2040. The result is a standalone camera with slightly better quality than the original, and with near-limitless storage and easy retrieval of pictures.

For us the interesting revelation from this project comes in the light it sheds on the sensor module, the Mitsubishi M64282FP, but it’s no slouch as a camera beside that. There are motion sensor and timelapse modes, as well the ability to take high dynamic range pictures, and as if that’s not enough it also has all the tweakable things you’d expect from a “proper” camera. The oldest adage in photography is that the best camera in the world is the one in your hand, and we’d say that this one’s better than a real Game Boy Camera should the once-in-a-lifetime picture come while you’re holding it.

Of course, a better Game Boy camera needs a better lens, right?

Classic Film Camera Goes Digital With Game Boy Tech

Despite having been technologically obsolete for a decade or two, analog photography is still practiced by hobbyists and artists to achieve a particular aesthetic. One might imagine a similar thing happening with early digital cameras, and indeed it has: the Game Boy Camera has seen use in dozens of projects. [Michael Fitzmayer] however decided to combine the worlds of analog and early digital photography by equipping a Holga with the image sensor from a Game Boy Camera.

A camera module and an STM32 module on a solderless breadboardThe Holga, if you’re not familiar, is a cheap film camera from the 1980s that has achieved something of a cult following among retro-photography enthusiasts. By equipping it with the sensor from what was one of the first mass-market digital cameras, [Michael] has created a rather unusual digital point-and-shoot. The user interface is as simple as can be: a single button to take a photo, and nothing else. There’s no screen to check your work — just as with film, you’ll have to wait for the pictures to come back from the lab.

The sensor used in the Game Boy Camera is a Mitsubishi M64282FP, which is a 128 x 128 pixel monochrome CMOS unit. [Michael] hooked it up to an STM32F401 microcontroller, which reads out the sensor data and stores it on an SD card in the form of a bitmap image.

With no film roll present, the Holga has plenty of space for all the electronics and a battery. The original lens turned out to be a poor fit for the image sensor, but with a bit of tweaking the Game Boy optics fit in its place without significantly altering the camera’s appearance.

A monochrome low-resolution selfie of a man making the peace sign[Michael] helpfully documented the design process and shared all source code on his GitHub page. Holgas shouldn’t be hard to find to find, but if none are available in your area you can just roll your own. The Game Boy Camera is actually one of the most versatile cameras out there, having been used for everything from video conferencing to astrophotography.

Creating A Game Boy ROM From Pictures

There are very few legal ways of obtaining ROM files for video games, and Nintendo’s lawyers are extremely keen on at least reminding you of the fact that you need to own the game cart before obtaining the ROM. With cart in hand, though, most will grab a cart reader to download the game files. While this is a tried-and-true method, for GameBoy games this extra piece of hardware isn’t strictly required. [Travis Goodspeed] is here to show us a method of obtaining ROM files from photographs of the game itself.

Bits can be manually edited to fix detection errors.

Of course, the chips inside the game cart will need to be decapped in order to obtain the pictures, and the pictures will need to be of high quality in order to grab the information. [Travis] is more than capable of this task in his home lab, but some work is still required after this step.

The individual bits in the Game Boy cartridges are created by metal vias on the chip, which are extremely small, but still visible under a microscope. He also has a CAD program that he developed to take this visual information and extract the data from it, which creates a ROM file that’s just as good as any obtained with a cart reader.

This might end up being slightly more work especially if you have to decap the chips and take the photographs yourself, but it’s nonetheless a clever way of obtaining ROM files due to this quirk of Game Boy technology. Encoding data into physical hardware like this is also an excellent way of ensuring that it doesn’t degrade over time. Here are some other methods for long-term data storage.