What The Artisan 3-in-1 CNC Offers (If One Has The Table Space)

I never feel like I have enough space in my workshop. The promise of consolidating tools to make the most of limited space drew me to the Snapmaker Artisan, a plus-sized 3-in-1 tool combining 3D printer, laser engraver, and CNC machine.

Smaller than three separate tools, but still big.

Jacks of all trades may be masters of none, but it is also true that a tool does not need to be a master of its functions to be useful. For many jobs, it enough to simply be serviceable. Does a machine like the Artisan offer something useful to a workshop?

Snapmaker was kind enough to send me an Artisan that I have by now spent a fair bit of time with. While I have come to expect the occasional glitch, having access to multiple functions is great for prototyping and desktop manufacturing.

This is especially true when it allows doing a job in-house where one previously had to outsource, or simply go without. This combo machine does have something to offer, as long as one can give it generous table space in return.

What It Is

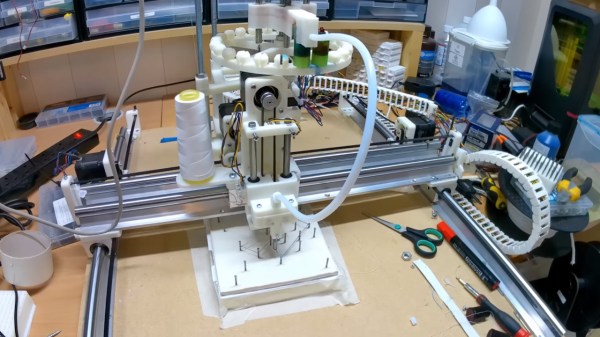
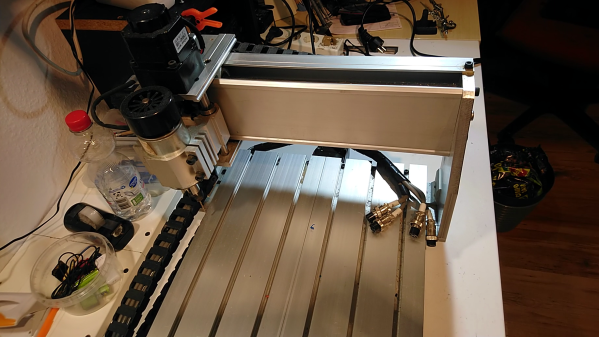
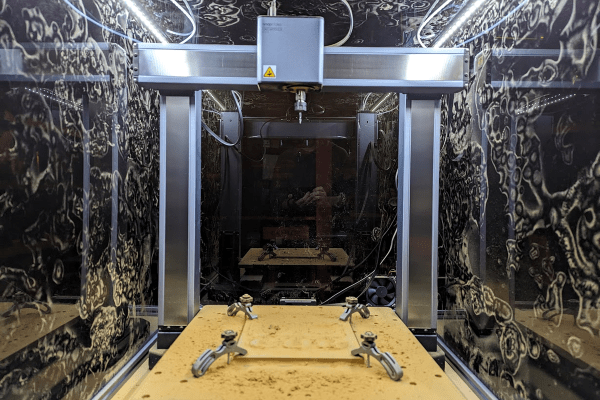
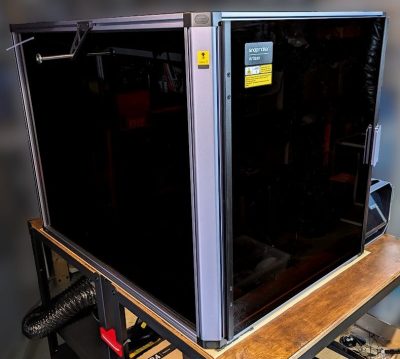
The Artisan is a large dual-extrusion 3D printer, CNC router, and diode-based laser engraver. To change functions, one physically swaps toolheads and beds. Very thankfully, there are quick-change fixtures for this.

Driving the Artisan is Snapmaker’s software Luban (GitHub respository). Named for the ancient Chinese master craftsman, it is responsible for job setup and control. For laser and CNC work, there are convenient built-in profiles for a variety of paper, plastic, leather, and wood products.

The unit is enclosed, nicely designed, and — while I have come to expect the occasional glitch — serviceable at all three of its functions. The size and stature of the machine warrants some special mention, however.

Continue reading “What The Artisan 3-in-1 CNC Offers (If One Has The Table Space)”

CNC Soldering Bot Handles Your Headers

Soldering pin headers by hand is a tedious task, especially when your project has a huge number of them. [iforce2d] has a large number of boards with a lot of headers, and has created a rather special CNC machine to to do the job. It’s a soldering robot, controlled by LinuxCNC and you can see it below the break.

Superficially it resembles a 3D printer made in aluminium, with an X-Y movable table and a Z-direction represented by a soldering iron and solder feeder on an arm. The solder feeder uses a Bowden tube, with a 3D-printer extruder motor pushing the solder wire down a PTFE tube and finally into a fine aluminium tube from which it’s fed to the iron tip.

Though he’s done a beautiful job of it, creating the machine is not all that’s required, because the tool path requires more attention than simply moving the iron to each pin and supplying some solder. There’s a need to consider the effect of that heat, how much each pad needs, and how much neighbouring pads contribute.

We’ve had repetitive soldering tasks just like this one though not on this scale, so we can understand the tedium this machine will relieve. We can’t however help being reminded of XKCD 1319.

Continue reading “CNC Soldering Bot Handles Your Headers”

Simple Add-On Makes Cheap Plasma Cutter Suitable For CNC Use

Plasma cutters are ridiculously cheap these days, just cruise by the usual online sources or your local Harbor Freight if you’ve got any doubt about that. But “cheap” and “good” don’t always intersect on a Venn diagram, and even when they do, not every plasma cutter is suitable for use on the spanking new CNC table you’re building. But luckily, there’s a mod for that.

As [Jake von Slatt] explains it, there are two kinds of plasma cutters on the market: high-frequency (HF) start and pilot arc start. The basic difference is that HF start cutters, which comprise the majority of cheap cutters on the market, need direct electrical contact with the workpiece to start the cutting action. Pilot arc torches, which are more suitable for CNC cutters, can strike the arc through a separate conductor without the need to contact the workpiece.

While there are homebrew bodges that claim to turn an HF torch into a pilot arc, [Jake]’s approach is a bit more complicated, and necessarily so. His add-on box intercepts the ground clamp — which is actually the positive conductor for plasma cutting — and switches it through a heavy-duty HVAC contactor. The 24 VDC coil of the contactor is controlled by a homebrew current sensor made from a huge toroid ferrite core wrapped with 20 turns of 6 AWG welding wire.

Before winding, the core is split in two and epoxied back together with a small magnetic reed switch bridging the gap. A simple 24 VDC power supply runs the whole thing. When the torch starts, the nozzle is connected to ground through the contactor, but as soon as the arc strikes and starts pulling cutting current through that toroid, the magnetic field closes the reed switch, which opens the contactor via a small DC relay. This removes the connection between the nozzle and ground, leaving the plasma to carry all the cutting current.

We’ve featured many, many CNC plasma cutter tables before, but most of these builds have concentrated on the table more than the cutter. It’s a refreshing change to get some insider tips on what kinds of cutters work best, and how to adapt what you’ve got for the job.

Continue reading “Simple Add-On Makes Cheap Plasma Cutter Suitable For CNC Use”

String Art Build Uses CNC To Make Stringy Art

String art is as old as, well, string and something to hang it from. But, like most things, it gets more enjoyable when you involve a CNC. [Paul MH] went the whole hog with this build, creating a CNC string art builder that could handle the whole process, from placing the nails to running the string.

It’s an impressive build: you feed in an image, and the system calculates the location of the pins and the path that the string will need to follow. It then puts the nails into the board, pushes them in, and, with a custom attachment for the CNC, runs the string to create the art.

Of course, the path to this was filled with prototypes, failures, and dead ends. [Paul] has laid these out pretty well in the video for the project, which he just released. In this, problems like detecting when the nails are picked up and placed are detailed, and the prototypes and Rube Goldberg solutions that [Paul] came up with are covered.

Like all great projects, it is still a work in progress, but [Paul] has made some impressive progress, although he hasn’t posted the code and models for his custom parts yet. We’ve featured several string art builds, from polar platforms to fully formed commercial-grade builds that print your work for you.

Continue reading “String Art Build Uses CNC To Make Stringy Art”

Impulse Buying A 3040 CNC Machine, What Could Go Wrong?

[joekutz] made an impulse purchase of a CNC machine. It was a 3040 CNC that looked reasonably complete and had an attractive price, what could possibly go wrong? As it happens, [joekutz] really didn’t know what he was in for. Sometimes the price is good, but you pay in other ways. But where some would see defeat, [joekutz] sees an opportunity to document the restoration.

Dial indicators are useful tools for measuring how straight some parts aren’t.

The 3040 are relatively cheap and simple CNC machines that have been available from a variety of overseas retailers for years. They have 30 cm by 40 cm beds (hence the name) and while there are many variations, they all work about the same. [joekutz] expected that getting his up and running and converted to open source would be a fun weekend project, but it ended up taking far longer than that. In fact, it turns out that the machine was damaged in surprising and unexpected ways.

[joekutz] has a series of videos demonstrating the process of diagnosing and repairing the various things wrong with this device. In the first video, he dismantles the machine and discusses the next steps. In the second video, he takes some time to repair some dial indicators that will be critical for measuring the various things wrong with the CNC parts. Video number three delves into finding out the horrible things wrong with the machine, and the fourth is where repairs begin, including bending shafts and sanding blocks back into service.

Those videos are embedded below, and while the machine isn’t quite restored yet, progress is promising. We’ve seen easy and effective upgrades for such CNC machines before, but if you happen to be in more of a repair and restore situation, give [joekutz]’s work a look because it might just save you some time and frustration.

Continue reading “Impulse Buying A 3040 CNC Machine, What Could Go Wrong?”

A wooden frame with 64 green LEDs running a Game of Life simulation

Wooden CNC Sculpture Displays Conway’s Game Of Life

Conway’s Game of Life has been the object of fascination for computer hobbyists for decades. Watching the generations tick by is mesmerizing to watch, but programming the data structure and implementing the rules is also a rewarding experience, especially if you’re just getting acquainted with a new computing platform. Just as rewarding can be creating a nice piece of hardware to run the game on, as [SandwichRising] has just done: check out his beautiful wooden Game of Life implementation.

A set of PCBs implementing an 8x8 LED displayThe main part of his Game is a piece of poplar wood that was CNC routed to produce an 8×8 display adorned with neat chain-like shapes. The display consists of standard 5 mm green LEDs, but they’re not the things you see poking out the front of the wooden frame. Instead, what you’re seeing are 64 lenses made out of epoxy. [SandwichRising] first covered the holes with tape, then poured green epoxy into each one and waited for it to harden. He then took off the tape and applied a drop of UV-cured epoxy on top to create a lens.

All the LEDs are mounted on PCB strips that are hooked up to a central bus going to the main ATmega328P  microcontroller sitting on a separate piece of PCB. Whenever the system is powered on, the game is set to a random state determined by noise, after which the simulation begins. On such a small field it’s pretty common for the game to end up in a stable state or a regular oscillation, which is why the ATmega keeps track of the last few dozen states to determine if this has happened, and if so, reset the game to a random state again.

The source code, as well as .STL files for the PCBs and the frame, are available in the project’s GitHub repository. If woodworking isn’t your thing, there’s plenty of other ways to make neat Game of Life displays, such as inside an alarm clock, with lots of LEDS under a coffee table, or even with a giant flip-dot display.

GrblHAL CNC Controller Based On RP2040 Pico

[Phil Barrett] designed a new CNC controller breakout board called the PicoCNC which uses the Raspberry Pi Pico RP2040 module and grblHAL. It packs a bunch of features typical of these controllers, and if you use the Pico W, you get WiFi connectivity along with USB. And if you don’t want connectivity, you can execute G-code directly from a micro SD card. The board is available in kit form, and schematics are posted on the GitHub repository above. Some of the features include four axes of motion, spindle control, limit switches, relay drivers, expansion headers, and opto-isolation.

This isn’t [Phil]’s first controller board. He also designed the grblHAL-based Teensy CNC controller breakout board, a step up from the usual Arduino-based modules at the time and boasting Ethernet support as well. According to the grblHAL site, nine different processors are now supported. There are well over a dozen CNC controller breakout boards listed as well. And don’t forget [bdring]’s 6-Pack grbl-ESP32 controller, a modular breakout board we covered a few years back. So pick your favorite board or roll your own and get moving.