Rebuilding A $700k Refrigerator

When cleaning out basements, garages, or storage units we often come across things long forgotten. Old clothes, toys, maybe a piece of exercise equipment, or even an old piece of furniture. [Ben] and [Hugh] were in a similar situation cleaning out an unused lab at the University of California Santa Barbara and happened upon an old refrigerator. This wasn’t just a mini fridge left over from a college dorm, though. This is a dilution refrigerator which is capable of cooling things down to near absolute zero, and these scientists are trying to get it to its former working state.

The pair are hoping to restore the equipment to perform dark matter experiments, but the refrigerator hasn’t been in use since about 2016 (and doesn’t have an instruction manual), which is a long time for a piece of specialty scientific equipment to be collecting dust. The first step is to remove wiring and clean it of all the grime it’s accumulated in the last decade. After that, the pair work to reassemble the layers of insulation around the main cooling plate and then hook up a vacuum pump to the device which also needed some repair work.

The critical step at this point is to evacuate the refrigerant lines so they can be filled with expensive Helium-3 and Helium-4. The problem is that there’s still some of this valuable gas in the lines that needs to be recovered, but the risk is that if any air gets into the cold section of the refrigerator it will freeze and clog the whole system. After chasing some other electrical and vacuum gremlins and discovering a manual from a similar refrigerator, they eventually get it up and running and ready for new scientific experiments. While most of us won’t discover a fridge like this cleaning out our attics, this refrigerator powered by rubber bands is a little more accessible to the rest of us.

Continue reading “Rebuilding A $700k Refrigerator”

ESP32 Freezer Alarm Keeps Tabs On Tricky Door

Leaving your freezer door open accidentally is a great way to make a huge mess in the kitchen. [Guy Dupont] had a freezer that would regularly fail to close properly, and was sick of the regular meltdown events. Thus, he whipped up a very digital solution.

The build combines an ESP32 with a reed switch, which is activated by a magnet on the freezer door. If the freezer door is open, the reed switch similarly remains open. The ESP32 checks the switch status every few minutes, and if the door remains open for two consecutive checks, it raises the alarm. A notification is sent to [Guy] via WiFi so that he can rectify the situation. The rig runs off a 400 mAh battery, which lasts for just over three weeks running door checks at two minute  intervals.

Based on [Guy]’s YouTube video, it appears the freezer door is jamming up against the wall. Perhaps shoving the freezer into a better position would help, though we suspect he would have thought of that first. And, in his own words, “That would be a very boring YouTube video, wouldn’t it?”

It’s not the first fridge alarm we’ve featured, and it won’t be the last, refrigeration gods willing.

Continue reading “ESP32 Freezer Alarm Keeps Tabs On Tricky Door”

DIY Mini Fridge Is Pure Brilliance In Foam

There’s nothing more pleasing on a hot day than an ice-cold beverage. While the vast majority of us have a fridge in the kitchen, sometimes it’s desirable to have a further fridge in the lab, games room, or workshop. To that end, you may find value in this ultra-cheap, low-cost DIY fridge build from [Handy_Bear].

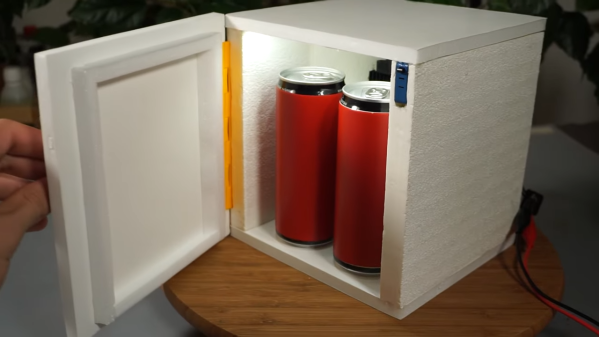
Like many tiny fridge builds, this design eschews complex gas-cycle refrigeration techniques for simple Peltier modules. These are devices that have one cold side and one hot side, because they move heat when electricity is applied. This build uses a Peltier module fitted with a fan to better shift away heat from the hot side, improving the module’s cooling ability.

The “fridge” itself is assembled out of thick XPS insulation foam. A hot wire cutter was used to cut several slabs which were then assembled using hot glue. The Peltier module is installed on the back, at the top of the fridge. Thus, air which is cooled in this area will then travel down through the rest of the fridge’s cavity. [Handy_Bear] also goes over how to produce a working hinge and a gasket for the door, which helps with ease-of-use and efficiency. As a nice touch, a set of 12V LED lights are also installed inside, which light when the door is open. Just like the real thing!

The final build is noisy, slow to cool down, and it uses 60 watts of power to cool down just two regulation-sized sodas. Notably, you could fit two standard NATO smoke grenades in the same space, as they’re almost-identically sized (ask us how we know). However, smoke grenades don’t usually need to be refrigerated.

None of that means it isn’t fun though! Plus, [Handy_Bear] notes that adding a second Peltier would greatly aid the fridge’s ability to quickly chill your grenades sodas. You might even like to explore the use of special fan designs to make the fridge even quieter! Video after the break.

Continue reading “DIY Mini Fridge Is Pure Brilliance In Foam”

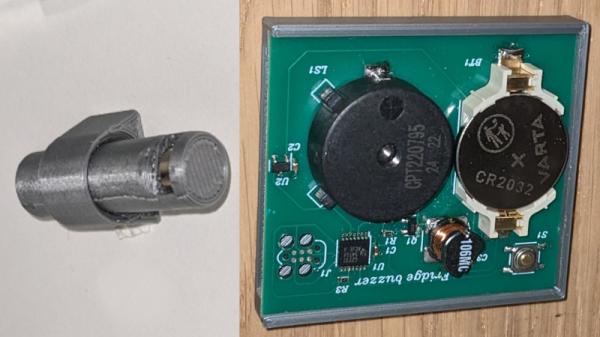
A composite picture with a 3D printed cylinder with a magnet at one end held in a 3D printed housing ring on the left composite picture and a fridge buzzer board with buzzer, CR2032 battery, MCP430 microcontroller and hall effect sensor slid into a 3D printed base on the right part of the composite picture

Don’t Lose Your Cool With This Fridge Buzzer

[CarrotIndustries] wanted to add an audible warning for when the refrigerator door was left open. The result is a fridge buzzer that attaches to the inside of a fridge door and starts buzzing if the door is left ajar for too long.

The main components of the fridge buzzer consist of an MSP430G2232 low-power MCU connected to a SI7201 hall sensor switch, along with a CR2032 battery holder, push button and buzzer. The MSP430’s sleep mode is used here, consuming less than 3 µA of current which [CarrotIndustries] estimates lasting 9 years on a 235 mAh CR2032 battery.

A 3D printed housing is created so that the board slides into a flat bed, which can then be glued onto to the fridge door. The other mechanical component consists of a cylinder with a slot dug out for a magnet, where the cylinder sits in a mounting ring that’s affixed to the side of the fridge wall that the end of the door closes on. The cylinder can be finely positioned so that when the refrigerator is closed, the magnet sits right over the hall sensor of the board, allowing for sensitivity that can detect even a partial close of the fridge door.

All source code is available on [CarrotIndustries] GitHub page, including the Horizon EDA schematics and board files, the Solvespace mechanical files, and source code for the MSP430. We’ve featured an IoT fridge alarm in the past but [CarrotIndustries]’ addition is a nice, self contained, alternative.

Moving Fridge Magnets Make For Unique Clock

We see a ton of clock projects around these parts, and being hackers, we love to feature them all. But every once in a while we stumble upon a great new way to display the time that really gets our attention and requires a closer look, such as this moving fridge magnet clock.

The fridge magnets [Craig Colvin] built this unique clock around are the colorful plastic kinds that have adorned the lower regions of refrigerators in toddler-filled households for ages. Instead of residing on a fridge, [Craig] laminated a sheet of white acrylic to a thin sheet of steel, to give the magnets something to hold onto. Moving the numbers is the job of a CoreXY-style mechanism. The belt-driven Cartesian movement maneuvers a head to to the right location to pick up a number; a servo in the head moves two powerful magnets into position under the number. The head then moves the number to the right spot, releases its magnets, and the number stays put on the board. You can see it in action in the video after the break.

While we love this as it is, it brings to mind some great mods. One can imagine the addition of letters to make a legit word clock, or to just add a calendar display. We’d also love to see these magnets in their natural habitat by building this into the door of a working fridge.

Continue reading “Moving Fridge Magnets Make For Unique Clock”

Defeating Fridge DRM With Duct Tape And A Dremel

We love writing about DRM here at Hackaday. Because when we do, it usually means someone found a way to circumvent the forced restrictions laid upon by a vendor, limiting the use of a device we thought is ours once we bought it. The device in question this time: the water filter built into GE’s fridges that would normally allow its “owner” to pour a refreshing glass of cold water. Except the filter is equipped with an RFID tag and an expiration, which will eventually deny you that little luxury. And if that’s already a feature, you can bet it won’t just let you insert any arbitrary filter as replacement either.

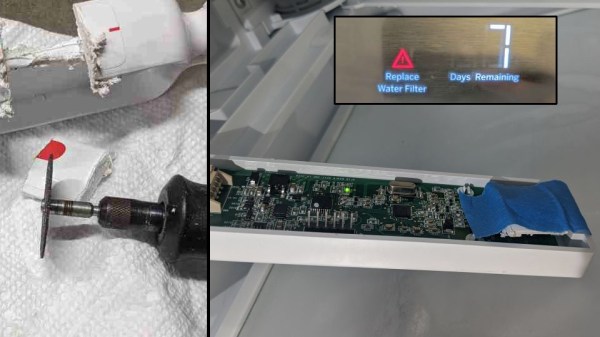
Enraged by every single aspect of that, [Anonymous] made a website to vent the frustration, and ended up tearing the culprit apart and circumvent the problem, with a little help from someone who was in the same situation before. As it turns out, the fridge comes with a “bypass filter” that is just a piece of plastic to fit in place of the actual filter, to pour unfiltered, but still cold water. That bypass filter is also equipped with an RFID tag, so the reader will recognize it as a special-case filter, which luckily enough doesn’t have an expiration counter.

The general idea is to take out that bypass filter’s RFID tag and place it on a generic, way cheaper filter to trick the fridge into thinking it simply doesn’t have a filter in the first place, while still enjoying the filters actual functionality. However, this might not be the most stable solution if the tag isn’t placed in the exact position. Also, retrieving the tag in the first place proved tricky, and [Anonymous] initially ended up with nothing but the antenna pad, while the tag itself remained sturdily glued into the plastic piece.

Continue reading “Defeating Fridge DRM With Duct Tape And A Dremel”

Air Compressor From Fridge Parts Gets An Upgrade

Air compressors are often loud, raucous machines – but they don’t have to be. [Eric Strebel] built a remarkably quiet compressor using parts salvaged from an old fridge. After several years of use, it was due for an upgrade (Youtube link, embedded below}.

While performance of the original setup was good, [Eric] desired a compressor with more capacity for his resin casting activities. A 15 gallon air tank was sourced from a damaged Craftsman brand compressor, and pressed into service. The build involved plenty of sheet metal work to mount the various components, as well as an upgrade to the pressure regulator.

During the refit, [Eric] takes the time to answer questions from the audience about his original build. He notes that the fridge compressor has worked well without using any noticeable amount of oil, and that there was a problem with water build up in the original tank which has been solved in the new rig.

It’s a great example of building your own tools, which can provide years of service if done right. Check out our write up on [Eric]’s first build, or his work on photogrammetry. Video after the break.

Continue reading “Air Compressor From Fridge Parts Gets An Upgrade”