Multi-Year Doorbell Project

Camera modules for the Raspberry Pi became available shortly after its release in the early ’10s. Since then there has been about a decade of projects eschewing traditional USB webcams in favor of this more affordable, versatile option. Despite the amount of time available there are still some hurdles to overcome, and [Esser50k] has some supporting software to drive a smart doorbell which helps to solve some of them.

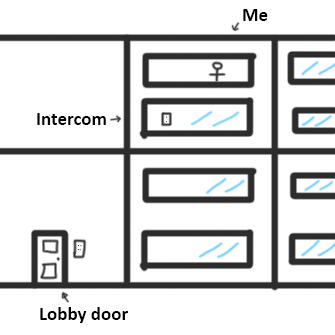
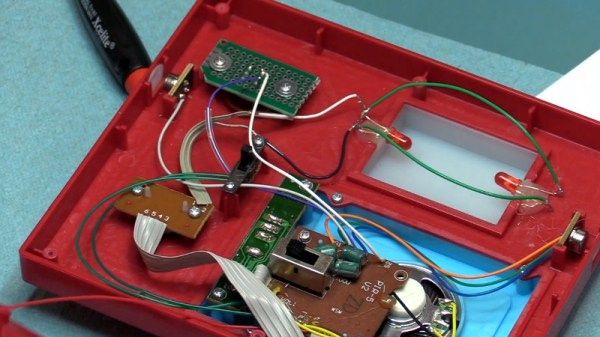
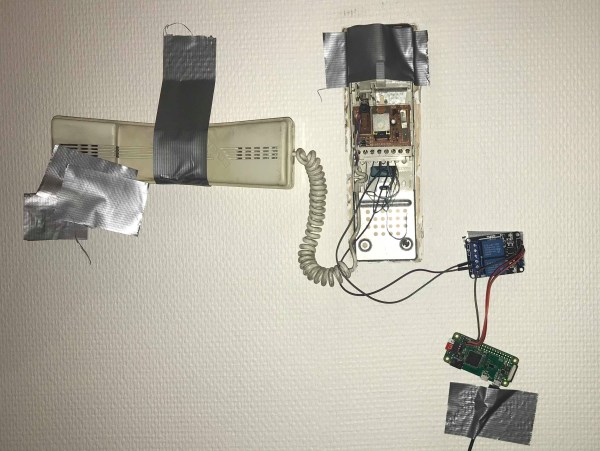
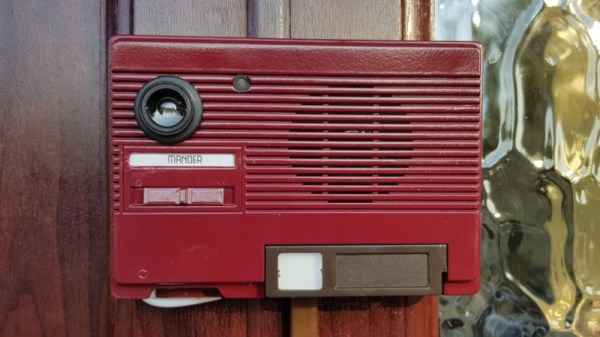
One of the major obstacles to using the Pi camera module is that it can only be used by one process at a time. The PiChameleon software that [Esser50k] built is a clever workaround for this, which runs the camera as a service and allows for more flexibility in using the camera. He uses it in the latest iteration of a smart doorbell and intercom system, which uses a Pi Zero in the outdoor unit armed with motion detection to alert him to visitors, and another Raspberry Pi inside with a touch screen that serves as an interface for the whole system.

The entire build process over the past few years was rife with learning opportunities, including technical design problems as well as experiencing plenty of user errors that caused failures as well. Some extra features have been added to this that enhance the experience as well, such as automatically talking to strangers passing by. There are other unique ways of using machine learning on doorbells too, like this one that listens for a traditional doorbell sound and then alerts its user.

Continue reading “Multi-Year Doorbell Project”

Fixing (And Improving!) An Annoying Apartment Entry System

[Zak]’s two-floor apartment has a typical door entry control system, but the setup is less than ideally convenient. The wall-mounted telephone-like intercom is downstairs, but [Zak] is usually upstairs. What’s an enterprising hacker to do? Obviously the most elegant solution is to simply do without visitors in the first place, but [Zak] opted for a more full-featured solution to the problem.

The layout of the typical wall-mounted door intercom is less than ideal.

He fixed things with a custom ESP8285-based board that, with the help of opto-isolation, allows him to detect visitors and grant entry without having to be physically present at the wall-mounted intercom. It’s even integrated into Telegram, and has a few neat new features. Let’s take a look.

The first interesting bit is how [Zak] rolled his own opto-isolation. The door entry system uses 14 VAC and is frankly — electromagnetically-speaking — a very noisy device. Attaching GPIO pins directly to this system from the ESP board for interfacing is not an option. The solution in situations like this is to use opto-isolation, so that interfaced devices can be electrically isolated from one another.

Rather than use off-the-shelf options, [Zak] opted to keep things small and economical by rolling his own solution using side-mounted IR LEDs on the small interface PCB. LEDs can also act as photodiodes, so by pointing two LEDs directly at one another and driving one LED from the door control system and measuring the small amount of resulting current on the other LED, [Zak] can detect states without having to directly connect a GPIO pin.

Continue reading “Fixing (And Improving!) An Annoying Apartment Entry System”

Recreating The Intercom From Ferris Bueller’s Day Off

Ferris Bueller’s Day Off is a pop culture classic, and remains one of the standout teen films of the era. Notably, titular character Ferris was somewhat of a hacker himself, with the movie showcasing several contraptions the teenager used to get out of a day of school. Among them was the intercom, which [Aaron] faithfully recreated with modern technology.

For those who haven’t seen the film, the intercom was hooked up to a cassette player to feign a believable response to anyone that visited the house while Ferris was away. Rather than do things the old fashioned way, [Aaron] built his replica using an ESP32 fitted with a sound chip instead. When visitors ring the intercom, it plays back sound clips from the movie, while also signalling another ESP microcontroller inside [Aaron]’s house to let him know he has visitors.

The build is a charming tribute to the classic film, and all the more fun for [Aaron’s] efforts to make it look the part as well, choosing to build it inside a period-correct intercom housing. To avoid confusion for those who haven’t seen the film, however, he’s been careful to place a sign up to clarify the intercom is not as it seems.

We’ve seen other movie replicas in the same vein before – like this great Star Trek build. Video after the break.

Continue reading “Recreating The Intercom From Ferris Bueller’s Day Off”

Tuning Up The ThinkGeek Star Trek Intercom Panel

OnĀ Star Trek, all Kirk and friends had to do was snap the button on the always conveniently located intercom panel, start talking, and the intended recipient would immediately respond no matter where they were in the ship. How did it work? Who knows. In spite of, or perhaps even because of, the lightly-explained nature of the technology, the cherry-red wall intercoms still hold a certain charm for fans of the groundbreaking show.

A viewer sentĀ [Fran Blanche] a scaled down replica of the intercom from ThinkGeek, and while it certainly looks fairly close to the original prop, it has a couple of annoying design elements. When triggered by the side-mounted motion sensors, the panel will play either the iconic swoosh of the automatic doors or the “Red Alert” sound effect. It’s a cute idea for a kid’s bedroom maybe, but not exactly ideal for somebody who regularly records YouTube videos.

Peak 23rd century technology

So the first order of business was to cut the motion sensors out of the circuit and replace them with a push button. [Fran] draws up a quick diagram to explain how these sensors work, and shows that they can easily be bypassed with a momentary switch since they normally bring the line high when triggered. She then converted the indicator light on the right side of the panel into a button to enable the alert sound effect, which is more accurate to how it worked in the show anyway.

The other issue, and perhaps the most egregious to Star Trek fans, is that the “Red Alert” indicator on the top of the panel didn’t actually flash like it did in the show. To design and build this panel and not put a few LEDs behind that piece of frosted plastic seems a bit like producing a Matchbox car and forgetting to make the wheels spin. With a couple of red LEDs and a bit of new wiring, the oversight was quickly rectified.

While it might not be perfect, at least ThinkGeek actually produced a functional product this time. It could have ended up like one of their April Fool’s “products” that never get put into production, forcing a desperate Trekkie to begrudgingly build his own version.

Continue reading “Tuning Up The ThinkGeek Star Trek Intercom Panel”

Quick And Dirty: Operate An Intercom Via Telegram

Never underestimate the quick and dirty hack. It’s very satisfying to rapidly solve a real problem with whatever you have on hand, and helps to keep your hacking skills sharp for those big beautifully engineered projects. [Guillaume M] needed a way to remotely open his apartment building door for deliveries, so he hacked the ancient intercom to be operated via Telegram, to allow packages to be deposited safely inside his mailbox inside the building’s front too.

[Guillaume] needed to complete the hack in a way that would allow him to return the intercom to its original state when he moves out. Opening the 30-year-old unit, he probed a row of screw terminals and identified a 13V supply, ground, and the connection to the buildings’ door lock. He connected the lock terminals to a relay, which is controlled by a Raspberry Pi Zero W that waits for the “open” command to be sent to a custom Telegram Bot.

To power the Pi, [Guillaume] connected it to the 13V supply on the intercom via a voltage divider circuit. Voltage dividers usually make lousy power supplies, since the output voltage will fluctuate as the load changes, but it looks as though it worked well enough for [Guillaume]. The intercom had a lot of empty space inside, so after testing everything was packed inside the housing.

If you want to achieve the same with an ESP8266, there’s a library for that. Just keep in mind that being dependent on web servers to open critical doors might get you locked out.

Reverse Engineering A Two-Wire Intercom

There was a time when an intercom was simply a pair of boxes with speakers joined by a couple of wires, with an audio amplifier somewhere in the mix. But intercoms have like everything else joined the digital age, so those two wires now carry a load of other functionality as digital signalling. [Aaron Christophel] installs these devices for a living, and has posted a fascinating reverse engineering video that we’ve also placed below the break.

Power for the system is present as a constant 24V DC, and the audio is still an old-fashioned analogue signal that we’ll all be familiar with. On that 24V DC though are imposed a series of pulse trains to trigger the different alarms and other functions, and he describes extracting these with an oscilloscope before showing us the circuitry he’s used to send and receive pulses with an Arduino. The bulk of the video is then devoted to the software on the Arduino, which you can also find in a GitHub repository.

The result is an interesting primer for anyone who fancies a bit of serial detective work, even if they don’t have a intercom to hand.

Continue reading “Reverse Engineering A Two-Wire Intercom”

Video Doorbell Focuses On Quality, Aesthetic

One of the most popular futurist tropes of the 20th century was the video intercom. Once this technology was ready, it would clearly become a mainstay of modern living overnight. Our lived reality is however somewhat different. For [MisterM], that simply wouldn’t do, so he set about producing a retro-themed video doorbell that is sure to be the envy of the neighbourhood.

Not one to settle for second best, [MisterM] wanted to focus on quality in video and sound. A Microsoft LifeCam 3000HD handles video and audio capture, with a Raspberry Pi 3B+ providing plenty of grunt to run the show. The Pimoroni pHAT BEAT add-on provides audio output. It’s all integrated into a 1980s vintage intercom, which is painted a deep shade of maroon for an extra classy look. Further parts are integrated into a classic Sony tape deck, with LEDs shining out from under the cassette door for added visual appeal.

The doorbell works by making calls to Google Duo, which allows the user to answer the door from anywhere in the house, or indeed – anywhere with an Internet connection! [MisterM] reports this has already proved useful for communicating with couriers delivering packages to the house. There’s also a standard wireless doorbell and chime integrated into the unit which alerts those within the house in the usual way.

It’s a project that is both highly functional and looks particularly swish. Integrating new brains into old-school enclosures is a great way to give your project a cool look. These aircraft surplus clocks are a great example. Video after the break.

Continue reading “Video Doorbell Focuses On Quality, Aesthetic”