Machine Your Own Ring Light

[Alan] acquired a stereo microscope from eBay, and decided to save some more money by designing, machining, and assembling his own arc reactor ring light to go along. After finding an LED driver board sitting around as well as ordering some surface mount LEDs, he set about using a lathe to cut away a block of lexan, making sure to include slots for the lights as well as the microscope mount point. Follow the link to see the detailed build photos, as well as some comparison shots with and without the ring light.

A month or two earlier though, and [Alan] would have had a fantastic start to an Iron Man costume.

Swapping Speedometer Needle For LEDs

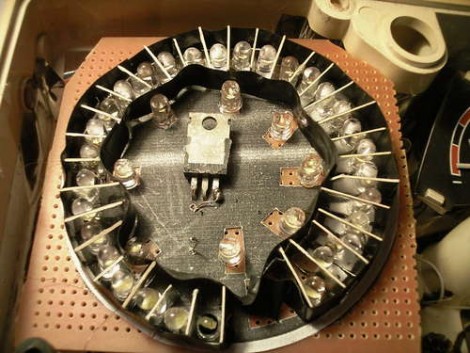
[Ah2002] didn’t like the shaky needle in his car’s speedometer so he replaced it with a ring of LEDs. The old speedometer had a cable which rotated along with the gearbox for mechanical speed measurement. By connecting the stepper motor from a printer instead of this cable, a voltage is generated that fluctuates with the speed of the car. The fluctuation is linear so a given voltage measurement can be directly associated with one particular speed. By using a trimpot to calibrate the input voltage, [Ah2002] connected the signal to an LM3914 dot/bar display driver. These can be chained together, lighting a string of outputs based on the single voltage input. The result is the board seen above, which was covered with a printed paper graph in the final assembly.

Judging from the video after the break, we’d bet there was some distracted driving during the calibration process. The driver appears to be holding the video recorder, and since a cellphone GPS was used during calibration we wonder if [Ah2002] was adjusting the trimpot, looking at the GPS, and driving all at once. It’s a fairly awesome hack, but do be careful when you’re working on something like this.

Continue reading “Swapping Speedometer Needle For LEDs”

Build A Confetti Cannon For Your Next Party

[Scott] built a confetti canon to spice up the party. It’s pneumatic and re-purposes a fire extinguisher as the air tank. He had a refillable extinguisher that used water instead of chemical retardant. After emptying the water and ensuring all of the pressure had been release he swapped the hose and nozzle for a sprinkler solenoid valve. Securing the extinguisher’s actuator lever with a pipe clamp holds the internal valve open, leaving the solenoid to control the pressure release. This way the canon can be fired electronically, or manually.

This type of solenoid valve is a popular choice with pneumatic canons. We suppose you could even adapt this for use as a T-shirt cannon.

[Thanks BoBeR182]

Czech Discovery Ressurects PS/2 Keyboard

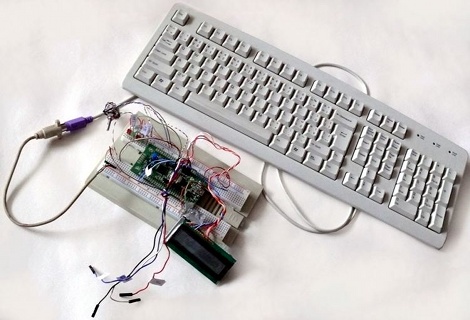
Like us, you probably have piles of old PS/2 keyboards occupying strategic positions in your house and causing all sorts of trouble with the neighbours. As luck would have it, there is a way to put those lazy peripherals to work!

Our friends in the Czech Republic have successfully interfaced a PS/2 keyboard to an STM32 Discovery board (translated), and not a moment too soon—just in time for you to integrate their work into your entries for those juicy contests we told you about (the European one and the North American one).

The project page contains an in-depth walkthrough of how the PS/2 connection talks to the keyboard hardware along with source code and links, more than enough information to get started with a PS/2 keyboard hack on your Discovery application. And why stop at keyboards? Give your old PS/2 mouse a new lease on life, or even hook up your custom game controller to spice up the experience.

V4Z80P: The 8-bit Laptop

[Phil] over at Retroleum has cobbled together a clean, well put together laptop based entirely around a Zilog Z80 microprocessor and a pair of Spartan II FPGAs. These FPGAs allow him to reduce the number of devices on his board, and therefore cut his production cost as well as device size. He even managed to integrate a salvaged PSOne screen. The laptop comes complete with [Phil]’s own Homebrew OS as well as a great graphical vector based demo.

Sure he’s updated the project in recent years to shrink the board, speeding up the Z80, and increasing the peripheral speed and functionality, but we’re suckers here for a total package hack. Seriously though, check out the newest version of the device as well as the backlog that shows the project growing over time.

Thanks to [Steth] for the heads up.

Swiveling Arms Replace Laptop LCD Hinges

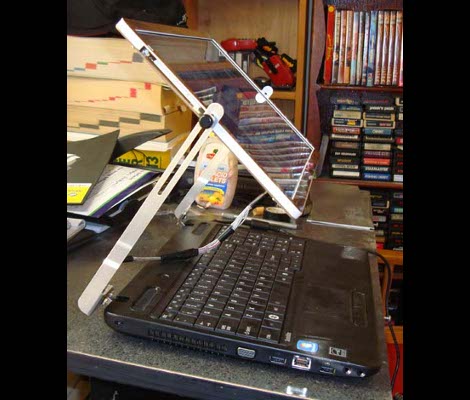
This swivel arm LCD screen is [Ben Heck’s] latest hack. It replaces the hinges that normally only allow one point of rotation on the screen. You can still use the laptop like normal, but when space is at a premium a second adjustment, both in rotation and linear position, has been added using the slots and screw knobs seen above. Ostensibly this is to use on an airplane, where there may not be enough space to fully open your laptop. We’ll let you decide if it’s wise to try to get your own hacks past airport security. Historically, the TSA hasn’t been impressed with hardware hackers. We like how this came out and could see ourselves using these techniques to make a convertible tablet notebook by reworking the cable routing.

We’ve embedded [Ben’s] quick demo of the finished product after the break. If you want to see the whole build process it is the subject of Episode 5 of the Ben Heck Show.

Continue reading “Swiveling Arms Replace Laptop LCD Hinges”

CNC Machine From PC Parts

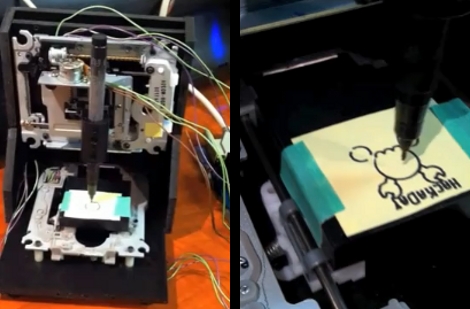
[Mike Rankin] built a small CNC machine using some PC parts. He repurposed two optical drives and a floppy drive to create the plotter seen drawing the Hackaday logo above. The X and Y axes use the stepper motor controlled read heads from two optical drives. The Z axis is built using the read head hardware from a floppy drive. A 3-axis controller module from eBay drives the little machine, keeping the cost quite low at around $45.

As you can see in the video after the break it does a great job as a plotter. [Mike] doesn’t think there’s enough power in the hardware to be used as a mill. We’d still like to try adding a flexible shaft rotary tool and see if this could mill some rudimentary PCBs, but maybe you need to shell out just a little bit more for that functionality. It might also be possible to use an etchant resist marker instead of toner transfer or photo-resist.

Continue reading “CNC Machine From PC Parts”