Pros And Cons Of Replacing Tool Batteries With Lithium Polymer

[HammyDude] was tired of buying replacement batteries for his power tools. He had some Lithium Polymer batteries on hand and decided to take one of his dead drills and swap out the dead power pack.

The orange battery pack you see above has a deans connector on it for use with RC vehicles. By opening up the drill housing, [HammyDude] was able to add the mating deans connector. Now the replacement easily plugs into the drill, and it even fits inside the handle body.

This battery is made up of several cells, and an inexpensive charger is capable of topping off each individually for a balanced charge. In the video after the break [HammyDude] points out that the Makita charger applies voltage to all of the cells in series. It’s incapable of balance charging so when one cell dies the battery is toast. We’ve encountered this problem with Makita tools before.

One drawback to take note of in the end of the video: this replacement doesn’t have any low voltage cut-off. Running this battery pack down too low will permanently damage it. There must be a simple circuit that could be added as a safety measure. If you know of one, drop us a tip.

Continue reading “Pros And Cons Of Replacing Tool Batteries With Lithium Polymer”

Extreme Finger Painting With A Router

Most of the time, CNC machines are used for very precise and exacting. There is another way that allows for a more “hands on” approach to routers and mills that allows for a lot more creativity and freedom. The touchCNC these guys whipped up allows anyone to finger paint with a friggin router.

From the forum post the guys sent in, they wrote a simple Android app for a tablet that allows for router control via a touch interface. There are three parts to the software. An Android app sends finger positions to a java server running on the CNC computer. This server dumps gcode into a text file. A vbscript inside the router software keeps reading from the specified file. With all this, finger movements are translated directly into machine movements.

The controls are fairly simple, like a real-life representation of Microsoft Paint. Of course there’s a ‘tap GOTO’ command that moves the router to a specified position. The router bit is lowered onto the work piece with a ‘long tap’ and stays lowered until the finger is released.

You can check out the code for touchCNC, but the guys are working on a few additional features like converting the tablets gyro output to gcode. Until then, enjoy the videos the guys posted after the break.

Continue reading “Extreme Finger Painting With A Router”

G-35 Circuit Board Porn

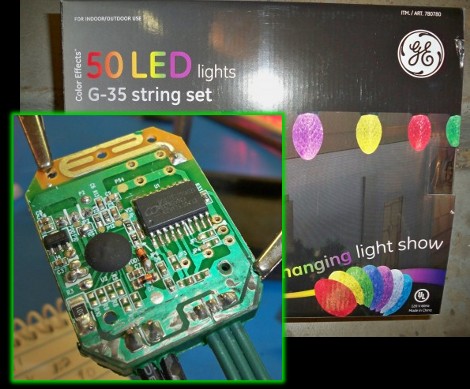
[Todd Harrison] took a slew of pictures in his quest to loose all the secrets of the G-35 Christmas Lights. These are a string of 50 plastic bulbs which house individually addressable RGB LEDs. We’ve seen a ton of projects that use them, starting about a year ago with the original reverse engineering and most recently used to make a 7×7 LED matrix. But most of the time the original control board is immediately ditched for a replacement. It’s become so common that you can now buy a drop-in board, no hacking needed. We enjoy the hard look that [Todd] took at the electronics.

The stock controller uses a single layer, single sided board. There’s a resin-blob chip, but also an SOP-20 microcontroller. Since [Todd’s] using several strings of lights on his house, he wondered if it would be possible to improve on the controller in order to synchronize the strands. His investigation showed that the board was designed to host a crystal oscillator but it is unpopulated. Unfortunately you can’t just add those parts to improve the timing of the chip (firmware changes would also be requires). He found that there’s a spot for a push-button. Quickly shorting the pads cycles through the effects, shorting them for a longer time turns off the string of lights. There is wireless control, but it seems that the only functionality it provides is the same as the unpopulated switch.

We enjoyed the close-up circuit board photos, and we like the spacing jig he used to attach the lights to his fascia boards. We’ve embedded a lengthy video about his exploits after the break. Continue reading “G-35 Circuit Board Porn”

Lamp Fading And Remote Control For The Lazy

[Dmitry Grinberg] has to walk all the way across his bedroom to switch the lamp on and off. The drudgery of this finally became too much, so he built a remote control and added dimming for good measure. Above you can see the circuitry for the remote and the receiver, as well as the finished remote housed in what he calls a ‘Chinese Altoids tin’.

After the break you’ll find [Dmitry’s] demo video. The remote control is quite responsive, and the dimming has great resolution. That’s thanks to a power N-channel MOSFET which switches the AC with the help of a full wave rectifier. The PIC 12F617 that controls the MOSFET is powered separately, and [Dmitry] mentions that you must use a transformer and not a switch-mode power supply to avoid a fire. We’d like to know more about this, so leave a comment if you are able to explain further.

The remote and receiver communicate via Infrared. The protocol is operating with 38 kHz signals using an easily sourced receiver tuned to that frequency. [Dmitry] shares all the details about the encoding scheme that he uses. Recreating this communications pairing is a great way to test your understanding of this technique. But if you need a refresher, here’s a tutorial to push you in the right direction. Continue reading “Lamp Fading And Remote Control For The Lazy”

Desktop Coilgun Lets You Play Scorched Earth In Your Living Room

desktop-coilgun

A few years ago when [Dr. West] was wrapping up his collegiate studies, he put together a pretty cool coilgun for his senior project. The gun was built to simulate the Scorched Earth computer game in real life, but due to time constraints he was only able to build one turret instead of two.

The turret was constructed using mainly salvaged components, most of which came from old laser printers and desktop computers. The turret sits atop a computer PSU, which also happens to be the source of the coilgun’s charging power. A Rabbit 2000 microcontroller is used to drive the gun, which is something we’re familiar with from [Dr. West’s] past projects.

The gun can be aimed manually via the attached keypad, but we prefer the more authentic route, allowing the turret to aim itself after being fed X and Y coordinates. As you can see in the demo video, the coilgun works nicely, allowing [Dr. West] to hit a target from across the room.

We love the concept, and think it would be tons of fun to play a real life game of Scorched Earth with a pair of these turrets. If you are interested in making one of your own, you can find the writeup for his final project here in his public Dropbox.

Adding Sound And Light To Your Radio Controlled Vehicles

[Nicholas] wanted to add some flair to his RC car. In addition to the headlights that you see above, there’s brake lights, and a horn that plays “Dixie” like the General Lee in the Dukes of Hazard. All of this is triggered by the wireless controller, but he figured out a way to monitor the servo signals in order to add the additional features.

The hack is driven by a Propeller chip. [Nicholas] patches into the servo lines by adding a servo-in and servo-out header to his prototyping shield. With that in place he’s able to tap into the voltage and ground pins to power the microcontroller. By attaching a 4k7 resistor to the control line, he can listen in on the servo signals using the Propeller.

This RC car has a throttle servo. So when the throttle is opened all the way up the Propeller chip flashes some white LEDs in the headlights, and uses an LM386 audio amplifier to play a tune. When the throttle is pulled all the way back the brake lights are activated. Don’t miss the test footage of this which is embedded after the break.

Continue reading “Adding Sound And Light To Your Radio Controlled Vehicles”

For The Trade Show Booth That Has Everything, A Blimp!

Trade shows are all about attracting attention and getting people to learn about your product, so what could be better than a custom-built RC blimp? Sure, you could just buy one, but what’s the fun in that? After several design iterations, [Tretton37] came up with a blimp known as the [LeetZeppelin] controlled by an Arduino, an XBee module, as well as a Wiimote controller connected to a computer.

The hack itself is a great example of repurposing off-the-shelf materials into something more interesting and unique. In addition to the components listed above, hobby servos were modded to allow for thrust motor control in conjunction with Legos for the gearing and “pillow-block bearings.” A list of the “important” parts used in this hack is furnished on their site as well as a video of it in action, which is also after the break.

As for the results of this hack as a trade-show attention grabber, Fredrik Leijon had this to say: “We think that all the gazing at the sky and half opened mouths proves that it was a huge success!”

[youtube http://www.youtube.com/watch?v=geMrAmBJsls&w=470&h=315%5D