Servos, Servos, And More Servos

For one reason or another, a lot of Hackaday readers are doing stuff with servos as of late. Here’s a few servo hacks that made their way into our tip line over the past day or so:

USB servo controller and a Stewart Platform

[Patricio] needed a way to control a bunch of servos for his thesis project. He came up with a USB servo controller (Spanish, here’s the translation) powered by a 40-pin PIC 18F microcontroller. The board connects to the USB port of a computer and supports up to 8 servos with 8 additional digital I/Os. Why all this horsepower? It’s for a Stewart Platform [Patricio] and his partner [Natalia] built.

Continuous rotation servos

Standard servos are usually limited to a rotation angle of somewhere between 140 and 160 degrees. Sometimes you need a continuous rotation servo, and those are a little more expensive. Every servo is a continuous rotation servo if you disable a the variable resistor as [Valentin] shows us. It’s a simple, if old, hack. It’s new to someone, though.

Eight servos on a Raspi

[Mikael] made a little board to attach to the GPIO header of his Raspberry Pi and control up to 8 servos. The board is running a serial interface with a small microcontroller on board. There’s nothing in the way of schematics or code, a testament for why you should always use a good email address when sending something into the HaD tip line. It seems [Mikael] is making a proper board, and we’ll more than happily give it a full post when it’s complete.

Chorded Keyboard For Touchscreens

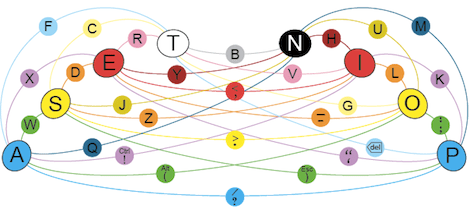
For over a hundred years, good typists didn’t ‘hunt and peck’ but instead relied on keeping their fingers on the home row. This technique relies on physical buttons, but with on-screen keyboards used on tablets and other touch screen devices touch typists have a very hard time. [Zach] is working on a new project to bring a chorded keyboard to these devices called ASETNIOP.

Instead of training a typist where to place their finger – the technique used in most other keyboard replacements, ASETNIOP trains the typist which fingers to press. For example, typing ‘H’ requires the typist to press the index and middle fingers of their right hand against the touchscreen. In addition to touchscreens, ASETNIOP can be used with projection systems, Nintendo Power Glove replicas, and extremely large touchpads that include repurposed nooks and Kindles.

If you’d like to try out ASENTNIOP, there’s a tutorial that allows you to try it out on a physical keyboard as well as one for the iPad. It’s a little weird to try out but surely no more difficult to learn than a Dvorak keyboard.

Building Fiber Optic Chandeliers

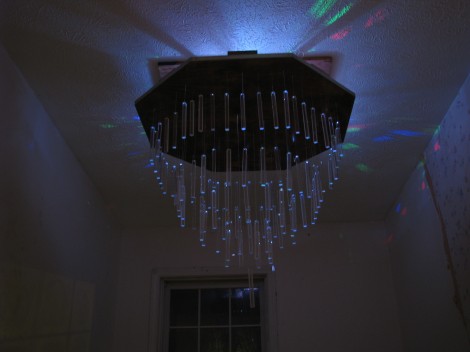
This chandelier keeps the light source hidden and uses fiber optics to illuminate the acrylic diffusers. It’s the second attempt [TheCreator] has made at building his own. Bother projects are interesting in their own way.

The first attempt used marbles as diffusers and had a much different look to it. This time around he’s using what he calls acrylic dowels. They’re not round, but square (which is why we’re not sure dowel is the right term), and he says they work better than marbles for several reasons. The marbles weren’t very heavy so they didn’t really weigh down the glass fibers to keep then straight. They were also difficult to attach to the fibers and prone to breakage.

To attach the dowels he drilled a hole in the end and epoxied a fiber optic strand in place. To direct light into the other end of the filament he built his own frustum (a pyramid with the tip cut off) of inward facing mirror. This helps to focus what is coming from the RGB LEDs in the appropriate direction so that as much light as possible makes it into the fibers.

He didn’t really give any final thoughts so we wonder if it puts out enough light for his needs. We’re sure that if it’s purely a mood piece he’s satisfied.

Building A Steam Punk Style Time And Weather Display

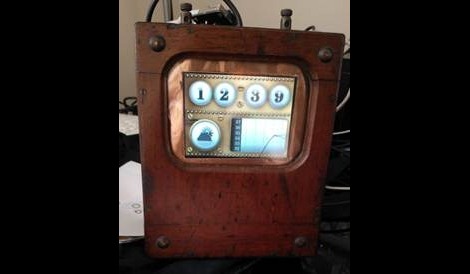
This is [Pierre Cauchois’] digital weather display. Since weather displays are ubiquitous in this day of smart phones in every pocket he went out of his way to give it a unique look. He started with a wooden voltmeter case, swapping the ancient display for a modern LCD screen.

He used Gadgeteer components for the retrofit. The images for the LCD are stored on an SD card and displayed on demand. Since the digital bezel will be the same no matter what the time or environmental conditions [Pierre] used the power of the .NET framework that drives the system. He made up an image using magenta for all of the dial openings. This way a sprite can be used just for the changing numbers, weather icon, and graphing area.

Looking at all that went into coding the project we think the Gadgeteer components are perfect for those that are well-versed in upper-level languages and don’t really want to deal with low-level microcontroller issues.

[Thanks George]

Redesigning The RC Tank

[youtube=http://www.youtube.com/watch?v=–YZHMqHzPw]

[Vincent] started building this tank (translation) with a regular hobby model: the Heng Long Tiger 1. However, after considering some goals for the project, he decided to nearly gut the tank and redesign it, basing it on the Arduino and a standard Motor Shield. The possibilities with this setup are nearly endless. In its current form, the ArduTiger detects obstacles in front of it by way of three servo-mounted infrared rangefinders. The tank’s trajectory can be adjusted automatically based on feedback from the servo positions. Two additional short-range rangefinders detect if there is ground for the tank to roll over, keeping it safe from cliffs and black holes.  [Vincent] plans on updating this beast by adding a Raspberry Pi for live video and advanced control… and maybe even adding a Geiger counter!

DIY GLOBARS For Nighttime Bike Visibility

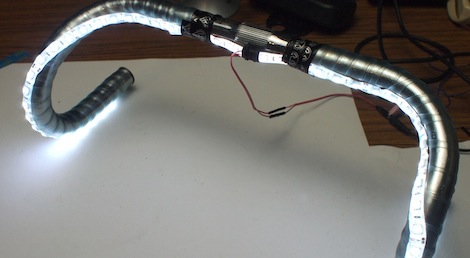
Inspired by a non-existant yet still cool illuminated bicycle handlebar project, [Becky] over at Adafruit came up with her own version of light up  handlebars. Not only is her project actually real, they’re also a pretty cool build that brings a little lightcycle ambiance to twilight bicycling.

[Becky]’s light up handlebars are inspired by the GLOBARS concept design that made the blog rounds earlier this year. Instead of custom machined aluminum tubing, [Becky] used an Adafruit LED strip neatly assembled with heat shrink tubing and waterproof tape, along with an 8 AA-cell battery holder in a fabric and velcro pouch suspended from the top tube on her bike.

After wrapping the LEDs around the handlebars, [Becky] wrapped them in clear handlebar tape she sourced from Amazon. From the video after the break, the 2 meter LED strip on [Becky]’s handlebars verge on lightcycle territory, but sourcing a 6 AA-cell battery holder over an 8-cell will bring the brightness down to a reasonable but still safe level.

You can check out [Becky]’s build video after the break.

Continue reading “DIY GLOBARS For Nighttime Bike Visibility”

Picking Handcuffs With Laser Cut Keys

At this year’s HOPE conference, German competitive lockpicker and security researcher [Ray] gave a talk about escaping high security handcuffs that are probably being used by your local police and other LEOs. He’s doing this with 3D printed and laser cut keys because, you know, security through obscurity never works.

Two years ago, [Ray] gave a talk at HOPE on 3D printing Dutch handcuff keys (you can listen to his conference as an .MP3 here). This time around, [Ray] copied the keys of Bonowi and Chubb handcuffs, very popular brands for American police. After obtaining a key from each of the two brands, [Ray] broke out the calipers and micrometer and designed his own versions that can be printed on a RepRap or Makerbot, or just laser cut from a piece of plastic; the perfect material for sneaking one through a metal detector.

The .DXF and .STL files for the handcuff keys will be available on Thingiverse shortly. We’d suggest watching this Thingiverse account (nevermind), as they have the files for [Ray]’s earlier Dutch handcuff key.