128-inch Silver Screen For Your Viewing Room

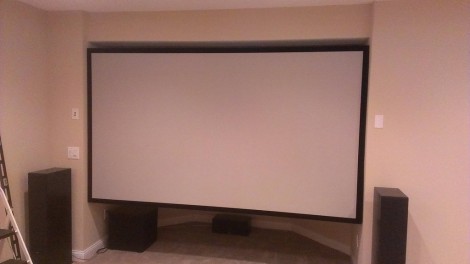
This huge projection screen fills an odd alcove in [Dodge Boy’s] screening room. He built it himself for under $200. The materials, tools, and techniques make this a possibility for anyone who wants their own projection setup.

The frame is made of pine 1×3 dimensional lumber. To keep the fabric from touching the supports in the center of the frame he added quarter-round trim to around the perimeter. From there he painted it black and went for a test-fit. The bad news is that the drywall is neither perfectly flat, nor parallel/square. He ended up taking the trim off and ripping down one side of the frame. That did the trick and he went on to stretch spandex over the whole thing. The frame hangs from a french cleat on either side of the opening. From what we can tell, the surface is just fabric and not painted as we usually see with these setups.

[Dodge Boy’s] utility room shares the back wall of the screening room. That’s where he stores the HTPC which feeds he project, with an RF remote to control it through the wall.

[via Reddit]

tft-with-arduino

Use A Nokia N82 TFT Panel With Your Arduino

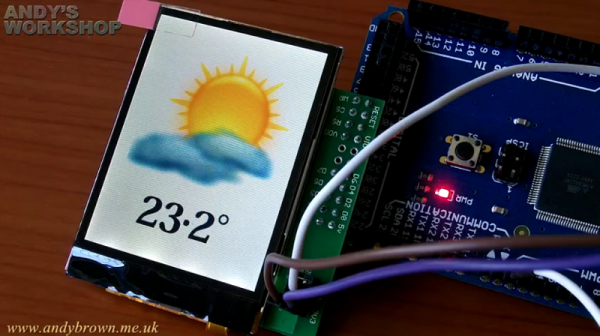
[Andy] has been hard at work reverse-engineering the Nokia N82 2.4 inch cell phone display for use with an Arduino. As pointed out in the article, this same 2.4 inch display can be found in at least seven other Nokia products, so they are readily available. The panels can be found for as low as 3 pounds (or a little less than 5 dollars) on Ebay.

The results are quite good and can be seen in the videos after the break. The first demo displays a simulated weather report, and the second displays some JPEG images. Although an Arduino Mega was used in this demonstration, a standard Arduino can be used as well. Schematics as well as a bill of materials is included in the article, however if you’d rather just buy a board, he’s selling the rest of what he’s built on a first come first served basis. No word on how many he has in stock though!
Continue reading “Use A Nokia N82 TFT Panel With Your Arduino”

Lite Brites Fade, But LED Clocks Are Forever

litebrite-clock

Ahh, the Lite Brite.

What could be more fun than pushing dozens of little plastic pegs through a piece of black paper in order to create a pixelated, though colorful image? Well, I can think of quite a few things more engaging than that, and luckily so can [Lonnie Honeycutt] over at MeanPC.

While contemplating what to build with a pile of LEDs, his daughter came into the room with her portable Lite Brite. He thought that the pegs she was using looked awfully similar to the LEDs on his desk, so he did some test fitting and was surprised to see that they fit almost perfectly.

[Lonnie] thought that the toy would make an excellent clock, and his daughter happily agreed to let Dad do some tinkering. A few hours, an Arduino, and some Charlieplexing later, he had a nice looking clock that his kids were sure to enjoy.

If you’re interested in seeing more about how constructed, be sure to check out his YouTube channel and Instructable, where he happily provides all of the build details.

Making Sure A Baby Is Still Breathing With Lasers And A Wiimote

[Gjoci] just became a father, and to make up for not having to carry a baby to term he decided to make himself useful in another way. He developed a sensor to detect a baby’s breathing, allaying the fears of nervous parents who are wondering why their child is so quiet.

Unlike similar builds and products that rely on microphones or capacitive sensors, [Gjoci]’s build uses the camera from a wiimote to triangulate points of light and detect motion.

The build started off with infrared LEDs, but the batteries were big and there is always the possibility of the baby swallowing electrical components. [Gjoci] finally hit upon the idea of using small 1mW laser diodes to project points of light. This worked beautifully, and since newborns don’t move much there’s no danger of shining a laser into a baby’s eye.

The rest of the build is just querying the camera every few milliseconds and seeing if the position of the reflections captured by the wiimote camera have changed. In two weeks of operation, [Gjoci] only had to respond to a few false alarms, and the hardware hasn’t crashed at all.

After the break are three videos [Gjoci] put up for us that show a test of the breathing detection system, a demo of the alarm, and an example of the build in full operation. A very awesome build, and we look forward to this post being used as evidence of prior art in a patent dispute a few years down the line.

Continue reading “Making Sure A Baby Is Still Breathing With Lasers And A Wiimote”

Eradicating Invasive Species With Quadcopters

That right there is Sydney Golden Wattle, a fast-growing invasive species native to Eastern Australia that has the possibility of covering 20 percent of the bushland in Western Australia by the year 2020. [John Moore], a researcher at the Department of Food and Agriculture, wants to put an end to this infestation by destroying large swaths of wattle with a quadcopter armed with weed killer.

The plan for the robotic plant assassins is simple; take aerial photographs of the bushland in Western Austraila and identify stands of individual weeds. [Moore]’s robots are then dispatched to these stands of weeds to spray them down with weed killer.

The quadcopters are armed with a camera, allowing the operator to make sure the robot is hovering directly over the invasive weeds. Considering these weeds are found in somewhat inaccessible places – and the fact that just about everything in Australia is poisonous – these robotic weeders will kill more wattle than what could be done on foot.

We couldn’t find a video of the robot in action, or a demo of the herbicide spay system of [John]’s copter. If you can find one of those, send it in and we’ll put it up.

Thanks to [Michal] for sending this in.

Toorcamp: The Tesla Gun

We discussed [Rob]’s Tesla Gun in the past. At that time, the build looked very impressive, but had not been fired yet. Fortunately, [Rob] got the device working and brought it to Toorcamp. He took the gun out every night and demoed the handheld Tesla Coil by having volunteers catch the streamers with a knife.

The gun uses a cordless drill battery for power, and a flyback transformer to generate the ~20,000 volts needed to drive the coil. The power electronics module was designed to be easy to replace, and [Rob] had extras at Toorcamp in case he burnt one up. [Rob]’s build log is very detailed, and definitely worth reading through. It explains how he cast the enclosure out of aluminium, built a custom porcelain high voltage switch, and designed the power electronics.

While this build should probably get a “do not try this at home” label, he definitely created something unique. We’re looking forward to when [Rob] shows the gun off next.

IR Remote As PC Input

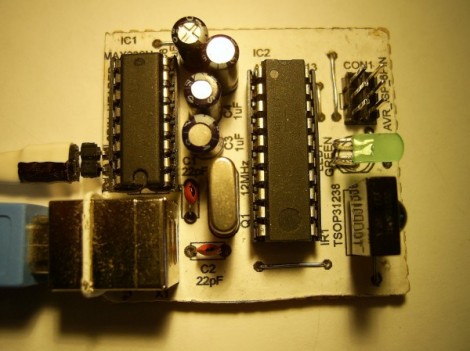
As a learning experience [GeriBoss] put together an IR remote control receiver board for his PC. His want of volume control from across the room was reason enough to undertake the project, and he got to work with a 38 kHz receiver module and Manchester encoding in the process.

The decoder portion of the project is built around an ATtiny2313 chip. The external interrupt pin (INT0) is connected to a TSOP31238. When it decodes a valid remote code it pushes a character to the RS232 chip connecting to the computer’s serial port.

We think this is a wonderful accomplishment for [GeriBoss], but we encourage him to refine the design further. You’ll notice in the image there’s a USB port on the board which is only used to provide regulated power. We know it’s possible to use V-USB with the ATtiny2313 to add USB functionality and this would be a great way to learn about it. We’d also like to mention the resistor and capacitor suggested for filtering the IR receiver module signal. We’ve included the recommended application schematic for that part after the break.

Continue reading “IR Remote As PC Input”