LCD-based QR Clock

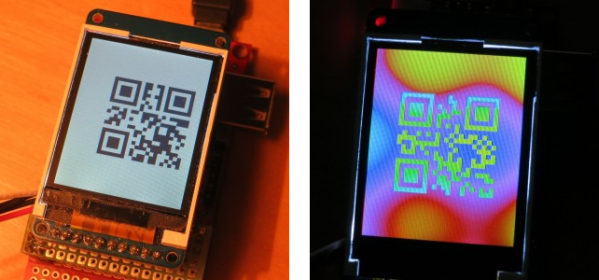
Here’s a new take on the QR clock concept that uses an LCD display. The concept comes from the work [ch00f] put into his two versions of a QR clock (both of which used LED arrays). The time of day is encoded using the Quick Response Code standard. This version generates a new code each second which encapsulates date, hour, minute, and second information. If you look at the image on the left you’ll notice the code is not centered. Take a look at the video after the break and you’ll see that’s because it’s bouncing around the LCD like a screensaver. Watch a little longer and you’ll see the psychedelic effects shown in the image on the right.

A PIC32 is driving the display. It’s connected to a DCF77 radio module which feeds the system atomic clock data. The color plasma effects are used to show when the device has locked onto the radio signal.

Continue reading “LCD-based QR Clock”

3D Printed HOG Drive

3d-printed-hog-drive

Here’s a 3D printed Hemispherical Omnidirectional Gimballed Drive system which you can make at home. That’s a mouthful which is why it is commonly referred to as a HOG drive. Never heard of one? Well you need to keep up with your Hackaday because about 20 months ago we featured this amazing robot project that uses one. The design is a tricycle orientation with the HOG drive as the only powered ‘wheel’. But it’s not really a wheel, it’s a half-sphere (a hemisphere which is not pictured above but attaches to the motor spindle) which can provide thrust in any direction depending on which way the motor is spinning a how the gimbal bracket is oriented.

Unfortunately [Dan] isn’t showing off a vehicle that is powered by the device just yet. But from what we’ve seen in the demo after the jump it is fully functional. His target project for the system is a line-following robot which we hope to post as a follow-up when he reaches that goal.

Continue reading “3D Printed HOG Drive”

Add Some Animated Bling To Your GQ Duds

geeky-tie-uses-animated-leds

This tie turned VU meter has us asking: Will anyone be able to look you in the eye during a conversation? It uses an integrated microphone and microcontroller to make a single-column display made of RGB LEDs move to ambient sound.

It shouldn’t be hard to guess that this project is another build from [Becky Stern]. She’s been on fire lately, offering up glowing football helmets and a turn-signal backpack. This uses the same family of components as the latter. A Flora board brings an Arduino to the party. It drives sixteen RGB LED pixels which are addressed using a 1-wire protocol. Sound is measured through a microphone and amplifier breakout board.

Since the hardware gets in the way of a full-windsor, the tie used for the project is a breakaway version which uses velcro. But because you need the needle and (conductive) thread to sew on the components it wouldn’t be hard to alter any tie to perform like this.

Don’t miss the high-quality video tutorial which we’ve embedded after the break.

Continue reading “Add Some Animated Bling To Your GQ Duds”

Acrylic Enclosures Use Integrated Clips To Do Away With Fasteners

acrylic-clip-lock-enclosures

Here’s a design that lets you make acrylic enclosures without using fasteners. The red outline in the diagram above is a bit hard to make out. But look closely and you’ll realize that there is very little material which has been removed to form the clip. This uses the rigidity/flexibility of the material to form a spring that will hold a couple of pieces tightly together.

In a links post last year we looked at [Patrick Fenner’s] fantastic analysis of the strength of using kerf-bending to form several sides of a case out of one piece of material. He’s used that same analytic expertise to take a look into this design. He even suggests that making the cut on the hook-side a bit deeper will help improve the resilience of the part. If you have a laser cutter on hand and want to give this a try he’s posted the plans on Thingiverse.

Interpreting Brainf*#k On An AVR

We won’t call it useless, but we will ask why [Dan] wrote a brainfuck interpreter for the AVR

It’s not generating code for the AVR; think of it more as a bootloader. To run a brainfuck program, [Dan] uploads it to the EEPROM inside his ATMega32, after which the microcontroller takes over and starts performing whatever instruction the brainfuck program tells it to do. Because the whole thing runs off the EEPROM, the code size is limited to 1022 bytes. Enough for any brainfuck program written by a human, we think.

As for why [Dan] would want an AVR to build an interpreter for a language that is nearly unreadable by humans, we honestly have no idea other than the common, ‘because it’s there’ sentiment. There are some pretty cool projects out there that use brainfuck, including this genetic algorithm software developer. Right now, though, blinkey LEDs are enough to keep us happy, so you can see a video of brainfuck doing its thing on a LED bar display after the break.

Continue reading “Interpreting Brainf*#k On An AVR”

Hacking A Radio Controlled Spy Device For Overly Attached Girlfriend.

This is the first in our series of videos meant to spread the hacking goodness far and wide on the net. As you can see, it is a pretty silly video, hopefully you enjoyed the humor.  This wouldn’t be hackaday without an appropriate writeup though!

Initially the idea was to make this as a device that my boss could deploy from his Tesla Model S. Ultimately, we missed the release of SkyFall, so the whole 007 theme seemed a little flat. However, we did just happen to have a wonderful woman in the office that agreed to be an “overly attached girlfriend”. Here’s a link to the meme for those who are unfamiliar. Even though we made her look like a crazy person, she was a great sport about it (Thanks [Stephanie]!).

The Goal was to have a radio controlled device that would send live video and audio to someone and had the ability to plant a small GPS tracker on the undercarriage of a car.

Continue reading “Hacking A Radio Controlled Spy Device For Overly Attached Girlfriend.”

Making A Violin Mold With A 3D Printer

IMG104

Some people see 3D printers as expensive and slow devices for replicating bracelets, whistles, and Yoda heads. Until the world transitions to a plastic octopus-based economy, those of us with 3D printers will have to find something useful for these tools. Bayesian Empiritheurgy out of Halifax, Nova Scotia wanted to do something useful with their 3D printer for the large-scale, distributed hackerspace competition, The Deconstruction. They ended up using their printer to make molds for a paper mache violin, and ended up being fairly successful at it.

The basic idea behind their paper mache violin was to create a plastic mold for exactly half a violin body. This block was covered in newspaper drenched in wheat paste. Once the paste was dry, the violin half was pulled off the mold and another half was created. These were stitched and glued together, resulting in a violin body.

The bridge, tailpiece, tuners, and fingerboard were 3D pprinted and held together with epoxy. The epoxy flexed a lot, so every time a string was tuned it threw out the tuning of the other three strings. In the video after the break, you can check out the paper mache and plastic violin being played. It’s not much for the eyes or ears, but everyone had fun, and the team completed the proof of concept for a fiberglass or carbon fiber violin we’d suggest they try next.

Continue reading “Making A Violin Mold With A 3D Printer”