Etch Your Own CPLD Development Board

etch-your-own-cpld-breakout

Ever wanted to make the jump from microcontrollers to logic chips? Although not technically the same thing we consider FPGA and CPLD devices to be in similar categories. Like FPGAs, Complex Programmable Logic Devices let you build hardware inside of a chip. And if you’ve got the knack for etching circuit boards you can now build your own CPLD development module. Long-time Hackaday readers will remember our own offering in this area.

Our years of microcontroller experience have taught us a mantra: if it doesn’t work it’s a hardware problem. We have a knack for wasting hours trying to figure out why our code doesn’t work. The majority of the time it’s a hardware issue. And this is why you might not want to design your own dev tools when just starting out. But one thing this guide has going for it is incremental testing. After etching and inspecting the board, it is populated in stages. There is test code available for each stage that will help verify that the hardware is working as expected.

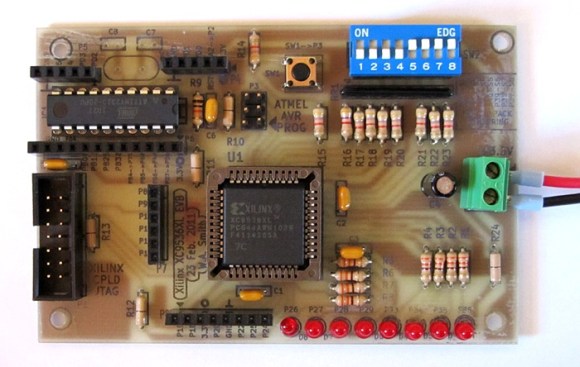
The CPLD is programmed using that 10-pin header. If you don’t have a programmer you can build your own that uses a parallel port. Included on the board is an ATtiny2313 which is a nice touch as it can simulate all kinds of different hardware to test with your VHDL code. There is also a row of LEDs, a set of DIP switches, and a few breakout headers to boot.

Blood Glucose Monitor Data Pushed To Smart Watch

image

[Don] uses a Continuous Glucose Monitor to stay on top of his diabetes. It means carrying around an expensive and fragile device which acts as the readout. He’s an active guy and doesn’t want to destroy the thing while dirt biking or kick boxing so he’s been trying to use a TI Chronos smart watch as a display alternative.

As you can see he has already made some headway. This image shows the watch displaying data from the device. Unfortunately he’s depending on a PC to interface with the CGM display, then pushing it to the watch. He may try moving to a Raspberry Pi to help make this more mobile. This way the sensitive hardware could be tucked safely in a case inside a backpack while the watch shows his current glucose levels. We’d also love to see an embedded solution that would emulate the communications the PC is using to harvest the data. If you’ve got any suggestions in this area we’re sure that [Don] would appreciate the help.

WS2811 Can Be Addressed At 800kHz Using A 8MHz Clock

ws2811-running-at-8mhz

Timing is everything and that’s why most communication protocols require a very accurate clock source. The WS2811 LED strip controllers are no different. But [Danny] figured out a way to drive them reliably with an 8MHz clock source.

The WS2811 has become one of the most popular controllers for RGB pixels and strips alike. We’ve seen several hacks used to address them, including the 16MHz AVR technique that inspired [Danny] to take on this project. He planned to use that library but the 25-day shipping time for a 16MHz crystal drove home to invent a way to use the internal oscillator instead.

The gist of the hack is that he wrote assembly code to handle pairs of binary bit values. With a code block for each of the four possible combinations in hand he had to find a way to craft the conditional jumps to preserve accurate timing. After hitting the wall trying to solve this puzzle by hand he wrote a C++ program to solve it for home. The proof is in this video which shows one chip driving multiple Larson scanners on a single strip.

Continue reading “WS2811 Can Be Addressed At 800kHz Using A 8MHz Clock”

Adding Night Vision To The Raspberry Pi Camera

After months of promises, the Raspberry Pi camera is finally heading out to hackers and makers across the world. Of course the first build with the Pi cam to grace the pages of Hackaday would be removing the IR filter, and it just so happens [Gary] and his crew at the Reading hackerspace are the first to do just that.

As [Gary] shows in his video, the process of removing the Pi cam’s IR filter is extremely fiddly.  Getting the filter out of the camera involves removing the sensor, gently cutting it open with a scalpel, and finally gluing the whole thing back together with a tiny bit of superglue. Not for the faint of heart, and certainly not for anyone without a halfway decent bench microscope.

If you’re looking for a Raspberry Pi-powered security camera, game camera, or something for an astronomy application, this is the way to make it happen. You might want to be careful when removing the IR filter; [Gary] broke one camera on their first attempt. They got it to work, though, and the picture quality looks pretty good, as seen in the videos below.

Continue reading “Adding Night Vision To The Raspberry Pi Camera”

Book Review: The Good Life Lab

the-good-life-lab

Stop whatever you’re doing and get this book. I’ve just finished reading it and I have to say that [Wendy] and [Mikey] could easily be the poster children for modern day hacking, and this book could be the manual for a life built on hacking.

When I visited [Wendy] and [Mikey] last year I was blown away.  Their little homestead was a veritable smorgasbord of hacks. Everywhere I looked, things were cobbled together, modified, repaired, and improved. There wasn’t a single piece of their lives that wasn’t somehow improved by their efforts to play an active role in their own living.

That sounds a bit cheesy I know. We all play an active role in our lives right? Sure. But what they have done is created a hacker’s homestead. My projects tend to live on my workbench, occasionally poking into my daily life, but they went were there was virtually nothing and hacked together everything they found they needed.  Their life is their workbench.

Continue reading “Book Review: The Good Life Lab”

Moostar — Fortune Telling Moose Knock-off Of Zoltar

zoltare-the-fortune-telling-moose

Meet Moostar, the fortune-telling Moose inspired by Zoltar. You remember Zoltar, the coin operated fortune-teller who made [Tom Hanks] a rich movie star? Maybe you didn’t see that flick, but [Sketchsk3tch] did and he pulled this show piece together for a company-wide conference with relative ease.

If you’re good at choosing parts for your projects it makes things a lot simpler. He started with a singing Christmas moose, a mini plasma ball to act as the crystal ball, and somehow came across a collector’s basketball case which was the perfect size for the enclosure.

The electronics also came together remarkably well. He uses a thermal printer to spit out the fortunes — which are actually security tips for employees since that’s the dcpartment he works in. The coin acceptor is a Sparkfun part and he tried two ready made solutions to make the moose talk. The first is seen below and uses pre-recorded messages played by an Arduino Wave shield. This was improved upon by using an EMIC2 text-to-speech module that really opens up the moose’s range of chatter.

Continue reading “Moostar — Fortune Telling Moose Knock-off Of Zoltar”

Hackaday Links: Sunday, May 26th, 2013

hackaday-links-chain

The warmer months cometh and it’s time to think of this year’s Burning Man. [Matt’s] already set himself up with a sound-reactive LED project he calls the Seed of Life.

Older readers, and those who really know their hobby electronic history, will know the name Heathkit. Many readers tipped us off about their triumphant return. We’re not sure what form this reincarnation will take, but you can help shape it by participating in the survey.

Dust off that MSP430 launchpad and turn it into a composite video Pong console.

Here’s a way to use your Android phone as a computer mouse.

We’re not quite sure what this is, but turn your volume down before watching the video about a modular sythesizer hack.

[Arkadiusz Spiewak] wrote in to share some of the printing success (translated) he’s had recently with the H-bot style printer we saw a while back.

Strap an Arduino and an Electric Imp to your arm (and everyone else’s) and it’ll remember everyone you meet. You know, kind of like Google Glass but with geeky arm-wear instead of geeky headgear?

And finally, [Nerick] has just finished a thermometer project using Nixie tubes (translated).