Interview With [Damien George], Creator Of The Micro Python Project

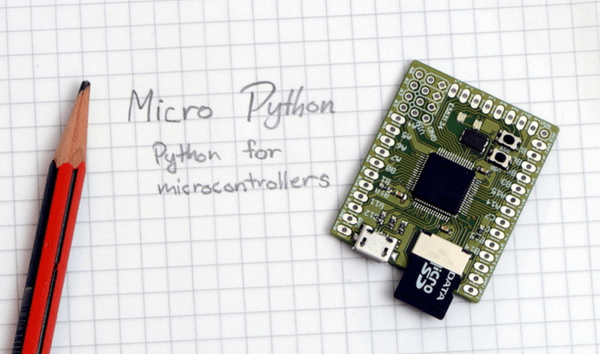
[Damien George] just created Micro Python (Kickstarter alert!), a lean and fast implementation of the Python scripting language that is optimized to run on a microcontroller. It includes a complete parser, compiler, virtual machine, runtime system, garbage collector and was written from scratch. Micro Python currently supports 32-bit ARM processors like the STM32F405 (168MHz Cortex-M4, 1MB flash, 192KB ram) shown in the picture above and will be open source once the already successful campaign finishes. Running your python program is as simple as copying your file to the platform (detected as a mass storage device) and rebooting it. The official micro python board includes a micro SD card slot, 4 LEDs, a switch, a real-time clock, an accelerometer and has plenty of I/O pins to interface many peripherals. A nice video can be found on the campaign page and an interview with the project creator is embedded after the break.

Continue reading “Interview With [Damien George], Creator Of The Micro Python Project”

A Modular Game Boy Synthesizer

Euro

Synth heads and electronic music aficionados the world over love a good rackmount synth. These days, though, synthesis tends more toward small, digital, and ‘retro’ rather than the monstrous hulking behemoths of the 60s and 70s. [gieskes] might be ahead of the curve, here, as he’s built a Game Boy module for his eurorack synthesizer.

The software running on [gieskes]’s Game Boy is the venerable Little Sound DJ (LSDJ), the last word in creating chiptunes on everyone’s favorite 8-bit handheld. As with any proper Game Boy used in chiptunes, there are a few modifications to the 1980s era hardware. [gieskes] tapped into the cartridge connector with a ‘repeat’ signal that provides slowed down, noisy signals for LSDJ. There’s also pitch control via CV, and the audio output is brought up to 10Vpp

In the video below, you can see [gieskes]’ euroboy in action with a few Doepfer synth modules. There’s also a very cool pulse generator made from an old hard drive in there, so it’s certainly worth the watch.

Continue reading “A Modular Game Boy Synthesizer”

Update: SD Card Locker Now Supports Password Protect

sdlocker2_1

[Karl Lunt] has updated his Secure Digital Card locker to support password based locking. [Karl’s] original design only supported write locking via the TMP_WRITE_PROTECT  bit. The new design gives the user an option: TMP_WRITE_PROTECT, or password protection. [Karl] goes into further detail this time around about the bit fields used with CMD42, and how they are set. The passwords in this case are up to 16 bytes. The bytes don’t necessarily have to be printable characters – any binary value can be used. Unfortunately, [Karl’s] locker doesn’t utilize a user interface beyond the buttons, so any password must be “baked in” to the SD Card locker firmware. We would love to see the option of even a basic serial interface for entering a password (most likely in hex).

[Karl] tried his device out with several different cards, and several computers. While not an exhaustive test, he did find that the computers always behaved the same: A locked SD card would not show up. In the case of windows, no beep, no drive, nothing. He goes into the security possibilities of using password locking: Financial data could be stored and physically transferred via SD or microSD, with the password sent separately (say in an email or SMS). Any unenlightened data thief attempting to use the card would think they have a broken device on their hands.

We don’t know how secure the password lock feature is – brute forcing a variable length 16 byte binary password would take some time. It all comes down to how quickly each password attempt takes. Some cursory web searching didn’t bring up any information about successful SD card password cracking. Sounds like a challenge for our readers!

Windows CE On A Raspberry Pi

From all the BSDs and Linuxes to extraordinarily odd operating systems, it seems just about every OS has been ported to the Raspberry Pi. All except Windows, that is, but a few people are working on it.

This build comes to us from [ideeman] who wanted to show off his Raspi running Windows Compact Embedded. It technically works, but there are still a few problems. In his own words:

Unfortunately, as it is now, I can’t really control it through anything else than via the kernel transport layer (through serial, directly to visual studio, and I still get lots of checksum errors, must me from the cheapo USB<==>TTL 3.3V adapter I’m using). The original developer (dboling) is still struggling with native USB drivers, but as you can see, he already got a (unaccelerated) running display driver.

If you’re interested, I can send you the compiled kernel image, but I don’t think you’ll do really much without the serial debugging provided through Visual Studio 2008 (+Platform builder 7.0)… I’m not sure it can be legally released to the public though.

While running Windows Compact Embedded isn’t as cool as running Windows RT on a Raspi, the latter will never happen. Windows RT requires 1 GB of RAM and a 1 GHz ARM v7 processor, neither of which the Pi has. Still, it’s a very impressive hack and with a few more devs on board, [dboling] and [ideeman] might end up with a truly functional system.

Below are pics of [ideeman]’s Raspi running WinCE. For [ideeman], feel free to link to a torrent in the comments.

Continue reading “Windows CE On A Raspberry Pi”

Robot Painter Works Like A Photobooth

robot-painter-photo-booth

[Ben], [David], [Drew], [Kayla], and [Peter] built a robotic artist as their senior design project. This mashes up a bunch of different project ideas, but the thing we like the most about it is that it works much like a photo booth that produces a painting. A Raspberry Pi uses a webcam to snap the picture, converts the image to three colors (plus the white background of the canvas) and sets the robot in motion. The team laments that initial testing of the completed project (seen in the clip below) worked out quite well but took hours to produce the painting. What do they expect? It’s art!

This is quite a bit different from the WaterColorBot (whose manufacturing process we just looked in on yesterday). WaterColorBot uses a flat canvas and a gantry system. This offering, which is called PICASSAU, uses an upright canvas with the paintbrush mounted in much the same way as a plotter robot. The biggest difference is that there is the ability to pivot the paint brush in order to pick up more paint, and for cleaning in between color changes.

Continue reading “Robot Painter Works Like A Photobooth”

DIY Home Control Using A SSRelay

ssrelay

[Ben Jones] just started a new site called Maker-Guide, where he makes some very informative and well produced DIY videos on anything from homemade photography hacks, to controlling an outlet using a solid-state relay.

It’s not the first time we’ve seen a relay controlled outlet, or this one… but it’s certainly one of the cleanest jobs we’ve seen. In his video guide, [Ben] shows us exactly how to fit a standard solid state relay into a regular outlet box, and easily control it with an Arduino Uno.

It even looks like there might be enough space inside the box for a small wireless setup — maybe using a Trinket even? What about using Power-Line networking to control each box via LAN? Could be the easiest home automation implementation yet! Well, aside from certain NEC (national electrical code) concerns of running high and low voltage in the same box…

Anyway if that wet your whistle, check out the great video guides after the break!

Continue reading “DIY Home Control Using A SSRelay”

Simple Dremel TRIAC Hack Repair

Dremel Repair

It’s a wonderful thing to see a clever hack repair instead of disposing of a product. The best repair approach is finding exact replacement components, but sometimes exact components can’t be sourced or cross-referenced. Other times the product isn’t worth the shipping cost for replacement parts or you just don’t have time to wait for parts. That’s when you need to really know how something works electronically so you can source suitable replacement components from your junk bin to complete the repair. This is exactly what [Daniel Jose Viana] did when his 110 volt Dremel tool popped its TRIAC after he plugged it into a 220 volt outlet.

[Daniel] knew how the TRIAC functioned in the circuit and also knew that a standard TRIAC of sufficient specifications could be used as a replacement even if it didn’t have the correct form factor to fit the PCB layout. For [Daniel’s] tool repair he had to think outside the box enough to realize he could use some jumper wires and snuggle a larger TIC206E TRIAC that wasn’t meant for the device but still applicable into the housing where there was enough free space. A little shrink-wrap and all was good again. Sure the fix was simple, but let’s not trivialize the knowledge he needed for this repair.

And if you’re wondering if it worked, he notes that he’s been using this tool for three years since the repair. We thank [Daniel] for sharing this tip and allowing us to add this to our tool belt of Dremel repair tricks.