Retrotechtacular: Understanding A Voltage Doubler

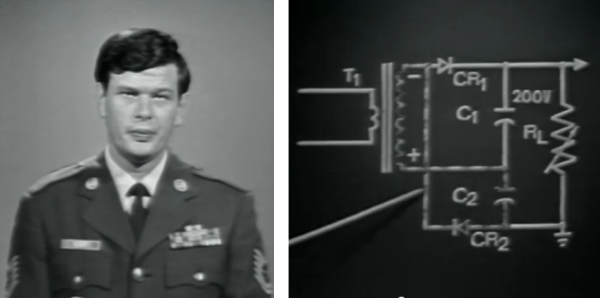
This very stern looking gentleman is about to explain how voltage doubles work in a plodding, yet satisfyingly thorough manner.

We’re not certain when this US Air Training Command video was produced. Obviously it was used to train servicemen who were responsible for keeping electronics running during war time. We’re glad for that, as they really found just the right balance to present a concept that required some knowledge, but is approachable for even the most basic of new electronics hackers.

The demonstration board shown on the right is the voltage circuit highlighted in the lesson. Here the pointing stick is being used to trace out the circuit function during one phase of the input transformer. The capacitor/diode pairs rectify the voltage, with the capacitors discharging in parallel series to double the output voltage. But how does the variable load (RL) affect the output? This is demonstrated under several different conditions using an oscilloscope to illustrate the change.

The discussion of how the diodes work reminded us of a modern tutorial we just ran across this weekend. It’s a bit bizarre, but explains the PN junction in a different way than we’re accustomed to. In this case you will already need to be familiar with how semiconductors work to understand the presentation.

Both clips can be found below the jump.

Continue reading “Retrotechtacular: Understanding A Voltage Doubler”

USB Adapter For An Old VT100 Keyboard

VT100

Ah, the VT100, the first dumb terminal that was controlled with a microprocessor. This ancient beast from the late 70s is quite unlike the terminals you’d find from even five years after its vintage – the keyboard connects via a TRS quarter-inch jack – the electronic and code design of this terminal is a bit weird. [Seth] was up to the challenge of making this mechanical keyboard work as a standard USB device, so he created his own USB adapter.

On the little quarter-inch to USB adapter, [Seth] included an HD 6402 UART to talk to the keyboard, along with a Teensy dev board and a few bits of circuits stolen from DEC engineers. The protocol between the keyboard and terminal is a little weird – first the terminal sets a bit in a status word, then the keyboard scans all the key rows and columns in sequence before telling the terminal it’s done. Yes, this gives the VT100 full n-key rollover, but it’s just weird compared to even an IBM Model M keyboard that’s just a few years younger.

[Seth] finally completed his circuit and wired it up on a perfboard. Everything works just as it should, although a little key remapping was done to keep this keyboard adapter useful for Mac and Windows computers. It’s a wonderful bit of kit, and any insight we can get into the old DEC engineers is a wonderful read in any event.

Vidias below.

Continue reading “USB Adapter For An Old VT100 Keyboard”

Just Swipe Your Card And Enter The Pin… What Could Go Wrong?

We do hope this project makes you shiver.

“Financial risks” is an audiovisual installation that reacts when you swipe your credit card and prints an odd looking receipt if you type in your pin-code. Even though the website contains few technical details (read none) about the build, we chose to feature the project as we find his intent interesting:

‘Financial Risks’ installation is a project designed to present an ironical viewpoint on encoded wallets, as a data input interface invites to overcome fear of impossibility to control spread of confidential information for the sake of curiosity of interaction with an object of art.

The piece consists of 6 bank card readers, a hardware system of sound and video synthesis, a keyboard for pin code entering, a 2-channel sound system and a cash register printer configured to print images. Up to 6 cards simultaneously may be used for playing.

We do hope that nothing is stored in the platform’s memory… but is the installation monitored?

Raspi Bitcoin Miner May Just Pay For Itself Eventually

We’re sure a lot of people out there have a Raspberry Pi or two lying around waiting for a project to come to mind.  [Dave] has an interesting solution to this orphaned hardware – use it to mine Bitcoins and perhaps put a few extra bucks in your pocket at the end of the year.

[Dave] is using a Raspberry Pi, powered USB hub, and an ASICMiner Block Erupter to do Bitcoin mining at 330 Megahashes per second. There are a few ancillary items such as a case and USB fan, but if you already have a Raspberry Pi, you’re only looking at a $50 USD investment to have a dedicated Bitcoin miner.

According to this Bitcoin mining profitability calculator, with a $50 investment that can mine at 330 MH/s, you’re looking at a hardware break even point of about 120 days. You could cut that down to just a few months if you overclock your ASICMiner, but it’s still relatively late in the game for amateur Bitcoin miners to make a substantial amount of money. Think of Bitcoin mining as more of hobby, and you’ll hopefully be more realistic about your goals.

The BatBox: Portable Power, Polished And Professional. Plus Smoke!

batBox

About the size of a shoebox and stuffed with a compact battery/inverter combo, the BatBox packs a mean wallop at 480Wh. What else was [Bill Porter] supposed to do with his free time? He’s already mailed out electronic wedding invitations and built custom LED centerpieces for the reception. He and his wife [Mara] then made an appearance in a Sunday roundup tying the knot by soldering a circuit together. Surely the LED Tetris Tie would have been in the ceremony had it existed. This time, though, [Bill’s] scrounged up some leftover electronics to put a realistic spin on a Minecraft favorite: the BatBox.

A pair of 18V high energy density batteries connect up to a 12V regulator, stepping them down to drive a 110VAC inverter. The BatBox also supplies 5V USB and 12VDC output for portable devices. Unfortunately, [Bill]’s first inverter turned out to be a low-quality, voltage-spiking traitor; it managed to let the smoke out of his fish tank’s LED bar by roasting the power supply. Undeterred, [Bill] pressed on with a new, higher-quality inverter that sits on an acrylic shelf above the batteries. OpenBeam aluminum extrusion seals up the remainder of the enclosure, completing the BatBox with a frame that looks both appealing and durable.

Swapping The Sensor In A DSLR

OLYMPUS DIGITAL CAMERA

To take a color image, modern digicams have something called a Bayer pattern – small red green and blue filters, one color for each pixel – that drastically reduce the resolution if all you’re doing is taking black and white pictures. [Lasse] is an astrophotographer, and doesn’t exactly need color pictures, so he decided to swap the color sensor in his camera with a monochrome CCD.

Most DSLRs have CCD sensors on strange surface mount packages or put everything on flex PCBs. [Lasse]’s Olympus E-500, though, features an 8 Megapixel CCD on a ceramic DIP that is actually fairly easy to remove given the right tools and just a little bit of mechanical encouragement.

After putting in a new monochrome CCD, [Lasse] had a much more sensitive sensor in his camera, and processing the RAW files off the camera gives him a great improvement for his astrophotography.

This isn’t [Lasse]’s first adventure in tearing apart DSLRs for astrophotography. Earlier, he uncovered the secrets of the Four Thirds lens format with a logic analyzer, making his Olympus camera a wonderful tool for looking into the heavens.

Galaxy S4 Inductive Charging Hack Keeps Everything Inside The Case

We’ve seen this hack a bunch of times, but this does a great job of internalizing all of the phone-side inductive charging components.

It uses the Palm Pixi wireless charging hardware which seems to be the most popular system out there. We’ve already seen that you can add this to any phone that uses USB for charging. But we don’t like the idea of opening the phone to solder connections to the USB header. We also don’t want a USB plug sticking out the bottom of the phone all the time.

This hack satisfies both issues, and it’s actually thanks to the manufacturer. The Samsung Galaxy S4 just happens to have two contacts available inside the removable back plate which are designed for Samsung’s own inductive charging hardware. Contact with the Palm charging hardware is made by pressing copper foil into place. Mating foil traces on the inside of the back cover patch this into the Touchstone receiver hardware which is a direct transplant from a Palm case.

This is touted as a solution that costs under $30. That beats the current price of a genuine Samsung inductive charging kit by a wide margin.

Continue reading “Galaxy S4 Inductive Charging Hack Keeps Everything Inside The Case”