Laminated Wooden Case Brings A Dropped Coffee Grinder Back From The Junk Heap

coffee-grinder-fix

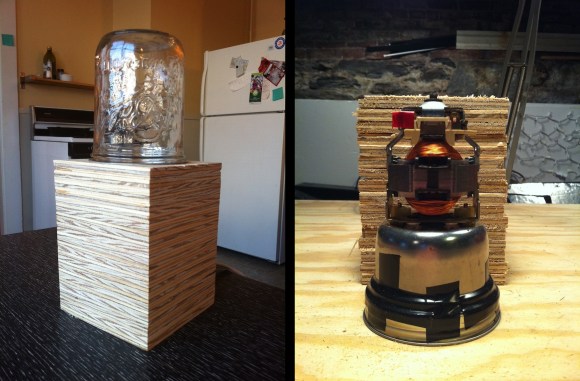
Instead of giving it up for dead, [Suprise Pink Mist] fabricated a replacement case for the motor and blade of his broken coffee grinder. The original enclosure was made of plastic, which didn’t survive being dropped. There isn’t an image of what those plastic parts looked like, but we have to think they were nowhere near as neat as the replacement.

The first step was to cut a set of plywood discs to the approximate outside dimensions. Since the base of the motor has several different diameters each disc had a void cut out of its center to match. The image to the right shows the motor sitting upside down next to the stacked plywood. The black electrical tape seals around the mason jar ring which was a perfect friction fit with the original bowl of the grinder. Once everything was glued together the outside edges were flattened on a belt sander and the mason jar was screwed in place to house the beans during grinding.

[via Reddit]

Award Clock Put To Good Use As A Bench Meter

award-clock-turned-voltage-meter

The motivation industry turns out these type of award trinkets by the millions. Here’s a way to actually put the thing to use. Instead of displaying time, the clock dial serves as the readout of a voltage meter.

When we first saw this post we assumed that the hack used some type of coil injection to drive the hands. But it turns out that this is mechanically driven. The image above shows the stepper motor which is mounted behind the clock. Its drive shaft is coupled with the adjustment knob on the back of the clock. The precision of the motor lets the PICAXE set the clock dial based on the number of motor steps. The hour hand shows the tens value with the minutes serving as ones (base 10, not base 60). This means the top measurable voltage is 12V — when the hour hand is at 12 the measurement is 0 volts plus tenths of a volt from the minute hand. With the dial taken care of the rest of the project focuses on measuring the voltage using the ADC, which has an upper limit of just 5V. This is overcome with a simple voltage divider.

After the break you can see the accuracy of the rig as it performs measurements next to a digital voltmeter.

Continue reading “Award Clock Put To Good Use As A Bench Meter”

Building A Tool To Bend Small Metal Tubes

tube

[Joel] is setting up a really nice workshop. Included in his list of machinery are the staples of any workshop; a lathe, miter saw, containers full of organized screws, and a manual mill converted to a CNC machine. [Joel] wanted an oiling system for his mill, and like any good maker decided to fabricate his own. This required bending very small diameter brass tubes, something doable by hand (or without sand, at least). He decided to solve this problem with a DIY tube bending tool that allows him to bend tiny brass tubing without the walls collapsing.

[Joel] broke out his lathe and machined two brass rollers with a groove to hold his 3/16″ tubing. One of these brass rollers is attached to a handle, while the other is attached to a block that gets clamped into [Joel]’s bench vise. After threading some tubing through the rollers, [Joel] is able to bend it precisely with only a tiny bit of collapsing on small-radius bends.

Tired Of Playing The MacBook? Play The Raspberry Pi!

pithingy

Hit up any club, party, or get together where musicians are present and you’ll probably find a DJ booth stacked to the gills with faders, various MIDI devices, and a MacBook. However abundant an OS X-based DJ platform is, we haven’t heard hide nor hare of a Raspberry Pi being used as a sequencer, MIDI device, or MaxMSP box.

[James] over at Illuminated Sound put together a great tutorial for making all those cool electronic music devices play nice with a Raspberry Pi. He used a Novation Launchpad, an 8×8 MIDI controller that can act as faders, a keyboard, or even a functional equivalent to the pads on an MPC.

Hardware is nothing without software, so [James] used Puredata and libusb to turn the MIDI data into notes and audio effects.

[James] added a download that includes the Launchpad driver and a Puredata sketch to test everything out. You can see how it all fits together in the video after the break.

Continue reading “Tired Of Playing The MacBook? Play The Raspberry Pi!”

Plastic Sword Detects WiFi-enabled Orcs

sword

For a few years now, [Jomegat] has been thinking about Sting, the sword wielded by [Bilbo Baggins] and later [Frodo] in The Hobbit and The Lord of the Rings. Sting glows blue whenever an orc is near. Assuming the Elvish magic created by Tolkien is in reality highly advanced Elvish technology, [Jomegat] figured out a way to make his plastic Sting detect WiFi-enabled orcs.

Since The Hobbit was released, toy stores have been flooded with related merchandise that included a wonderful toy version of everyone’s favorite orc killing weapon. The only problem was how to add orc sensors to this plastic Sting. [Jomegat] assumed all orcs carry a cell phone, and being the low creatures they are, would always have their WiFi turned on. [Jomegat] found a very inexpensive WiFi detector key chain that would sense these phone-carrying orcs and light up to alert our warrior to imminent danger.

After acquiring the materials crafted from Elvish magic technology, [Jomegat] opened up the plastic hilt of Sting and installed the WiFi detector. Now, whenever Sting senses the preferred wireless connection of the orc, the blade glows a bright blue.

[Jomegat] was eaten by a grue shortly after completing this project.

Flatbed Scanner Eliminates The Perils Of Macro Photography

IMG_7728

If you have ever played around with macro photography, you’ll know how hard it is to get a focused image of something that isn’t two-dimensional. For virtually every 3D object, you’ll have to deal with the depth of field – the small region where things are actually in focus. [David] came up with a neat homebrew solution for making sure everything in his macro photos is in focus using a discarded flatbed scanner and a Raspberry Pi.

[David]’s technique relies on focus stacking. Basically, [David] takes dozens of images of the same object, moving the camera closer by a fraction of an inch before snapping each frame. These pictures are stitched together with CombineZ, a piece of software used for extending the depth of field in images.

The hardware part of the build is a Raspberry Pi hooked up to a stepper motor driver and the shutter button of [David]’s camera. By attaching his camera to the carriage of a flatbed scanner, [David] can inch his camera ever closer to his object of study while grabbing the images for CombineZ.

The results are impressive, and would be nearly impossible to replicate any other way without tens of thousands of dollars in camera equipment.

Raspberry Pi And R

R

[Stephen] picked up a Raspberry Pi to do a little hardware hacking and add a blinking LED to the many feathers in his software development hat. He picked up an analog to digital converter and a temperature sensor that would serve him well in a few projects he wanted to put together, including a weather station and a small Pi-controlled home brewing setup. He ended up not liking Python, and didn’t like the C-ness of wiringPi. He’s a scientist, so he’s most comfortable with R and Matlab. Of course, playing around with a R and a Raspberry Pi means replicating his sensor-reading code in R.

[Stephen] put together a neat little package that will allow him to read his sensors over an SPI bus with his Raspberry Pi. Yes, this functionality can easily be duplicated with Python, but if you’re looking to generate beautiful graphs, or just do a whole lot of statistics on something, R is the tool you need.

It’s a cool project, even if it is only measuring the temperature. Using R for the nerd cred isn’t bad, either.