Scope Noob: Bridge Rectifier

Welcome back to this week’s installment of Scope Noob where I’m sharing my experiences learning to use my first oscilloscope. Last week I started out measuring mains frequency using an AC-AC wall wart adapter. Homework, for those following along, was to build a bridge rectifier and probe the signals from it. Let’s take a look.

Continue reading “Scope Noob: Bridge Rectifier”

Fixing An NES For Good

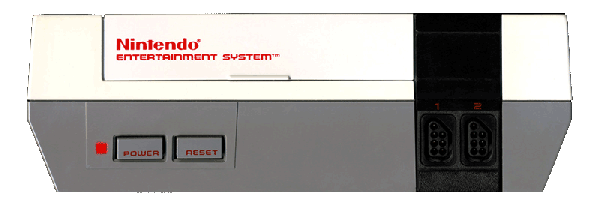
Sometime in the late 80s, the vast collective consciousness of 8-year-olds discovered a Nintendo Entertainment System could be fixed merely by blowing on the cartridge connector. No one knows how this was independently discovered, no one knows the original discoverer, but one fact remains true: dirty pins probably weren’t the problem.

The problem with a NES that just won’t read a cartridge is the ZIF socket inside the console. Pins get bent, and that spring-loaded, VCR-like front loader assembly is the main point of failure of these consoles, even 30 years later. You can get replacement ZIF sockets for a few bucks, and replace the old one using only a screwdriver, but this only delays the inevitable. That ZIF socket will fail again a few years down the line. Finally, there is a solution.

The Blinking Light Win, as this project is called, replaces the ZIF connector with two card-edge slots. One slot connects to the NES main board, the other to the cartridge connector. There’s a plastic adapter that replaces the spring-loaded push down mechanism created for the original ZIF connector, and installation is exactly as easy as installing a reproduction NES ZIF connector.

If you’re wondering why consoles like the SNES, Genesis, and even the top-loader NES never had problems that required blowing into the cartridge connector, it’s because the mere insertion of the cartridge into the slot performed a scrubbing action against the pins. Since the ZIF socket in the O.G. NES didn’t have this, it was prone to failure. Replacing the ZIF with a true card-edge slot does away with all the problems of dirty contacts, and now turns the NES into something that’s at least as reliable as other cartridge-based consoles.

Popular Electronics Magazine Archive Online

They began publishing Popular Electronics magazine in 1954, and it soon became one of the best-selling DIY electronics magazines. And now you can relive those bygone days of yore by browsing through this archive of PDFs of all back issues from 1954 to 1982.

Reading back through the magazine’s history gives you a good feel for the technological state of the art, at least as far as the DIYer is concerned. In the 1950s and 1960s (and onwards) radio is a big deal. By the 1970s, hi-fi equipment is hot and you get an inkling for the dawn of the digital computer age. Indeed, the archive ends in 1982 when the magazine changed its name to Computers and Electronics magazine.

It’s fun to see how much has changed, but there’s a bunch of useful material in there as well. In particular, each issue has a couple ultra-low-parts-count circuit designs that could certainly find a place in a modern project. For example, a “Touch-Controlled Solid State Switch” in July 1982 (PDF), using a hex inverter chip (CD4049) and a small handful of passive components.

But it’s the historical content that we find most interesting. For instance there is a nice article on the state of the art in computer memory (“The Electronic Mind — How it Remembers”) in August 1956 (PDF).

Have a good time digging through the archives, and if you find something you really like, let us know in the comments.

Extremely Detailed FMCW Radar Build

A lot of hackers take the “learn by doing” approach: take something apart, figure out how it works, and re-purpose all of the parts. [Henrik], however, has taken the opposite approach. After “some” RF design courses, he decided that he had learned enough to build his own frequency-modulated continuous wave radar system. From the level of detail on this project, we’d say that he’s learned an incredible amount.

[Henrik] was looking to keep costs down and chose to run his radar in the 6 GHz neighborhood. This puts it right in a frequency spectrum (at least in his area) where radar and WiFi overlap each other. This means cheap and readily available parts (antennas etc) and a legal spectrum in which to operate them. His design also includes frequency modulation, which means that it will be able to determine an object’s distance as well as its speed.

There are many other design considerations for a radar system that don’t enter into a normal project. For example, the PCB must have precisely controlled trace widths so that the impedance will exactly match the design. In a DC or low-frequency AC system this isn’t as important as it is in a high-frequency system like this. There is a fascinating amount of information about this impressive project on [Henrik]’s project page if you’re looking to learn a little more about radio or radar.

Too daunting for you? Check out this post on how to take on your first radar project.

Kentucky-Fried Induction Furnace

[John] and [Matthew] built an induction-heater based furnace and used it to make tasty molten aluminum cupcakes in the kitchen. Why induction heating? Because it’s energy efficient and doesn’t make smoke like a fuel-based furnace. Why melt aluminum in the kitchen? We’re guessing they did it just because they could. And of course a video, below the break, documents their first pour.

Now don’t be mislead by the partly low-tech approach being taken here. Despite being cast in a large KFC bucket, the mini-foundry is well put together, and the writeup of exactly how it was built is appreciated. The DIY induction heater is also serious business, and it’s being monitored for temperature and airflow across the case’s heatsinks. This is a darn good thing, because the combination of high voltage and high heat demands a bit of respect.

Anyway, we spent quite a while digging through [John]’s website. There’s a lot of good information to be had if you’re interested in induction heaters. Nonetheless, we’ll be doing our metal casting in the back yard.

Continue reading “Kentucky-Fried Induction Furnace”

Trinket Everyday Carry Contest Drawing #1 Results

We just had our first drawing for the Trinket Everyday Carry Contest. Thanks to a little help from random.org, the winner is [Korishev] with his project Trinket Timer!

korishev-trinket-timer[Korishev] finds that family life calls for a lot of timed events, from how long the kids spend on their homework to keeping the peace by sharing toys. The plan is to build at least a one timer for each child that they will be able to carry around and use as needed. We hope he gets them in on the build to help sow the seeds of hardware development at a young age.

trinket-prize-blink1As the winner of the first drawing [Korishev] will receive this beautiful BLINK(1) MK2 from The Hackaday Store. The USB dongle houses a programmable RGB LED. We wonder if this will also be applied as an additional timer for the household?

If you didn’t win this week, don’t worry, there are still four more chances to win a random drawing! Our next drawing will be on 12/9/2014 at 9pm EST with the Cordwood Puzzle as a prize. To be eligible you need to submit your project as an official entry and publish at least one project log during the week.

The deadline for the main contest is January 2, 2014! There are just over 40 entries right now, and the top 50 will receive custom t-shirts. Of course the three top prizes are the real juicy ones. Let’s get those pocketable projects going!

A Wooden LED Matrix Coffee Table

[johannes] writes in with a pretty impressive LED table he built. The table is based around WS2801 serially addressable LEDs which are controlled by a Raspberry Pi. The Pi serves up a node.js-driven web interface developed by [Andrew Munsell] for a room lighting setup. The web interface controls the pattern shown on the display and the animation speed.

[johannes] built a wooden coffee table around the LED matrix, which includes a matte glass top to help diffuse the lighting. An outlet to plug in a laptop and two USB charging ports are panel-mounted on the side of the enclosure, which are a nice touch. The power supply for the LEDs is also inside the enclosure, eliminating the need for an external power brick.

While [johannes] hasn’t written any software of his own yet, he plans on adding music synchronization and visualizations for weather and other data. Check out the video after the break to see the table in action.

Continue reading “A Wooden LED Matrix Coffee Table”