Bringing A Legacy Pager Network Back To Life

[Jelmer] recently found his old pager in the middle of a move, and decided to fire it up to relive his fond memories of receiving a page. He soon discovered that the pager’s number was no longer active and the pager’s network was completely shut down. To bring his pager back to life, [Jelmer] built his own OpenWRT-based pager base station that emulates the POCSAG RF pager protocol.

[Jelmer] opened up his pager and started probing signals to determine what protocol the pager used. Soon he found the RF receiver and decoder IC which implements the POCSAG pager protocol. [Jelmer] began going through the sparse POCSAG documentation and assembled enough information to implement the protocol himself.

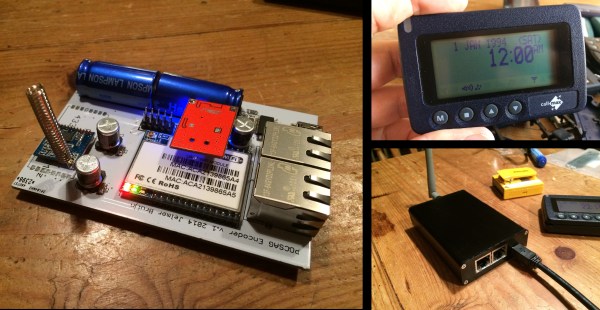
[Jelmer] used a HLK-RM04 WiFi router module for the brains of his build, which talks to an ATMega that controls a SI4432 RF transceiver. The router runs OpenWRT and generates POCSAG control signals that are transmitted by the SI4432 IC. [Jelmer] successfully used this setup to send control signals to several pagers he had on hand, and plans on using the setup to send customizable alerts in the future. [Jelmer] does note that operating this device may be illegal in many countries, so as always, check local frequency allocations and laws before tackling this project. Check out the video after the break where a pager is initialized by [Jelmer]’s transmitter.

Continue reading “Bringing A Legacy Pager Network Back To Life”

Z80, CP/M, And FAT File Formats

[Gary Kildall] and CP/M are the great ‘also ran’ of the computing world; CP/M could run on thousands of different 1980s computers, and [Gary] saw a few million in revenue each year thanks to CP/M’s popularity. Microsoft, DOS, and circumstances have relegated [Kildall] and CP/M to a rather long footnote in the history of microcomputers, but that doesn’t mean CP/M is completely dead yet. [Marcelo] wrote a Z80 emulator running CP/M inside an Arduino Due, and he did it in such a way that it’s actually convenient and useful to use.

Instead of using CP/M disk images, [Marcelo]’s emulator emulates CP/M disk drives on top of a regular FAT file system. Drives are mapped to folders in the FAT file system, so a folder named ‘A’ will show up as the A: disk in CP/M. Drives up to P: are supported, the maximum number of drives available under CP/M. The BIOS resides in the root directory of the SD card, and so far Microsoft Basic, Turbo Pascal, UCD Micromumps, and Wordstar work just fine.

The Arduino project was built upon one of [Marcelo]’s earlier projects that put the CP/M emulator on Windows. The version for the Due works exactly how you think it would, with a serial connection and terminal emulator providing the IO, and the huge amount of processing power and RAM available on the Due doing all the heavy lifting.

Reading Power Use Data With A Webcam And Python

As any hacker will attest to, whenever an important tool is missing, you might as well just build a new one! That’s the position that [Matt] found himself in when he was attempting to measure the power consumption at his parents’ house. He left the transmitter for the power meter at home, and so the logical thing to do was to set up a webcam and a python script to monitor his dad’s power meter instead of going back to get his.

The power meter that he had handy was a GEO Minim Electricity Monitor. He found it very difficult to extract the data directly from this particular meter, so instead of digging into any of the communications protocols int he meter, he set up a webcam in a box with an LED and monitored it with a specially-written Python script. The script is able to see the particulars of the meter, and then reports back to the computer with all of the relevant data. [Matt] has put this code up on his project site for anyone to use.

This is a great workaround that doesn’t involve delving too deep into the inner workings of the meter in question. You could always build your own power monitoring system though, if that’s more of your style!

Bike Rim Lighting Lets The Night Crowd Know When You’re Rollin’

There comes a wonderful “MacGyver moment” in many hackers’ lives when we find ourselves with just the right microcosm of scrap parts to build something awesome. That’s exactly what [dragonator] did with his gifted tech box from Instructables. He’s combined RGB LEDs, a Trinket, and a hall effect sensor to add a semicircular rainbow pattern to his night ride while he rides it.

The theory behind the hack is well-known: given the time between pings from a hall-effect sensor responding to the magnet on a bike wheel, an embedded system can estimate the wheel rpm and predict the time to display a particular color on the LEDs. [dragonator] uses the known wheel speed to determine the LED pattern currently on display: either a slow breathing pulse to a half-circle rainbow that displays on the lower bike rim. He drops in the needed equations and required components to follow his trail in a well-documented instructable.

Persistence of Vision (POV) is a nice extension from blinking your first (or first hundred) LED(s). It’s just enough math to get the casual onlooker to cry “magic” and just enough embedded electronics to get those seasoned double-Es to nod their heads. If you’re new to the POV crowd, [dragonator’s] Instructable may be a great start.

Continue reading “Bike Rim Lighting Lets The Night Crowd Know When You’re Rollin’”

Ultimate Oscilloscope Hack – Quake In Realtime

[Pekka] set himself up with quite the challenge – use an oscilloscope screen to display Quake in realtime – could it even be done? Old analog scope screens are just monochromatic CRTs but they are designed to draw waveforms, not render graphics.

Over the years Hackaday has tracked the evolution of scope-as-display hacks: Pong, Tetris, vector display and pre-rendered videos. Nothing that pushed boundaries quite like this.

[Pekka]’s solution starts off the same as many others, put the scope in X-Y mode and splice up your headphone cable – easy. He then had to figure out some way to create an audio signal that corresponded to the desire image. The famous “Youscope” example demos this, but that demo is pre-rendered. [Pekka] wanted to play Quake in realtime on the scope itself, not just watch a recording.

With only so much bandwidth available using a soundcard, [Pekka] figured he could draw a maximum of about a thousand lines on screen at a time. The first headache was that all of his audio cards had low-pass filters on them. No way around it, he adjusted his ceiling accordingly. ASIO and PortAudio were his tools of choice to create the audio on the fly from a queue of XY lines given.

To tell his audio engine what lines to draw, he solicited Darkplaces – an open source Quake rendering engine – and had it strip polygons down to the bare minimum. Then he had to whip out the digital hedge trimmers and continue pruning. This writeup really cannot do justice to all the ingenious tricks used to shove the most useful data possible through a headphone jack. If this kind of thing interests you at all, do yourself a favor and check out his well-illustrated project log.

In the end [Pekka] was not entirely happy with the results. The result is playable, but only just barely. The laptop struggles to keep it simple enough, the soundcard struggles to add enough detail and the scope struggles to display it all quickly enough. At the very least it sets the bar extraordinarily high for anyone looking to one-up him using this method. There is only so much water that can be squeezed from a rock.

See the video below of [Pekka] playing the first level of Quake.

Continue reading “Ultimate Oscilloscope Hack – Quake In Realtime”

Trinket EDC Contest Entry: Shorty

Sometimes finding a short-circuit is easy, especially after the magic smoke has escaped. Finding a short on a newly etched or milled board though, can be a maddening task. Many of us have been there – wrestling with multimeter probes under a magnifier trying to find the offending bit of copper that is the source of all our problems. [Jaromir] designed Shorty to make this task a little bit easier.

Shorty is a short-circuit finder – but it’s not exactly like the one you would find on a typical multimeter.  [Jaromir] used MCP6041 Op-Amp to detect resistances down to the order of tens of milliohms. Determining an exact resistance measurement at these levels would require a heck of a lot of calibration. When looking for a short though, [Jaromir] is only concerned with the relative value – is he getting closer to or further away from the short. He determines this by sound. The Op-Amp output is sent to the Pro Trinket’s ADC input. The trinket drives a speaker with lower or higher tones based upon the ADC voltage. Much like the childhood game of “hot and cold”, Shorty will direct you right to your short!

There’s still time to enter the Trinket Everyday Carry Contest. The main contest runs until January 2, but we’re having random drawings every week! Don’t forget to write a project log before the next drawing at 9pm EST on Tuesday, December 30th. You and all of the other entrants have a chance to win a Teensy 3.1 from The Hackaday Store!

dremel base station

DIY Super Accessory For Your Dremel

Little jobs require little tools and you can’t get much more littler than a Dremel. For his tiny tasks, [sdudley] has built a Dremel-powered base station that features a table saw, drum sander and router table. Overall, it is about one cubic foot in size and is almost entirely made from ‘1 by’ dimensional lumber. The Dremel power plant was actually used to make the base, specifically slowly removing material at the clamping points that hold the rotary tool secure to the base. The Dremel is held in an upright position and pokes out through the center of the table for both the drum sander and router configurations. To use this as a table saw, the Dremel is mounted almost horizontally on the base. A Mini Saw attachment has to be purchased for the table saw configuration but it does a great job at holding a vertically spinning saw blade.

After the break there’s a nice video of this tool’s use and assembly (it’s even worth watching just for the musical accompaniment that takes you on a wild ride through several genres of music). For those who want to make one for themselves, [sdudley] has made his part templates and assembly guide available in PDF format on his Instructables page. If you’re looking for something a little larger, check out this circular saw converted to a table saw.

Continue reading “DIY Super Accessory For Your Dremel”