camera battery emulator

3D Printed Camera Battery Emulator

There are certainly battery hungry devices out there on the market and, unless you do some serious research before the purchase of said device, you really don’t know how it will perform. Needless to say, some of us get stuck with power hog device, and it seriously sucks because changing out batteries often is expensive and just plain annoying.

If you couldn’t tell, I am speaking from experience, my old Sony DSC-H5 camera works great with the exception of needing new batteries every hour. And if you get cheap batteries, the camera won’t even turn on! There’s a USB connector on the camera but it is only for transferring data and there is also no DC input jack. The entire situation is a totally bummer.

I’m happy (or disappointed) that I am not alone in the world. [Phil] wrote into the HaD tip line to tell us about his solution to this very problem. He has a Canon SD1000 camera and although the battery works fine he needs it to work at an altitude of 15km in order to take some sunrise photos. Cold weather testing (in the fridge freezer) showed that the battery isn’t going to cut the mustard for the hour-long flight. The rest of the balloon-lifted unit already has a battery pack and the plan would be to tap into that to power the camera. Unfortunately his camera, like mine, doesn’t have a DC input jack and can not be powered off the USB port.

[Phil] decided to make a 3D printed battery emulator. It sits in place of the stock battery and holds bare wire where the batteries terminals normally are. The other end of the wires are run out of the camera to a voltage regulator that converts the battery pack’s 6 volts down to the 3.9 that the camera needs.

Continue reading “3D Printed Camera Battery Emulator”

Tweakie CNC Router

Home Made CNC Router Boasts Welded Steel Frame And Super Tidy Wire Management

[Cooperman] had been poking around the ‘net checking out DIY CNC machines for a while. He wanted to build one. During his search, he noticed that there was a common thread amongst homemade machines; they were usually made from parts that were on hand or easily obtainable. He had some parts kicking around and decided to hop on the band wagon and build a CNC Router. What sets [Cooperman]’s project apart from the rest is that he apparently had some really nice components available in his parts bin. The machine is nicknamed ‘Tweakie‘ because it will never really be finished, there’s always something to tweak to make it better.

The foundation for Tweakie is a welded frame made from 25mm steel square tubing. A keen observer may point out that welding a frame may cause some distortion and warping. [Cooperman] thought of that too so he attached aluminum spacers to the steel frame and lapped them flat. After that, fully supported THK linear bearings were attached to the now-straight spacer surface. Both the X and Y axes have ball-screws to minimize backlash and are powered by NEMA23 stepper motors. The Z axis uses 16mm un-supported rods with pillow block linear bearings. Unlike the X and Y, the Z axis uses a trapezoidal lead screw and bronze nut. [Cooperman] plans on replacing this with a ball-screw in the future but didn’t have one on hand at the time of assembly.

Mach3 is the software being used to control the CNC Router. It communicates via parallel port with a 3-axis StepMaster motor driver board that can handle providing 24vdc to the stepper motors. All of the electronics are mounted neatly in an electrical cabinet mounted on the back of the machine. Overall, this is a super sturdy and accurate machine build. [Cooperman] has successfully cut wood, plastic and even aluminum!

Sigzig Data Loggers Ditch The Noise While Pimping The Case

We ran into [Paul Allen] at CES. He was showing off Sigzig, a super-low noise data logger which his company is just rolling out.

IMG_20150107_174520A couple of years ago he worked on a standalone chemical sensor and had a few extra boards sitting around after the project was done. As any resourceful hacker will do, he reached for them as the closest and easiest solution when needing to log data as a quick test. It wasn’t for quite some time that he went back to try out commercially available loggers and found a problem in doing so.

The performance of off-the-shelf data loggers wasn’t doing it for [Paul’s] team. They kept having issues with the noise level found in the samples. Since he had been patching into the chemical sensor PCBs and getting better results, the impetus for a new product appeared.

The flagship 24-bit 8-channel Sigzig samples 0-5v with less than 1uV of noise. A less expensive 4-channel differential unit offers 18-bit with 10-12 uV of noise. They are targeting $199 and $399 price points for the two units. We asked about the sample rate in the video below. The smaller version shown here captures up to 240 samples per second. The big guy has the hardware potential to sample 30,000 times per second but since the data is continuously streaming over USB that rate is currently limited to much less.

Update: It has been pointed out in the comments that USB may not be the choke point for sample rate.


Zubie

Remotely Controlling Automobiles Via Insecure Dongles

Automobiles are getting smarter and smarter. Nowadays many vehicles run on a mostly drive-by-wire system, meaning that a majority of the controls are electronically controlled. We’re not just talking about the window or seat adjustment controls, but also the instrument cluster, steering, brakes, and accelerator. These systems can make the driving experience better, but they also introduce an interesting avenue of attack. If the entire car is controlled by a computer, then what if an attacker were to gain control of that computer? You may think that’s nothing to worry about, because an attacker would have no way to remotely access your vehicle’s computer system. It turns out this isn’t so hard after all. Two recent research projects have shown that some ODBII dongles are very susceptible to attack.

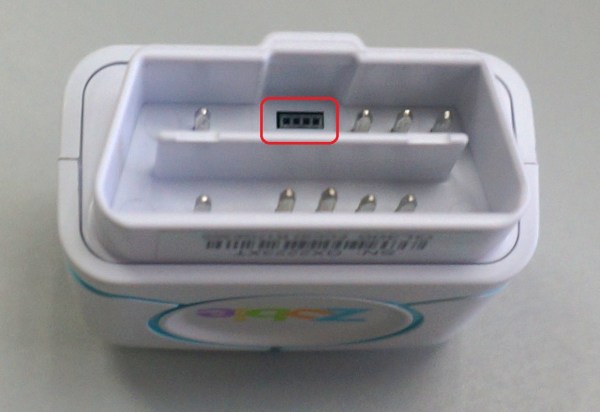
The first was an attack on a device called Zubie. Zubie is a dongle that you can purchase to plug into your vehicle’s ODBII diagnostic port. The device can monitor sensor data from your vehicle and them perform logging and reporting back to your smart phone. It also includes a built-in GPRS modem to connect back to the Zubie cloud. One of the first things the Argus Security research team noticed when dissecting the Zubie was that it included what appeared to be a diagnostic port inside the ODBII connector.

Online documentation showed the researchers that this was a +2.8V UART serial port. They were able to communicate over this port with a computer with minimal effort. Once connected, they were presented with an AT command interface with no authentication. Next, the team decompiled all of the Python pyo files to get the original scripts. After reading through these, they were able to reverse engineer the communication protocols used for communication between the Zubie and the cloud. One particularly interesting finding was that the device was open for firmware updates every time it checked in with the cloud.

The team then setup a rogue cellular tower to perform a man in the middle attack against the Zubie. This allowed them to control the DNS address associated with the Zubie cloud. The Zubie then connected to the team’s own server and downloaded a fake update crafted by the research team. This acted as a trojan horse, which allowed the team to control various aspects of the vehicle remotely via the cellular connection. Functions included tracking the vehicle’s location, unlocking hte doors, and manipulating the instrument cluster. All of this can be done from anywhere in the world as long as the vehicle has a cellular signal.

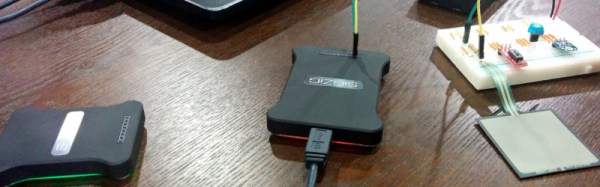
A separate but similar project was also recently discussed by [Corey Thuen] at the S4x15 security conference. He didn’t attack the Zubie, but it was a similar device. If you are a Progressive insurance customer, you may know that the company offers a device that monitors your driving habits via the ODBII port called SnapShot. In exchange for you providing this data, the company may offer you lower rates. This device also has a cellular modem to upload data back to Progressive.

After some research, [Thuen] found that there were multiple security flaws in Progressive’s tracker. For one, the firmware is neither signed nor validated. On top of that, the system does not authenticate to the cellular network, or even encrypt its Internet traffic. This leaves the system wide open for a man in the middle attack. In fact, [Thuen] mentions that the system can be hacked by using a rogue cellular radio tower, just like the researchers did with the Zubie. [Thuen] didn’t take his research this far, but he likely doesn’t have too in order to prove his point.

The first research team provided their findings to Zubie who have supposedly fixed some of the issues. Progressive has made a statement that they hadn’t heard anything from [Thuen], but they would be happy to listen to his findings. There are far more devices on the market that perform these same functions. These are just two examples that have very similar security flaws. With that in mind, it’s very likely that others have similar issues as well. Hopefully with findings like this made public, these companies will start to take security more seriously before it turns into a big problem.

[Thanks Ellery]

A Portable KIM-1

The KIM-1 was the first computer to use the 6502, a CPU that would later be found in the Apple, Ataris, Commodores, and the Nintendo Entertainment System. Being the first, the KIM-1 didn’t actually do a whole lot with only 1k of ROM and a bit more than 1k of RAM. This is great news for anyone with an Arduino; you can easily replicate an entire KIM-1, with a keypad and 7-segment display. That’s what [Scott] did, and he put it in an enclosure that would look right at home in a late 70s engineering lab.

The impetus for this build was [Scott]’s discovery of the KIM-Uno, a kit clone of the KIM-1 using an Arduino Pro Mini. The kit should arrive in a few weeks, so until then he decided to see if he could cobble one together with parts he had sitting around.

Inside a handheld industrial enclosure is an Arduino Uno, with a protoshield connecting the keypad and display. The display is an 11-digit, seven-segment display [Scott] picked up at a surplus shop, and the metal dome keypad came from a hamfest.

Getting the software working took a bit of work, but the most important parts are just modifications to the standard Arduino libraries.

Now that [Scott] has a KIM-1 replica, he can program this virtual 6502 one hex digit at a time, run Microchess, or use the entire thing as a programmable calculator.

LED Matrix Infinity Mirror

[Evan] wrote in to let us know about the LED matrix infinity mirror he’s been working on. [Evan] built a sizable LED matrix out of WS2812B LEDs and mounted them to a semi-reflective acrylic sheet, which makes a pretty awesome infinity mirror effect.

Instead of buying pre-wired strands of serial LEDs like we’ve seen in some other projects, [Evan] purchased individual WS2812 LEDs in bulk. Since the LEDs just had bare leads, [Evan] had to solder wires between each of his 169 LEDs (with some help from a few friends). After soldering up hundreds of wires, [Evan] drilled out holes for each LED in a piece of semi-reflective acrylic and inserted an LED into each hole.

To create the infinity mirror effect, [Evan] mounted the LED matrix behind a window. [Evan] put some one-way mirror film on the outside of the window, which works with the semi-reflective acrylic to create the infinity mirror effect. The LEDs are driven by an Arduino, which is controlled by a couple of free programs to show a live EQ of [Evan]’s music along with patterns and other effects.

Learning Python With Tron Radio

[5 Volt Junkie] has built his share of Arduino projects, but never anything with Python, and certainly never anything with a GUI. After listening to Internet radio one day, a new idea for a project was born: a Raspberry Pi with a small touchscreen display for a UI and displaying soma.fm tracks. It’s finally finished, and it’s a great introduction to Python, Pygame, and driving tiny little displays with the Pi.

Playing soma.fm streams was handled by mpd and mpc, while the task of driving a 2.8″ TFT LCD was handled by the fbtft Linux framebuffer driver. This left [5 Volt Junkie] with the task of creating a GUI, some buttons, and working out how to play a few streams. This meant drawing some buttons in Inkscape, but these were admittedly terrible, so [5 Volt Junkie] gave up and turned on the TV. Tron Legacy was playing, giving him the inspiration to complete his Tron-themed music player.

The result of [5 Volt Junkie]’s work is a few hundred lines of Python with Pygame and a few multicolor skins all wrapped up in a Tron theme. It looks great, it works great, and it’s a great introduction to Python and Pygame.

Continue reading “Learning Python With Tron Radio”