Another Radio Module For IoT Fun – EMW3162

The availability of cheap radio modules is making them ubiquitous in an increasing number of projects that we have been seeing recently. The usual go-to solution is using any one of the several modules based on the ESP8266 device. [Willem] wrote in to share with us his experiences with another radio module – the EMW3162 from MXChip, which at $10 isn’t as cheap as the ESP8266 modules, but is a more capable, power packed, device.

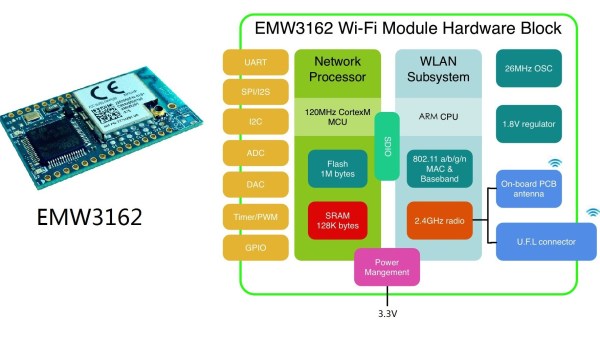
The EMW3162 (PDF datasheet) is a low-power embedded WiFi module with integrated wireless LAN, and a STM32F205 Cortex-M3 microcontroller that runs a “self-hosted” WiFi networking library and software application stack. The microcontroller has 1M flash, 128k RAM and runs at 120MHz. And since MXChip is a Broadcom partner, they are allowed to use the WICED_SDK.

The on-board ARM M3 means all kinds of useful interfaces are available: UART, SPI, I2C, ADC, DAC, PWM, TIMERS, GPIO, and a JTAG flash interface. The good news could be on the power consumption figures – the module is touted to be low-power, and the data sheet shows 7mA when connected to an access point but with no data transfer. When transmitting at 20kbps, the current draw is about 24mA, which goes up to 320mA at 11Mbps.

[Willem] has his EMW3162_WICED repository up on Github, but also take a look at the MXChips MICO (Mico-controller based Internet Connectivity Operation System) repository. At the moment, he has it working using Linux, with a gnu gcc compiler and a JLINK JTAG programmer. He also has the WICED SDK working and has a WiFi AP with an on-board 120MHz arm chip. It would be interesting to hear about other users’ experiences with this radio module. Do let us know in the comments below!


3D printed motorcycle

3D Printed Motorcycle Weighs Only 18kg

After discovering 3D printing a few years ago, [Jonathan Brand] was hooked. He loved the ability to design things on a computer, and then have them realized as a real 3D object he can touch — sometimes within hours of doing the CAD work. He’s always wanted a motorcycle, but it was never the right time so at long last he decided to print one.

First off — no, it doesn’t actually work — it’s a 1:1 scale model of a 1972 Honda CB500. But it is an amazing testament to 3D printing and prototyping. He’s been working on it for almost as long as he’s had a 3D printer, and while he didn’t quote exactly how long it took to print everything, we’re guessing its in the thousands of hours.

In fact, he printed tons of components, labeled them, and organized them for up to a year before even being able to assemble them together. Talk about project dedication.

He’s even designed loose fits for moving parts — the wheels spin! To give it the cool transparent look, each part is actually almost completely hollow — with thin wall thickness of only about a millimeter. Because of this, the whole bike only weighs 18kg.

For a slightly more functional large-scale 3D print — how about printing your own colorful kayak?

Continue reading “3D Printed Motorcycle Weighs Only 18kg”

circuit boards

Control Stuff With Your Muscles

[David Nghiem] has been working with circuitry designed to read signals from muscles for many years. After some bad luck with a start-up company, he didn’t give up and kept researching his idea. He has decided to share his innovations with the hacker community in the form of a wearable suit that reads muscle signals.

It turns out that when you flex a muscle, it gives off a signal called a Surface ElectroMyographic signal, or SEMG for short. [David] is using an Arduino, digital potentiometer and a bunch of op amps to read the SEMG signals. LEDs are used to display the signal levels.

The history behind [David’s] project dates back to the late twentieth century, which he eloquently points out – “Holy crap that was a long time ago”. He worked with the MIT Aero Astro Lab and the Boston University Neuromuscular Research Center where he worked on a robotic arm for astronauts. The idea being to apply an opposing force to the arm to help prevent muscle deterioration.

Be sure to check out [David’s] extensive and well documented work, along with the several videos showing his projects at various stages of completion. If this gives you the electromyography bug, check out this guide on detecting the signals and an application of the concept for robotic prosthesis.

Continue reading “Control Stuff With Your Muscles”

boom box

Get Blown Away By The Boominator

You have a greater chance of squeezing 5 amps through a 2N2222 than you do remembering the 1980s and not thinking about the legendary ‘boom box’. They could be seen perched on the shoulders of rockers and rappers alike – many sporting the Members Only or red leather jackets. The boom boxes visual characteristics can best be described as a rectangular box with two very large speakers on each end. It is no accident that The Boominator shares these features.

[Jesse van der Zouw] did a good job of showing how he created The Boominator. It has not two, but four 10 inch woofers that delivers 360 degrees of awesomeness at 115dB. The on board battery can sustain it for up to twenty hours, and the project is topped off with some blue LED rings the encircle each speaker.

We’ve seen boom boxes here before, but this is the first with some nice LED accents. Be sure to check out this build and let us know what you might have done differently.

[via Hackaday.io]

Build A Precision Voltage Reference Box

So you just scored a vintage piece of test gear, or maybe you just bought a fancy new DMM (Hmm…We love that new multimeter smell!) But can it read voltage accurately? How can you be sure? Well, that’s why you should build yourself a voltage reference box.

Youtuber [Scullcom’s] latest video has you covered. Wants some specs? Sure. How does a precision 10v and 5v output with only ±0.025% and an amazing 2.5ppm/°C sound? That’s very impress for something you can cobble together yourself.  We find it interesting that he actually uses some ebay parts to pull off this build. The LiPo battery, USB LiPo charging circuit, and boost regulator are all sourced from ebay. Not to worry though, as these parts are only used to supply power to a 15 volt linear regulator. The real magic happens in the Texas Instruments REF102 precision voltage reference. You give it a decently clean 12-36 volts, and it will give you a 10 volt reference out.  These amazing chips are able to obtain such precision in part because they are calibrated (or more specifically “laser trimmed”) from the factory. A secondary output of 5 volt is achieved by using a differential amplifier.

Warning: The video after the break is a bit on the long side(43 mins), so you might want to make some popcorn. But we find [Scullcom’s] teaching style to be lovely, and he does a wonderful job of explaining the project start to finish, soup to nuts. Continue reading “Build A Precision Voltage Reference Box”

3D Spectrum Analyzer Uses 1280 LEDs

One of [Dooievriend]’s friends recently pressed him into service to write software for a 3d spectrum analyzer/VU that he made. The VU is a fairly complex build: it’s made up of 1280 LEDs in a 16x16x5 matrix controlled by a PIC32 clocked at 80MHz. [Dooievriend] wrote some firmware for the PIC that uses a variation on a discrete Fourier transform to create a 3D VU effect.

j6v2i 
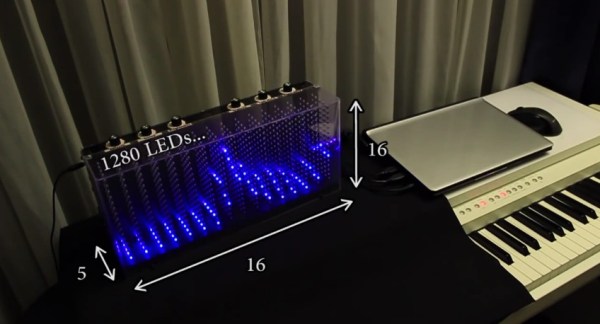
When [Dooievriend] set out to design the audio analyzing portion of the firmware, his mind jumped to the discrete Fourier transform. This transform calculates the amplitude in a series of frequency bins in the audio—seemingly perfect for a VU. However, after some more research, [Dooievriend] decided to implement a constant Q transform. This transform is very similar to a Fourier transform, but it takes into account the logarithmic way that the human ear interprets sound.

[Dooievriend] started implementing the constant Q transform using an interrupt-based sampler, but he quickly ran into issues with slow floating-point math on his PIC32 (which doesn’t have a hardware floating-point unit). Thankfully he rewrote his code using fixed-point math, and the transform runs nearly real-time. Check out the video after the break to see the VU in action, and a second video that gives some details on the hardware build.

Continue reading “3D Spectrum Analyzer Uses 1280 LEDs”

Enigma Machine Wristwatch

We don’t find smartwatches to be supremely usable yet. This one sets a definition for usefulness. The Enigma machine is of course the cipher process used by the Germans during World War II. This Enigma Machine wristwatch is not only functional, but the appearance is modelled after that of the original machine. With the speckled gray/black case and the Enigma badge branding [Asciimation] has done a fine job of mimicking the original feel.

Driving the machine is an Arduino Pro Mini. We’ve seen Arduino Enigma Machines in the past so it’s not surprising to see it again here. The user interface consists of an OLED display at 128×64 resolution, three buttons, with a charging port to the right and on/off switch on the left.

The device is demonstrated after the break. Quite a bit of button presses are used to set up each of the three encoder wheels. But that’s hardly avoidable when you’re not committing to a full keyboard. We’re pretty impressed by the functionality of [Asciimation’s] interface considering it’s hardware simplicity.

This seems perfect for kids that are proving to have an interest in engineering. They learn about ciphers, embedded programming, and mechanical design and crafting (this is a hand-sewn leather wristband). Of course if you build one and start wearing it into the office we won’t judge.

Continue reading “Enigma Machine Wristwatch”