Java Byte Code, Ahead Of Time Compilers, And A TI-99

Java famously runs on billions of devices, including workstations, desktops, tablets, supercomputers, and jewelry. Yes, jewelry. Look it up. [Michael] realized Java doesn’t run on Commodore 64s, TI-99s, and a whole bunch of other platforms. Not anymore.

Last year, [Michael] wrote Java Grinder, a Java byte-code compiler that compiles classes into assembly language instead of being part of a JVM. This effectively turns Java from a Just In Time compiled language to a normally compiled language, like C. He wrote this for the 6502/6510, the MSP430, and a Z80. The CPU in the TI-99/4A is a weird beast, though, and finally [Michael] turned this Java Grinder on that CPU, the TMS9900.

While most of the development was accomplished with the MESS emulator, [Michael] did manage to run Java on real hardware. His friend gave him a TI-99/4A a few years ago with a few cartridges. Cracking those cartridges open revealed one PCB that would hold an EEPROM. Writing his Java byte-code-derived assembly to a 28c64 EEPROM, he had a cartridge that would run compiled Java.

Right now, the demo is pretty simple with low-resolution graphics beeps and bloops of music, and generally not what you would expect from a TI/99. This is mostly due to the fact that the API for the TI-99 is extremely simple. You can check out the results of that programming endeavor below.

Continue reading “Java Byte Code, Ahead Of Time Compilers, And A TI-99”

Altair 8800 Front Panel For An 8080 Emulator

It appears a very important anniversary passed by recently without anyone realizing. The January 1975 issue of Popular Electronics featured the Altair 8800 on the cover, otherwise known as the blinky box that launched a revolution, the machine that made Microsoft a software powerhouse, and the progenitor of the S-100 bus. The 40-year anniversary of the Altair wasn’t forgotten by [dankar], who built a front panel emulator with the help of some much more modern components.

The build unofficially began with an Intel 8080 emulator written for an Arduino. The 8080 is the brains of the Altair, and while emulators are cool, they don’t have the nerd cred of a panel of switches and LEDs. The hardware began as a bunch of perfboard, but [dankar] wired himself into a corner and decided to make a real schematic and PCB in KiCAD.

Despite the banks of LEDs and switches, there really isn’t much to this front panel. Everything is controlled by shift registers, but there is a small amount of SRAM in the form of an SPI-capable 23LC1024. This comes in handy, because [dankar] is running CP/M 2.2 on this front panel emulator from disk images saved on an SD card. Everything you would want from a computer from 1975 is there; an OS, BASIC, and enough I/O to attach some peripherals.

Hackaday Links Column Banner

Hackaday Links: April 12, 2015

Everyone loves Top Gear, or as it’s more commonly known, The Short, The Slow, And The Ugly. Yeah, terrible shame [Clarkson] the BBC ruined it for the rest of us. Good News! A show featuring the Dacia Sandero drones will be filling the Top Gear timeslot. And on that bombshell…

More Arduino Drama! A few weeks ago, Arduino SRL (the new one) forked the Arduino IDE from Arduino LLC’s repo. The changes? The version number went up from 1.6.3 to 1.7. It’s been forked again, this time by [Mastro Gippo]. The changes? The version number went up to 2.0. We’re going to hold off until 2.1; major releases always have some bugs that take a few weeks to patch. Luckily the speed of the development cycle here means that patch should be out soon.

Need an ESP8266 connected to an Arduino. Arachnio has your back. Basically, it’s an Arduino Micro with an ESP8266 WiFi module. It also includes a Real Time Clock, a crypto module, and a solar battery charger. It’s available on Kickstarter, and we could think of a few sensor base station builds this would be useful for.

[Ben Heck] gave The Hacakday Prize a shoutout in this week’s episode. He says one of his life goals is to go to space. We’re giving that away to the project that makes the biggest difference for the world. We’re not sure how a [Bill Paxton] pinball machine fits into that category, but we also have a Best Product category for an opportunity to spend some time in a hackerspace… kind of like [Ben]’s 9 to 5 gig…

[Jim Tremblay] wrote a real time operating system for a bunch of different microcontrollers. There are a lot of examples for everything from an Arduino Mega to STM32 Discovery boards. Thanks [Alain] for the tip.

45s – the grammophone records that play at 45 RPM – are seven inches in diameter. Here’s one that’s 1.5 inches in diameter. Does it work? No one knows, because the creator can’t find a turntable to play it on.

Are we betting on the number of people who don’t get the joke in the second paragraph of this post? Decide in the comments.

Robotic Glockenspiel Crunches “Popcorn”

[James] sent us a video of his latest creation: a robotic glockenspiel that’s currently set up to play “Popcorn”. It uses eight servos to drive mallets that strike the tone bars with fast, crisp movements. The servos are driven with a 16-channel I²C servo driver and MIDI shield, which are in turn controlled with an Arduino Uno. The previous incarnation of his autoglockenspiel employed solenoids, dowels, and elastic bands.

[Gershon Kingsley]’s 1969 composition for synthesizer “Popcorn” has been covered by many artists over the years, though perhaps the most popular cut was [Hot Butter]’s 1972 release. Check it out after the break, and dig that lovely cable management. We’d love to see [James]’s autoglockenspiel play “Flight of the Bumblebee” next.

If you’re hungry for more electro-acoustic creations, have a gander at [Aaron Sherwood]’s Magnetophone.

Continue reading “Robotic Glockenspiel Crunches “Popcorn””

An RGB Word Clock, Courtesy Of WS2812s

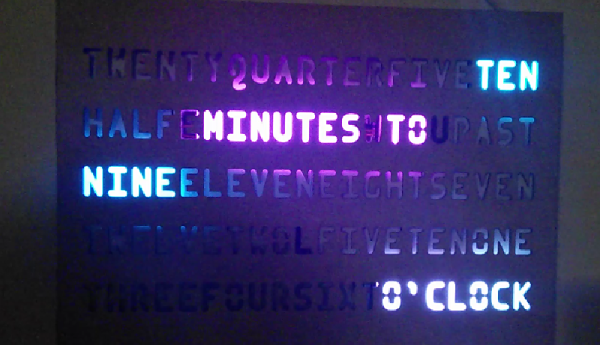
A word clock – a clock that tells the time with illuminated letters, and not numbers – has become standard DIY electronics fare; if you have a soldering iron, it’s just what you should build. For [Chris]’ word clock build, he decided to build an RGB word clock.

A lot has changed since the great wordclock tsunami a few years back. Back then, we didn’t have a whole lot of ARM dev boards, and everyone’s grandmother wasn’t using WS2812 RGB LED strips to outshine the sun. [Chris] is making the best of what’s available to him and using a Teensy 3.1, the incredible OctoWS2812 library and DMA to drive a few dozen LEDs tucked behind a laser cut stencil of words.

The result is blinding, but the circuit is simple – just a level shifter and a big enough power supply to drive the LEDs. The mechanical portion of the build is a little trickier, with light inevitably leaking out of the enclosure and a few sheets of paper working just enough to diffuse the light. Still, it’s a great project and a great way to revisit a classic project.

Dextrus V1.2 Robot Hand

Wounded Soldier Gets Robotic Hand Replacement

[Neal Muzzy], a local member of the Cedar Valley Makers makerspace, just made news on Open Bionics for his robotic prosthetic hand called Dextrus v1.2 which he made for his friend, and wounded war veteran, [Taylor].

In just two months, [Neal] worked with his friend to make this robotic prosthetic with the goal of having it more functional and easier to use than [Taylor]’s current prosthetic. The very first prototype was made by using the open-source Dextrus design, to test fit, and control using EMG sensors. Once they determined it would work — onto customizing!

They call it Dextrus V1.2, and it works better for [Taylor] than the original — but that’s the whole point of the Open Hand project — starting with a base design, and making it better. If you’re not familiar with the Open Hand Project, it was originally crowd-funded on Indiegogo, and is now an organization to make robotic prosthetic hands more accessible to amputees. We wrote about it in Hacklet 41 – Prosthetic Projects.

Continue reading “Wounded Soldier Gets Robotic Hand Replacement”

Documenting Poorly Documented LED Strips

While [Drew] was in China for the Dangerous Prototypes Hacker Camp, he picked up some very bright, very shiny, and very cheap LED strips. They’re 5 meter “5050” 12V strips with 20 LEDs per meter for about $15 a spool. A good deal, you might think until you look at the datasheet for the controller. If you want an example of how not to document something, this is it.

A normal person would balk at the documentation, whereas [Drew] decided to play around with these strips. He figured out how to control them, and his efforts will surely help hundreds in search of bright, shiny, glowy things.

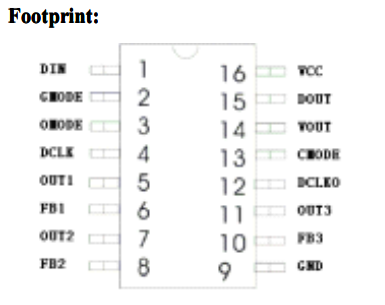
You are expected to tell the difference between 'GMODE', 'OMODE' and 'CMODE' in this pinout.
You are expected to tell the difference between ‘GMODE’, ‘OMODE’ and ‘CMODE’ in this pinout.

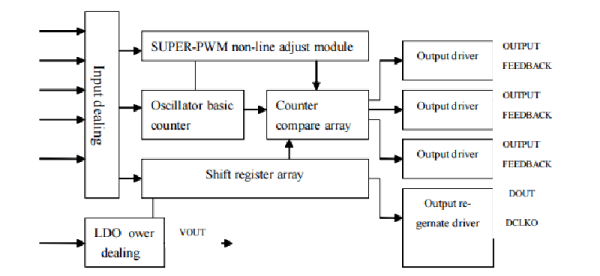
The datasheet for the LPD6803 controller in this strip – available from Adafruit here – is hilarious. The chip takes in clocked data in the order of Green, Red, and Blue. If anyone can explain why it’s not RGB, please do so. Choice phrasing includes, “VOUT is saturation voltage of the output polar to the grand” and “it is important to which later chip built-in PLL regernate circuit can work in gear.” Apparently the word ‘color’ means ‘gray’ in whatever dialect this datasheet was translated into.

Despite this Hackaday-quality grammar, [Drew] somehow figured out how to control this LED strip. He ended up driving it with an LPC1768 Mbed microcontroller and made a demo program with a few simple animations. You can see a video of that below.

Continue reading “Documenting Poorly Documented LED Strips”