Foam And Antistatic Bag Bring Vintage Compaq Keyboard Back To Life

After winning an online auction for an 1980s vintage Compaq Portable PC, [leadacid44] discovered why it only cost him $5USD – the keyboard was shot. Not willing to accept having forked out $45USD to ship a brick, he tore into the ancient machine and came up with a found-material solution to the wonky keyboard.

[leadacid44]’s very detailed writeup of the fix for his Compaq includes a thorough examination of the guts of the machine. He got it to boot to MS-DOS 5.0 off of a 20MB ISA hard drive card and began probing the keyboard problem. It turns out the Compaq keyboard has much in common with a modern touchscreen, in that it’s a capacitive keyboard. Unfortunately the foam disks used as springs under each key cap had degraded over the last 30 years, so [leadacid44] began a quest to replace them. After much experimentation and a few false starts, he created a sandwich of transparency film, closed-cell polyethylene foam, and a Mylar antistatic bag. Many discs were punched out with a leather punch and tediously placed in the body of each key switch, and the quick brown fox was soon jumping flawlessly over the lazy dog.

We’ve seen some fixes to these lovable luggables before, like this dumpster queen that became a Hackaday Retro submission. At least [leadacid44]s machine didn’t release the Magic Blue Smoke like that one did.

Lego 3D printer

Printing Chocolate With A LEGO 3D Printer

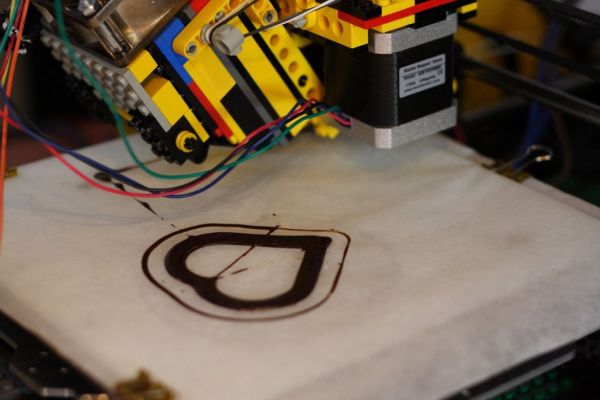
Some people think the future will include a 3D printer in every home. We think if LEGO started producing these as kits we’d get pretty close. Introducing the home-made LEGO 3D printer… with a chocolate extruder.

[Gosse Adema] has been working on his LEGO based 3D printer for a while now, and it’s gotten pretty good. It’s basically a repackaged Prusa i3, but that doesn’t make it any less impressive. It uses real NEMA 17 steppers mounted with LEGO Technic — the Mindstorms motors just don’t quite cut it… not yet anyway.

During his build, a colleague pointed out that back in 2005 Instructables had a remix contest, which included a 3D printer made out of LEGO. The original hacker, [Saul], issued a challenge at the end of his Instructable hoping someone else would build a better chocolate LEGO 3D printer… Well it’s only been 10 years, but [Gosse] did it!

Continue reading “Printing Chocolate With A LEGO 3D Printer”

Air Rocket Launch Pad UI Entertains Eager Kids

Last spring [Mike] built a foam rocket launchpad which was a hit with the kids in his neighborhood. But the launch system was merely a couple of buttons so the early enthusiasm quickly wore off. He went back to the drawing board to make improvements and really hit the jackpot!

The original launch system had one button for building up air pressure with a second big red button of doom for launching the rocket. The problem was a complete lack of user feedback; all the kids could do is guess how long they needed to hold the button to achieve the highest launch. This revision adds flashing LEDs to hold the attention of the wee ones but to also function as a gauge for the new pressure control system. The visually fascinating control board also includes a removable key to prevent accidental launches.

The particulars of this are as you’d expect: it’s a bunch of plumbing to manage the air pressure, an Arduino to control it all, and additional electronics in between to make them work together.

We’re especially impressed by the leap in features and quality from the first version to this one. It’s a testament to the power of quick proofs-of-concept before committing to a more involved build. Great work [Mike]!

We’ve seen rocket launchers for adults and some neat mission control panels but [Mike’s] kid friendly launch controller really is out of this world (sorry, couldn’t resist). You’ll find a video demo of this launcher after the break.

Continue reading “Air Rocket Launch Pad UI Entertains Eager Kids”

Hackaday Prize Semifinalist: Individualized Breathing Apparatus

Preterm infants frequently require ventilator support while they’re in the neonatal ICU, and this is usually done with a CPAP machine. The machine to infant interface is called a nasal cannula, a bit of plastic that connects an infant’s nose to the machine. Because there aren’t that many sizes of nasal cannula available, and preemies come in all sizes, there are inevitable problems. Ill-fitting nasal cannula can reduce the effectiveness of a CPAP, and can even cause significant damage to an infant’s septum.

For his Hackaday Prize entry, [Ben] is tackling this problem head on. He’s working on creating individualized nasal cannula for newborns using 3D modeling and printing, allowing nasal cannula of all shapes and sizes to be created in a matter of hours.

To create these customized cannula, [Ben] is 3D scanning an infant mannequin head to gather enough data to import it into a Processing sketch. A custom cannula is then created and printed with flexible 3D printer filament. In theory, it should work, apart from the considerations involved in building a medical device.

As for why custom plastic tubes matter, [Ben] works at the only NICU in Western Australia. Even though he only sees 8-10 CPAP ‘pressure injuries’ in his unit each year, these kids are extremely fragile and some parents have expressed a desire for something that isn’t as uncomfortable for their newborn than the off-the-shelf solution. Customizing these cannula from a quick 3D scan is a great way to do that, and a perfect example of the Hackaday Prize theme of ‘build something that matters.’

The 2015 Hackaday Prize is sponsored by:

STM32 JavaScript Peeks And Pokes

A lot of people find scripting languages very productive and we’ve seen quite a few chips now supporting what you normally think of as a scripting language. These high-level abstraction languages are great, until they aren’t. When you need to go under the abstraction and do something complex or you need every cycle of performance, you might have to break your normal tools.

The Espruino is an ARM processor (an STM32) that has JavaScript on board. However, [Gordon Williams] shows how you can use peeks and pokes to access the hardware directly when the need arises. The names derive from another popular abstraction’s escape hatch. The old BASIC languages allowed direct memory access using keywords peek and poke. [Gordon] shows some examples of accessing the timer for PWM, and even looks at the STM32 reference manual to show how he knew where to peek and poke to begin with.

Continue reading “STM32 JavaScript Peeks And Pokes”

Hacklet 77 – Projects That Tweet

Since it’s launch way back in 2006, Twitter has become a magnet for techies. Maybe it’s the simple interface, maybe it’s the 140 character limit. Whatever the reason, you can find plenty of hackers, makers, and engineers tweeting about their daily activities. It didn’t take long for folks to start incorporating Twitter into their projects. Ladyada’s Tweet-a-watt is a great early example of this. This week’s Hacklet is all about some of the best tweeting projects on Hackaday.io!

dogbarkWe start with [Henry Conklin] and A Twitter account for my dog. [Henry’s] dog [Oliver] loves to bark and finding a solution became his entry to The Hackaday Prize. Rather than bring Cesar Millan in, [Henry] decided to embrace [Oliver’s] vocalizations by sending them up to the cloud. A Raspberry Pi with a USB microphone uses some custom Python code to detect barks and ruffs. The Pi then sends this data to Twitter using the python-twitter library. The Pi is connected to the internet via a USB WiFi dongle. You can see the results of [Henry’s] work on [Oliver’s] own Twitter page!
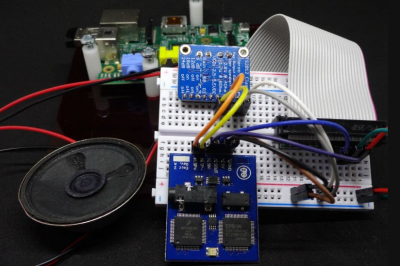
dectalkerNext up is [troy.forster] and tweetie-pi. Rather than constantly check his phone or computer, [Troy] wanted a device to read his tweets. A bit of NodeJS code later, and tweetie-pi was born. A Raspberry Pi connected to the internet pulls data through the Twitter stream API. When tweets directed at a pre-configured username are found, the data is sent to a an Emic 2 text to speech module. The Emic reads in that classic DECtalker style voice we all know and love from the movies. [Troy] even added code to properly handle usernames and retweets.
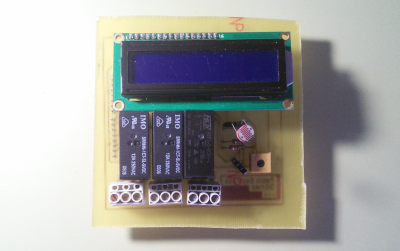
 

homeauto[SirClover] joined the internet of things by creating Home automation system with Twitter, his entry in the 2014 Hackaday Prize. This home automation system is based around an Arduino Leonardo and an Ethernet shield. [SirClover] rolled his own custom PCB to handle relays, a Cds cell, and a 2×16 character LCD. The system can be accessed through a simple web interface. This allows the user to open or close blinds, turn on lights, all that great smart home stuff. Every time it executes a command, the home automation system reports status to Twitter.

das-cubeFinally we have [Jakob Andrén] with A danceable notification cube, which is [Jakob’s] entry in the 2015 Hackaday Prize. The cube itself is a translucent box that contains a metric crapton of LEDs. 148 Neopixels and 12 3W power LEDs to be exact. All these LEDs are driven by a Teensy 3.1, which serves as the main processor for the entire system. The Teensy reads position data from an MPU6040 IMU. This allows it to change brightness and color as the box is moved around – or “danced”. An ESP8266 provides the cube with data from the interwebs, specifically Facebook and Twitter. The cube lights up and flashes whenever it receives a message.

If you want to see more tweeting projects, check out our new projects that tweet list.  Did I miss your project? Don’t be shy, just drop me a message on Hackaday.io. That’s it for this week’s Hacklet, As always, see you next week. Same hack time, same hack channel, bringing you the best of Hackaday.io!

redbull creation competition

2015 RedBull Creation Competition Is Underway!

I’m here as a judge at the 2015 RedBull Creation Competition in Detroit — it’s a super intense 72 hour build off where makers, engineers, and artists can come to show us what they’ve got. This year’s theme is pretty broad: Serious Fun.

The event is at Recycle Here and is open to the public, so if you’re in the area, come check it out! A massive recycling depot warehouse has been temporarily transformed into a giant workshop. Teams have access to some serious tools including heavy duty welding equipment, industrial forming tools like pipe benders, brake presses, your standard drill presses, cutting equipment and of course laser cutters and 3D printers.

There are two competition categories — Open Class, which was free for anyone to join with a team, and Invite Only. The six Invite Only teams are working in the Recycle Here workshop, and the teams competing in the open category are scattered across the city, making use of their own workshops or hackerspaces. The theme was only just announced yesterday, and the 72 hour countdown has been ticking away ever since.  I can’t wait to see what awesome interactive projects can be built in time to show off to the public this weekend.

Continue reading “2015 RedBull Creation Competition Is Underway!”