Solder More USB Ports To The Raspberry Pi Zero

Slowly, Raspberry Pi Zeros are falling into the hands of everyone who wants one. Quickly, though, it was realized that one USB port wasn’t enough, and having a single USB OTG port was only just the most economical solution. The Pi Zero does have a lot of test points exposed on the back, and [Peter van der Walt] is clever enough to come up with a 4-port hub you can solder directly to the Pi Zero.

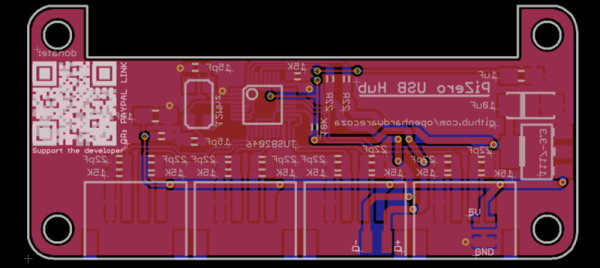
[Peter] has a bit of experience with USB ports on the Pi, and the test points available on the bottom of this cheap and wonderful board provide everything you need to break out the single USB OTG port to a USB hub. We’ve seen this done before with a few tenuous solder connections between the Zero and an off-the-shelf USB hub. [Peter]’s build does it by soldering a USB hub directly to the Pi through these test points. It’s the first purpose built bit of hardware designed for the express purpose of giving the Pi four USB ports while only making it a sliver thicker.

The chip [Peter] is using for the build is the TI TUSB2046B, a device that turns a single USB port into a 4-port hub. This is a part that only costs about $2 in quantity, and the USB connectors themselves are only about $0.60 if you want to build a thousand of these solderable USB hubs. Now you see why the Pi Foundation didn’t include a whole host of ports on the Pi Zero, but it does mean you should be able to pick this board up for under $10 when it’s inevitably cloned in China.

[Peter] doesn’t have this board working yet. In fact, he’s only just sent the Gerbers off to the PCB fab. There will be an update once [Peter] gets the boards back and solders up the tiny but tolerable 0603 parts.

How Y Combinator Brings Hardware Startups To Life

The world is more used to software startups than hardware startups. Luke Iseman is here to help. He is the Director of Hardware at Y Combinator and discusses some details that need to be kept in mind when starting up your own hardware company. Take a look at the talk he presented at the 2015 Hackaday SuperConference and then join us after the break to cover a few key points of his discussion.

Continue reading “How Y Combinator Brings Hardware Startups To Life”

3D-Printing The Most Ornate Room

It’s no secret that we like 3D printing, but Artist and architect [Michael Hansmeyer] really likes 3D printing. So much so that he’s based his entire career around exploring the artistic possibilities of what he calls “computational architecture”.

live9We first fell in love with [Michael]’s work “Columns” because it was both daring and relatively low-budget at the same time. He made a series of architectural-sized columns out of cross-sections of laser-cut cardboard. Why cardboard? Because his goal was to make the columns as complex as possible and the current range of 3D printers couldn’t give him the resolution he wanted.


installation3Fast-forward to “Digital Grotesque”. Now [Michael] has access to a large-scale sand printer, and the license to go entirely nuts. He makes a space reminiscent of a Rococo grotto, but full of so much detail that you can’t really take it all in: it’s nearly fractal. Some stats: 11 tons of printed sandstone, 260 million surfaces, 30 billion voxels. We’re stoked that we don’t have to dust it!


arabesque_wall11His latest piece, “Arabesque Wall” is partly organic and elegant, and part Aliens. If we can play art critic, we think it’s beautiful. Go click through the portfolio. (And although they never got printed, we really like some of the “Voxels” series of cellular-automata pieces.)

From new paint materials opening up new color possibilities to new instruments enabling entirely different types of music, art, and technology mutually inform each other much more than we often appreciate. In ten years time, we’ll be looking back on this work and saying “this piece looks good” and “that piece looks bad” instead of “wow, amazing tech!”. But for now, we’re also content to wallow in the “wow”.

Squash Your ESP-8266 Bugs With ESP-gdbstub

We hope we’re not insulting you by suggesting this, but it’s possible that even the best among us may be faced with bugs in our embedded code from time to time. And while we’re great fans of printf debugging over the serial port, and its high-speed equivalent — flipping a GPIO pin — there’s a time when your bug is so deep that having a real debugger is the best way to dig it out.

[slaff] has been doing some great work documenting C/C++ programming on the ESP-8266, mostly using Eclipse and some of the Arduino libraries. In the fourth part of his series of posts, he walks through using a couple debugger options for the ESP. What makes this all work is the ESP-gdbstub code from Espressif themselves. gdbstub looks great — it works both with the standard SDK as well as with FreeRTOS, so you can debug your ESP-8266 code whether it’s in an OS or on the bare metal. And all this just using the standard serial connection that’s used for programming.

Now, this still may not help with timing-related bugs. ESP-gdbstub uses the serial port, after all. But having the ability to set breakpoints and interactively inspect what’s going on in the chip’s memory is priceless, and doing so with no extra hardware connections is brilliant.

Continue reading “Squash Your ESP-8266 Bugs With ESP-gdbstub”

Industrial Automation In Action: Steam Controller Assembly

Right up front, we’ll cop to the inevitable “not a hack” comments on this one. This video of the Steam Controller assembly plant is just two minutes of pure robotics porn, plain and simple.

From injection molding of the case parts through assembly, testing and final palletizing of packaged controllers for the trip to distributors, Valve’s video is amazingly detailed and very well made. We’d wager that the crane shots and the shots following product down conveyors were done with a drone. A grin was had with the Aperture Labs logo on the SCARA arms in the assembly and testing work cell, and that inexplicable puff of “steam” from the ceiling behind the pallet in the final shot was a nice touch too. We also enjoyed the all-too-brief time-lapse segment at around 00:16 that shows the empty space in Buffalo Grove, Illinois being fitted out.

This may seem like a frivolous video, but think about it: if you’re a hardware hacker, isn’t this where you want to see your idea end up? Think of it as inspiration to get your widget into production. You’ll want to get there in stages, of course, so make sure you check out [Zach Fredin]’s 2015 Hackaday Superconference talk on pilot-scale production.

Continue reading “Industrial Automation In Action: Steam Controller Assembly”

Encryption For Arduino With Spritz

Hackaday.io user [Abderraouf] has written an implementation of the new(ish) Spritz cipher and hash for Arduino. While we’re not big enough crypto-nerds to assess the security of the code, it looks like it’s going to be pretty handy.

Spritz itself is a neat cipher. Instead of taking in fixed blocks of data and operating on them, it allows you to process it in (almost) whatever chunks it comes in naturally, and then extract out the encrypted results piecewise. It works both as a two-way cipher and as a one-way hash function. It looks like Spritz is a one-stop-shop for all of your encryption needs, and now you can run it on your Arduino.

In case you are afraid of new implementations of new ciphers (and you should be), Spritz’s pedigree should help to put you at ease: it was developed by [Ron Rivest] to be a successor to his RC4 algorithm, and it incorporates a lot of the lessons learned about that algorithm over the past. This doesn’t exclude subtle flaws in the implementation of the library (no offence, [Abderraouf]!) or your work downstream, but at least the underlying algorithm seems to be the real deal.

[Abderraouf] links it in his writeup, but just for completeness, here’s the Spritz paper (PDF). What crypto libraries do you currently use for Arduino or microcontroller projects? We’ve been fans of XXTEA for ages, but more because it’s simple and small than because it’s secure. Spritz may be simple enough to implement easily, and still more secure. Sweet.

DIY Electroluminescent Wire, Russian Style

Our favorite Russian mad scientists, [Kreosan], have shocked us yet again with another terribly ill-advised, super bad idea. Home made EL wire that runs off of mains voltage.

From the picture it looks a lot like EL wire, doesn’t it? Well, it’s actually just a nickel chromium wire hooked up to the main AC supply in their…. uh, testing house? Doesn’t look like they live there, so we have to wonder why it still has power. Anyway, yeah, they made a restive load using the wire, and connected it directly to the panel. So besides the fire hazard, you could also get electrocuted!

For house decorations it’s a great way to warm the place up, and it might even help start a fire if you’re lucky!

Continue reading “DIY Electroluminescent Wire, Russian Style”