LEGO Computer Case

With over 40,000 pieces in his possession, [Mike] is definitely a huge fan of LEGO. Given that he’s also very much a fan of technology, it’s no surprise that he has built more than one type of LEGO computer case. He wrote in to tell us that he’s finished work on a well-rounded system designed for everyone.

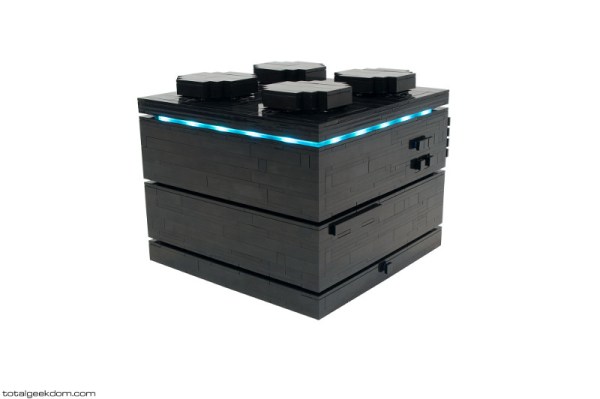
[Mike] is no stranger to interesting case builds. In the last couple of years, he’s also made a functioning wind tunnel case and a bio computer that uses generated heat to warm soil for wheat grass plants. In the course of planning the LEGO computer, he thought a lot about heat and airflow, ultimately deciding on a top-down cooling path.

He’s quoting custom LEGO computer builds, providing the choice between an i3, i5, or i7 with either 8 or 16 gigs of RAM. They will run Linux or Windows 7/8 and are 10-compatible. There are a few choices for the top of the case: classic LEGO brick, the industrial look with diagonal slats, and a colored, tiled top. These systems are completely upgradeable and are held firmly together with great engineering and the occasional support rod.

Magic Lantern Brings Linux To Canon EOS Cameras

On April 1st the Magic Lantern team announced a proof of concept that lets you run Linux on a Canon EOS camera. Because of the date of the post we’ve poured over this one and are confident it’s no joke. The development has huge potential.

The hack was facilitated by a recent discovery that the LCD screen on the camera can be accessed from the bootloader. In case you don’t recognize the name, Magic Lantern is an Open Source project that adds features to these high-end cameras by utilizing the bootloader with binary files on the SD card. It’s long been a way of hacking more features in but has always been complicated by the fact that you must figure out how to play nicely with the existing firmware. Commanding the LCD was the last part of the hardware that had previously not been driven directly from Magic Lantern.

Now that the Linux kernel is in the picture, ground-up features can be built without dealing with the stock firmware in any way (and without overwriting it). We’re excited to see where this one goes. Currently it’s just a proof that you can boot Linux, it’s not actually functional yet. Here’s your chance to polish those kernel porting skills you’ve been holding in reserve.

MAME Controller

MAME Now Available In The Palms Of Your Hand

Every kid dreams of having an arcade game at their house. When those kids grow up, they have a couple of options for getting that at-home arcade experience. They can either buy a one-game commercial game or build a multi-game MAME cabinet. Both options have the same disadvantage: they take up a bunch of space!

Arcade game-aholic, [lokesen], wanted to scratch his itch but do it with something a little less ‘big’ than a standard arcade cabinet. He came up with the only logical solution; a MAME computer stuffed inside an arcade controller.

A lot of thought went into the controller case, which is made from laser cut acrylic. It had to be large enough to allow a proper arcade-emulating spacing of the joystick and buttons as well as have room for a mini-ATX motherboard and 64gb SSD drive. The case also has provisions for a cooling fan and some exhaust vents. To finish off the case, wood grain veneer was applied to the sides.

[lokesen] chose this motherboard for a reason, it has several options of on-board video output; VGA, DVI and HDMI. Connecting this controller to any TV, monitor, or projector is a piece of cake.

Machining A Skeleton Clock In 10,000 Easy Steps

Another day, another interesting YouTube channel. [Chris]’ Clickspring channel and blog is something you don’t really see much these days: machining parts with a lathe, a mill, and no CNC. The project [Chris] is working on now is a clock based on a design by [John Wilding]. It’s very large, and all the parts are constructed out of raw brass and steel stock.

Of course making a clock isn’t just about cutting out some parts on a lathe and turning them on a mill. No, you’re going to need to make the parts to make those parts. [Chris] has already made a tailstock die holder for his lathe, a clamping tool to drill holes in rods, and a beautiful lathe carrier to hold small parts.

All of this is top-notch work, with custom tin lapping tools to put a mirror finish on the parts, and far more effort than should be necessary going into absolute perfection. The clock project is turning out great, although there are several more months until it will tick its first second.

Selected videos below.

Continue reading “Machining A Skeleton Clock In 10,000 Easy Steps”

High Speed SSD1306 Library

[Lewin] wrote in to tell us about a high speed library for Arduino Due that he helped develop which allows interfacing OLED displays that use the SSD1306 display controller, using DMA routines for faster display refresh time.

Typically, displays such as the Monochrome 1.3″ 128×64 OLED graphic display , are interfaced with an Arduino board via the SPI or I2C bus. The Adafruit_SSD1306 library written by [Limor Fried] makes it simple to use these displays with a variety of Arduinos, using either software or hardware SPI. With standard settings using hardware SPI, calls to display() take about 2ms on the Due.

[Lewin] wanted to make it faster, and the SAM3X8E on the Due seemed like it could deliver. He first did a search to find out if this was already done, but came up blank. He did find [Marek Buriak]’s library for ILI9341-based TFT screens. [Marek] used code from [William Greiman], who developed SD card libraries for the Arduino. [William] had taken advantage of the SAM3X8E’s DMA capabilities to enable faster SD card transfers, and [Marek] then adapted this code to allow faster writes to ILI9341-based screens. All [Lewin] had to do was to find the code that sent a buffer out over SPI using DMA in Marek’s code, and adapt that to the Adafruit library for the SSD1306.

There is a caveat though: using this library will likely cause trouble if you are also using SPI to interface to other hardware, since the regular SPI.h library will no longer work in tandem with [Lewin]’s library. He offers some tips on how to overcome these issues, and would welcome any feedback or testing to help improve the code. The speed improvement is substantial. Up to 4 times quicker using standard SPI clock, or 8 times if you increase SPI clock speed. The code is available on his Github repo.

peltier mini fridge

Building Your Own Mini Fridge?

Ever play with a Peltier plate? They’re these really cool components that kind of look like a ceramic sandwich, and when you put power into them, one side gets hot, and one side gets freezing cold! [Joseph Rautenbach] decided he wanted to try making his own mini fridge out of one — which is typically how most modern mini fridges work these days.

The peltier plate he’s using draws 12v at about 3.5 amps — so about 50W — and if you don’t heat sink it properly you could burn it out in a matter of seconds. Peltier plates only care about the temperature differential between the two sides — if you don’t take the heat away from the hot side, it will soon overheat and destroy itself.

[Joe’s] using a styrofoam cooler for the fridge with a pair of computer heat sinks and fans for the peltier plate, and a temperature PID controller he bought off eBay. The external heat sink sucks away the excess heat generated by the peltier plate, and the internal one helps spread cooled air around the inside of the styrofoam cooler. The PID controller allows him to set a preferred temperature to maintain in the box, which will then control the outputs to keep it that way.

Continue reading “Building Your Own Mini Fridge?”

USB PIDs For All

The USB Implementers’ Forum doesn’t make things easy for anyone building a product with a USB port. To sell anything with USB and have it work like USB should, you need to buy a USB Vendor ID, a $5000 license that grants you exclusive use of 65,536 USB Product IDs. Very few companies will ever release 65,000 products, and there are a lot of unused PIDs sitting around out there.

Now, someone has finally done the sensible thing and put an unused USB VID to work. pid.codes obtained the rights to a single VID – 0x1209 – and now they’re parceling off all the PIDs that remain to open source hardware projects.

This is not a project supported by the USB Implementers’ Forum, and is more of a legal game of chicken on the part of pid.codes. The only thing the USB-IF could do to stop this is revoke the original VID; useless, because they can’t reassign it to anyone else. The original owners of the VID, InterBiometrics, licensed their VID before transferring or sublicensing VIDs and PIDs was prohibited by the USB-IF.

You can get a PID by forking the pid.codes repo, claiming a PID, and sending a pull request. Once that’s accepted, that PID is yours forever.