Greased Lightning Shows 360 Degrees

A lot of people got drones for Christmas this year (and many Hackaday readers already had one, anyway). A lot of these drones have cameras on them. The expensive ones beam back live video via RF. The cheaper ones just record to an SD card that you can download later.

If you are NASA, of course, this just isn’t good enough. At the Langley Research Center in Virginia, they’ve been building the Greased Lightning (also known as the GL-10) which is a 10-engine tilt-prop unmanned aerial vehicle. The carbon fiber drone is impressive, sure, but what wows is the recent video NASA released (see below).

Continue reading “Greased Lightning Shows 360 Degrees”

Robo Car Via 3G

[Emil Kalstø] has a pretty solid remote control car. We don’t mean a little car with a handheld remote you can drive around the neighborhood. [Emil’s] car has a camera and a cell phone so that it can go anywhere there’s 3G or 4G networking available.

The video (see below) shows the results (along with [Emil’s] little brother acting as a safety officer). The video offers tantalizing detail you might find useful if you want to reproduce a similar vehicle. However, it stops short of providing complete details.

The two batteries onboard will power the vehicle for over 20 hours of continuous use. The 30W motor is reduced with a chain drive to go about “walking speed.” There’s a Raspberry Pi with a Huawei 3G USB dongle onboard and [Emil] uses an XBox controller to do the steering from the warmth of his living room. Of course, a Pi can’t handle a big motor like that directly, so a Phidgets USB motor controller does the hard work. The software is written using Node.js.

The camera mount can swivel 230 degrees on a servo so that the operator can scan the road ahead. The video mentions that steering the car required a heavy-duty servo with metal gears (an earlier attempt with nylon gears didn’t work out).

Overall, it looks like a solid build. We hope [Emil] will share code and more details soon. If you can’t wait (and your insurance is paid up), you might have a go at an even bigger car. Surprisingly, there’s more than one example of that.

Continue reading “Robo Car Via 3G”

Hackaday Links: February 7, 2016

For a very long time, the original, 11 foot-long on-screen model of the USS Enterprise from Star Trek the original series – “NCC one seven O one. No bloody A, B, C, or D.” – was housed in the Smithsonian’s Air and Space Museum in Washington, DC. Recent visitors may have noticed the Enterprise is no longer on display. It’s being restored by the finest aircraft conservators in the world. There are a few great videos showing off how much goes into restoring a cultural icon.

Last weekend Hackaday visited Sparklecon in Fullerton, CA. This means I was in LA on the last Saturday of the month. What’s so special about that? The W6TRW Swap Meet at Northrop Grumman in Redondo Beach. Here’s the pics from that. The best thing I found? A wooden acoustic coupler modem for $15. Once I told the guys at the booth what it was, the price went up to $20. Still worth it.

What’s the worst thing about modern computers? They’re all LCDs, and that means worse resolution, terrible colorspace, and monitors that are very, veeeerrrrryyyy wide. The consequence of this is a complete and total lack of screen savers. Never fear, because the flying toaster is back, this time as an SD card holder. It’s 3D printable, so if you have some white, silver, and black filament sitting around, you know what to do.

The USB Killer hit the tips line a few times this week for inexplicable reasons. We’ve seen it before, but we haven’t seen it again. Surprisingly, no one – outside a bizarre Indiegogo campaign that shouldn’t exist – has made their own USB killer. Here’s your call to action: build a USB killer, and I’ll test it out.

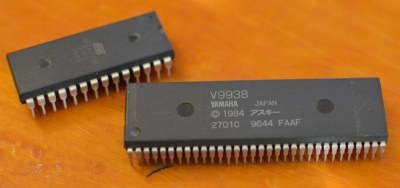
An SDIP-64 chip compared to a DIP-28 chip. Note the finer lead spacing on the SDIP device.

There’s more variety to your standard DIP-packaged chips than you might expect. The weirdest of these – at least when it comes to perfboard construction – is the SDIP, or Skinny Dual In-line Package. Instead of having a standard 0.1″ pitch between leads, the SDIP has a 0.070″ pitch. [Chuck] was having some problems looking for SDIP to DIP adapters until he found this amazing trick the connector companies don’t want you to know aboutJust plop the chip in at a 45º angle, bend a few pins, and you’re good to go.

Another Use For Old Hard Drive Parts: Anemometer

So you’ve just taken apart a hard drive, and you’re looking at all the pieces on your desktop. You’re somehow compelled to use them all in different projects. Why not pull out that very high quality bearing that keeps the platters spinning at high RPMs and build this simple anemometer with it? That’s what [Sergei Bezrukov] did, and it looks like a perfect el cheapo project.

The build is fairly low-tech and entirely sufficient. The cups are made from plastic containers that used to contain pantyhose. A Hall-effect sensor and a magnet take care of measuring the rotations, feeding its signal into a PIC that calculates the wind speed from the revolution rate. The rest of the housing is PVC, with some other miscellaneous parts found at the hardware store.

To calibrate the device, [Sergei] made a second hand-held unit that he could (presumably) drive around in a car to get a baseline wind speed, and then note down the revolution rate. Once you’ve got a good reference, holding the portable unit up to the permanent one transfers the calibration.

But the star of the show, that lets the anemometer spin effortlessly, is the sweet bearing that used to spin a hard-drive platter. If you haven’t played with one of these bearings before, you absolutely should. We just ran a post on taking apart a hard drive for its spare-parts goodness so you have no excuse. If you’re feeling goofy, you can mount one onto a board, step on it with the ball of your foot, and spin. They’re quality bearings, and you’ll be surprised how quickly you can spin as you pull your arms in.

Thank [Matt] for the tip!

Repairing Vintage Clock Movements

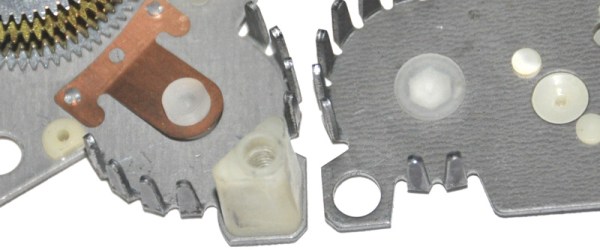
It’s obvious that [Matthew] cares a great deal for vintage electric clocks. He is especially fond of the bedside alarm variety, which in our experience cast a warm orange glow on the numbers and emitted a faint, gentle hum. [Matthew] has written up a thorough treatment of Sunbeam movements in particular that covers identification, disassembly, cleaning, and repair.

These workhorse timepieces are cheap and fairly plentiful if you work the estate sale or thrift store circuit. Sometimes there is a bit of trouble with motor pinions disintegrating or the teeth wearing down on the nylon gears. The decades-old petroleum lubricant combined with heat from the spinning rotor can eat away at the motor pinion, causing it to crumble if disturbed.

Wishing to save some of these clocks from landfills, [Matthew] designed motor pin replacements specifically for Sunbeam electric movements, the relatively  inexpensive alternative that graced many a mid-century household clock. He only had the shaft and a broken original to work with, but was able to design a sturdy acrylic replacement using this involute spur gear builder to generate a DXF file. Then it was just a matter of creating an STL file with Rhino 3D and shipping it off to Shapeways.

If you’ve ever wanted to get into clock or watch repair, this looks like a great way to get your feet wet unless you’re ready for some serious vintage watch repair. There’s no need to reinvent the pinion because [Matthew] sells them through his site. If you have a printer, the STL files await you.

Graphene Batteries Appear, Results Questionable

If you listen to the zeitgeist, graphene is the next big thing. It’s the end of the oil industry, the solution to global warming, will feed and clothe millions, cure disease, is the foundation of a space elevator that will allow humanity to venture forth into the galaxy. Graphene makes you more attractive, feel younger, and allows you to win friends and influence people. Needless to say, there’s a little bit of hype surrounding graphene.

With hype comes marketing, and with marketing comes products making dubious claims. The latest of which is graphene batteries from HobbyKing. According to the literature, these lithium polymer battery packs for RC planes and quadcopters, ‘utilize carbon in the battery structure to form a single layer of graphene… The graphene particles for a highly dense compound allowing electrons to flow with less resistance compared to traditional Lipoly battery technologies” These batteries also come packaged in black shrink tubing and have a black battery connector, making them look much cooler than their non-graphene equivalent. That alone will add at least 5mph to the top speed of any RC airplane.

For the last several years, one of the most interesting potential applications for graphene is energy storage. Graphene ultracapacitors are on the horizon, promising incredible charge densities and fast recharge times. Hopefully, in a decade or two, we might see electric cars powered not by traditional lithium batteries, but graphene supercapacitors. They’ll be able to recharge in minutes and drive further, allowing the world to transition away from a fossil fuel-based economy. World peace commences about two weeks after that happens.

No one expected graphene batteries to show up now, though, and especially not from a company whose biggest market is selling parts to people who build their own quadcopters. How do these batteries hold up? According to the first independent review, it’s a good battery, but the graphene is mostly on the label.

[rampman] on the RCgroups forums did a few tests on the first production runs of the battery, and they’re actually quite good. You can pull a lot of amps out of them, they last through a lot of charging cycles, and the packaging – important for something that will be in a crash – is very good. Are these batteries actually using graphene in their chemistry? That’s the unanswered question, isn’t it?

To be fair, the graphene batteries shipped out to reviewers before HobbyKing’s official launch do perform remarkably well. In the interest of fairness, though, these are most certainly not stock ‘graphene’ battery packs. The reviewers probably aren’t shills, but these battery packs are the best HobbyKing can produce, and not necessarily representative of what we can buy.

It’s also doubtful these batteries use a significant amount of graphene in their construction. According to the available research, graphene increases the power and energy density of batteries. The new graphene batteries store about as much energy as the nano-tech batteries that have been around for years, but weigh significantly more. This might be due to the different construction of the battery pack itself, but the graphene battery should be lighter and smaller, not 20 grams heavier and 5 mm thicker.

In the RC world, HobbyKing is known as being ‘good enough’. It’s not the best stuff you can get, but it is cheap. It’s the Wal-Mart of the RC world, and Wal-Mart isn’t introducing bleeding edge technologies that will purportedly save the planet. Is there real graphene in these batteries? We await an in-depth teardown, preferably with an electron microscope, with baited breath.

A Home CNC Built By Someone Who Knows Their Stuff

[thisoldtony] has a nice shop in need of a CNC. We’re not certain what he does exactly, but we think he might be a machinist or an engineer. Regardless, he sure does build a nice CNC. Many home-built CNCs are neat, but lacking. Even popular kits ignore fundamental machine design principles. This is alright for the kind of work they will typically be used for, but it’s nice to see one done right.

Most home-built machines are hard or impossible to square. That is, to make each axis move exactly perpendicular to the others. They also neglect to design for the loads the machine will see, or adjusting for deviation across the whole movement. There’s also bearing pre-loads, backlash, and more to worry about. [thisoldtony] has taken all these into consideration.

The series is a long one, but it is fun to watch and we picked up a few tricks along the way. The resulting CNC is very attractive, and performs well after some tuning. In the final video he builds a stunning rubber band gun for his son. You can also download a STEP file of the machine if you’d like. Videos after the break.

Continue reading “A Home CNC Built By Someone Who Knows Their Stuff”