Roll Your Own 64GB SD Card From An EMMC Chip

It’s well-known that buying Flash storage devices from cheap online retailers is fraught with danger. Stories abound of multi-gigabyte drives that turn out to be multi-megabyte ones engineered to falsely report their capacity. So when [Jason Gin] found a source of 64GB Toshiba eMMC chips for only $6 per device he bought a few, but was prepared for disappointment.

To test them, he decided to use an SD card interface. There are minor differences between eMMC and SD, but the interfaces are electrically the same and in most cases an SD controller will happily do business with an eMMC. It was not however an easy task to connect the two — these eMMCs were in BGA packages, hardly the easiest ones to work with. He resorted to dead-bug soldering the relevant interface wires to SD lines, and connecting up his computer.

His first attempt was something of a failure, wiring the chip to the PCB of a cheap USB-to-SD adaptor. This did not put him off though, he followed it up by cracking open a very old 2GB SD card that contained a PCB instead of being potted, and soldering his eMMC in place of its Flash and controller. This even fit in the original SD housing, and met with success when plugged into more reliable SD card readers. He was thus able to confirm the capacity of his chips.

His blog post is worth a read for more than just the very fine soldering involved. He takes us through some of the intricacies of SD interfacing, as well as talking at length about the decoupling and termination required to make a reliable connection. We particularly like his use of an area of unconnected BGA balls as prototyping space for decouplers.

If you marvel at the exceptional dexterity required for hand BGA work, we’ve a couple of other treats for you. There is this TI infra-red sensor BGA soldered to a piece of stripboard, and this wafer-level chip package soldered to an SOIC prototyping board.

The BASIC Issue With Retro Computers

If you are interested in how a computer works at the hardware grass-roots level, past all the hardware and software abstractions intended to make them easier to use, you can sometimes find yourself frustrated in your investigations. Desktop and laptop computers are black boxes both physically and figuratively, and microcontrollers have retreated into their packages behind all the built-in peripherals that make them into systems-on-chips.
Continue reading “The BASIC Issue With Retro Computers”

Think Your Way To Work In A Mind-Controlled Tesla

When you own an $80,000 car, a normal person might be inclined to never take it out of the garage. But normal often isn’t what we do around here, so seeing a Tesla S driven by mind control is only slightly shocking.

[Casey_S] appears to be the owner of the Tesla S in question, but if he’s not he’ll have some ‘splaining to do. He took the gigantic battery and computer in a car-shaped case luxury car to a hackathon in Berkley last week and promptly fitted it with the gear needed to drive the car remotely. Yes, the Model S has steering motors built in, but Tesla hasn’t been forthcoming with an API to access such functions. So [Casey_S] and his team had to cobble together a steering servo from a windshield wiper motor and a potentiometer mounted to a frame made of 2x4s. Linear actuators attach to the brake and accelerator pedals, and everything talks to an Arduino.

The really interesting part is that the whole thing is controlled by an electroencephalography helmet and a machine learning algorithm that detects when the driver thinks “forward” or “turn right.” It translates those thoughts to variables that drive the actuators. Unfortunately, space constraints kept [Casey_S] from really putting the rig through its paces, but the video after the break shows that the system worked well enough to move the car forward and steer a little.

There haven’t been too many thought-controlled cars featured here before, but we have covered a wheelchair with an EEG interface.

Continue reading “Think Your Way To Work In A Mind-Controlled Tesla”

IPhone NVMe Chip Reversed With Custom Breakout Boards

Ever so slowly, the main storage in our computers has been moving from spinning disks, to SSDs over SATA, to Flash drives connected to a PCI something or other. The latest technology is NVMe — Non-Volitile Memory Express — a horribly named technology that puts a memory controller right on the chip. Intel has a PCI-based NVMe drive out, Samsung recently released an M.2 NVMe drive, and the iPhone 6S and 6S Plus are built around this storage technology.

New chips demand a reverse engineering session, and that’s exactly what [Ramtin Amin] did (Internet Archive). He took a few of these chips out of an iPhone, created a board that will read them, and managed to analyze the firmware.

Any reverse engineering will begin with desoldering the chip. This is easy enough, with the real trick being getting it working again outside whatever system it was removed from. For this, [Ramtin] built his own PCIe card with a ZIF socket. This socket was custom-made, but the good news is you can buy one from ITEAD. Yes, it is expensive — that’s what you get with a custom-made ZIF socket.

With the chip extracted, a custom PCIe card, and a bit of work with the NVMe implementation for Linux, [Ramtin] had just about everything working. Eventually, he was able to dump the entire file system on the chip, allowing anyone to theoretically back up the data on their iPhone or MacBook Air. Of course, and especially for the iPhone, this data is encrypted. It’s not possible to clone an iPhone using this method, but it is a remarkably deep dive into the hardware that makes our storage tick.

Vintage Tube Radio Restorations

[J.B. Langston] has some vintage late-40’s/early-50’s tube radios that he wanted to repair – a Motorola All-American 5 AM radio, an Air Castle AM/FM radio and a Sears Silvertone AM/FM radio. He goes over, one by one, the three vintage radios, the problems they had, and how he got them back into working order. No finding a replacement microchip here, this was all about replacing capacitors and finding vacuum tubes!

In contrast to most modern builds we see on Hackaday, vintage radios are fairly simple – mainly turret-board builds with a transformer, resistors, capacitors, coil and tubes. The main issues in any vintage electronic repair is checking the capacitors because old wax paper and electrolytic capacitors can degrade and will need replacing. When repairing the All-American 5, [J.B. Langston] had an issue with the transformer, and he goes over how he fixed what’s called silver mica disease in it. While many parts were replaced with modern equivalents, only a selenium solid-state rectifier in one of them was replaced by a different part – a silicon diode and a high-wattage series resistor.

Looking at the inside of some of these radios, it’s surprising that they could be restored at all – 65-odd years of rust, dust, dirt and grime will take their toll – but [J.B. Langston] was able to fix all three radios and clean their Bakelite cases so they look and work like new. He goes over what he discovered, how he fixed the problems and the links to where he got help when needed. We’ve seen some great vintage radio projects over the years, including adding RDS (Radio Data Systems) to a vintage radio, converting a vintage radio with modern technology and even some other radio restoration projects.

Continue reading “Vintage Tube Radio Restorations”

A DIY Vacuum Pickup Tool For $75

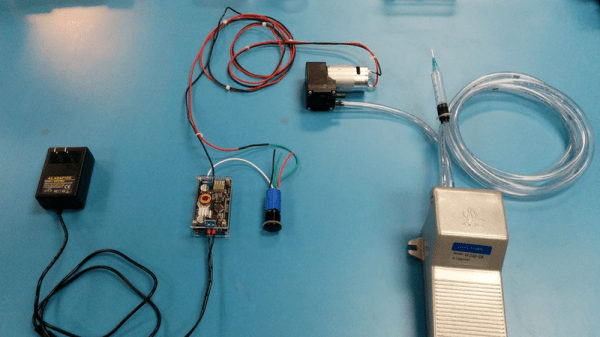
If you’re assembling prototypes of SMD boards on your own, placing the parts accurately can be a pain. Of course, it’d be nice to have a full pick and place machine, but those are rather expensive and time consuming to set up, especially for a small run of boards. Instead, a vacuum pickup tool can help you place the parts quickly and accurately by hand.

The folks over at Ohmnilabs have put together their own DIY pickup tool for about $75, and it’s become part of their in-house prototyping process. They grew tired of placing components with tweezers, which require you to remove parts from the tape before lifting them, and have a tendency to flip parts over at the worst time.

The build consists of a couple parts that can be bought from Amazon. An electric vacuum pump does the sucking, and the vacuum level is regulated with an adjustable buck converter. A solid foot switch keeps your hands free, and syringe tips are used to pick the parts up.

This looks like a simple afternoon build, but if you’re prototyping, it could save you tons of time. To see it in action, check out the video after the break.

Continue reading “A DIY Vacuum Pickup Tool For $75”

A Laser Effect Projector Built With Safety In Mind

There’s just something about wielding a laser pointer on a dark, foggy night. Watching the beam cut through the mist is fun – makes you feel a little Jedi-esque. If you can’t get enough of lasers and mist, you might want to check out this DIY “laser sky” effect projector.

The laser sky effect will probably remind you of other sci-fi movies – think of the “egg scene” from Alien. The effect is achieved by sweeping a laser beam in a plane through swirling smoke or mist. The laser highlights a cross section of the otherwise hidden air currents and makes for some trippy displays. The working principle of [Chris Guichet]’s projector is simplicity itself – an octagonal mirror spun by an old brushless fan motor and a laser pointer. But after a quick proof of concept build, he added the extras that took this from prototype to product. The little laser pointer was replaced with a 200mW laser module, the hexagonal mirror mount and case were 3D printed, and the mirrors were painstakingly aligned so the laser sweeps out a plane. An Arduino was added to control the motor and provide safety interlocks to make sure the laser fires only when the mirror is up to speed. The effect of the deep ruby red laser cutting through smoke is mesmerizing.

If laser sky is a little too one-dimensional for you, expand into two dimensions with this vector laser projector, and if monochrome isn’t your thing try an RGB vector projector.

Continue reading “A Laser Effect Projector Built With Safety In Mind”