1.5 Million Dollars Buys 850,000 LEDs And 29 Raspberry Pis

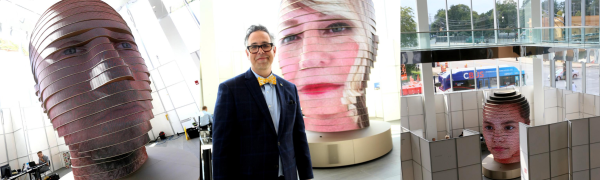
You think you like RGB LEDs? Columbus, OH art professor [Matthew Mohr] has more blinkenlove than you! His airport– convention-center-scale installation piece is an incredible 850,000 RGB LEDs wrapped around a 14-foot tall face-shaped sculpture that projection-maps participants’ faces onto the display. To capture images, there is also a purpose-built room with even illumination and a slew of Raspberry Pi cameras to take pictures of the person’s face from many angles simultaneously.

Besides looking pretty snazzy, the scale of this is just crazy. For instance, if you figure that the usual strip of 60 WS2812s can draw just about 9.6 watts full on, that scales up to 136 kW(!) for the big head. And getting the control signals right? Forgeddaboutit. Prof. [Mohr], if you’re out there, leave us some details in the comments.

(Edit: He did! And his website is back up after being DOSed. And they’re custom LEDs that are even brighter to compete with daylight in the space.)

What is it with airports and iconic LED art pieces? Does anyone really plan their stopovers to see public art? How many of you will fly through Columbus on purpose now?

Knowing What’s Below: Buried Utility Location

We humans have put an awful lot of effort into our infrastructure for the last few centuries, and even more effort into burying most of it. And with good reason — not only are above ground cables and pipes unsightly, they’re also vulnerable to damage from exposure to the elements. Some utilities, like natural gas and sanitary sewer lines, are also dangerous, or at least perceived to be so, and so end up buried. Out of sight, out of mind.

But humans love to dig, too, and it seems like no sooner is a paving project completed than some joker with a jackhammer is out there wrecking the pristine roadway. Before the construction starts, though, cryptic markings will appear on the pavement courtesy of your local buried utility locating service, who apply their rainbow markings to the ground so that nothing bad happens to the often fragile infrastructure below our feet.

Continue reading “Knowing What’s Below: Buried Utility Location”

Me Casa Es Techno Casa

“Jarvis, make me a sandwich” is not a reality yet. Though there exist a lot of home automation products out there today, commercial solutions just don’t make the cut for the self-respecting geek. So [Matias] took the DIY route with his La CasaC Home Automation project and achieved the functionality he was after.

[Matias’] project is one of the most elaborate and large-scale DIY home automation projects we have seen in recent years. With over 200 nodes, this project took a number of years of planning and execution. The core of the design is the ever popular Raspberry Pi running OpenHAB to ease the pain of customization and integration with various protocols. To further simplify the ginormous task, the design uses RS485 to communicate between master and slave devices.

Each wall node is managed by a nearby Arduino which in turn talks to a central Arduino Mega. OpenHab takes care of the higher functions such as UI, integration with existing hardware such as the solar heater, media center control,  and RFID and keypad control. Sensor data aggregation and building management is done centrally with data funneled to a separate NAS system as long-term storage.

What makes this project awesome is that [Matias] did not integrate a Raspberry Pi into his house, no! He actually integrated his entire house around the system because this build includes the construction of the house as well. Take a look at this Google Photos Gallery to see the photographic progress of the build. That is amazing!

The code and snippets are available on GitHub for your viewing pleasure though that seems the easy part. If this inspired you, then also take a look at the Raspberry Pi Home Automation of a Gingerbread House if you’d like to try it out before fully committing.

Bringing Back The IPhone7 Headphone Jack

Plenty of people bemoaned Apple’s choice to drop the 1/8″ headphone jack from the iPhone 7. [Scotty Allen] wasn’t happy about it either, but he decided to do something about it: he designed a custom flex circuit and brought the jack back. If you don’t recognize [Scotty], he’s the same guy who built an iPhone 6 from parts obtained in Shenzhen markets. Those same markets were now used to design, and prototype an entirely new circuit.

The iPhone 7 features a barometric vent, which sits exactly where the headphone jack lived in the iPhone 6. The vent helps the barometric pressure sensor obtain an accurate reading while keeping the phone water proof. [Scotty] wasn’t worried about waterproofing, as he was cutting a hole through the case. The vent was out, replaced with a carefully modified headphone jack.

The next step was convincing the phone to play analog signals. For this, [Scotty] used parts from Apple’s own headphone adapter. The hard part was making all of this work and keeping the lightning port available. The key was a digital switch chip. Here’s how the circuit works:

When no headphone is plugged in, data is routed from the iPhone’s main board to the lightning port. When headphones are plugged in, the data lines are switched to the headphone adapter. Unfortunately, this means the phone can’t play music and charge at the same time — that is something for version 2.0.

The real journey in this video is watching [Scotty] work to fit all these parts inside an iPhone case. The design moved from a breadboard through several iterations of prototype printed circuit boards. The final product is built using a flexible PCB – the amber-colored Kapton and copper sandwiches that can be found in every mobile device these days.

Making everything fit wasn’t easy. Two iPhone screens perished in the process. But ultimately, [Scotty] was successful. He’s open sourced his design so the world can build and improve on it.

Want to read more about the iPhone 7 and headphone jacks? Check out this point and counterpoint.  we published on the topic.

Continue reading “Bringing Back The IPhone7 Headphone Jack”