CES2017: Really, Really Big SLA Printing

Last year at CES, UniZ introduced the Slash, a desktop resin printer. It’s fast, it’s capable, and it’s shipping now, but there was something else in the UniZ booth that had a much bigger wow factor.

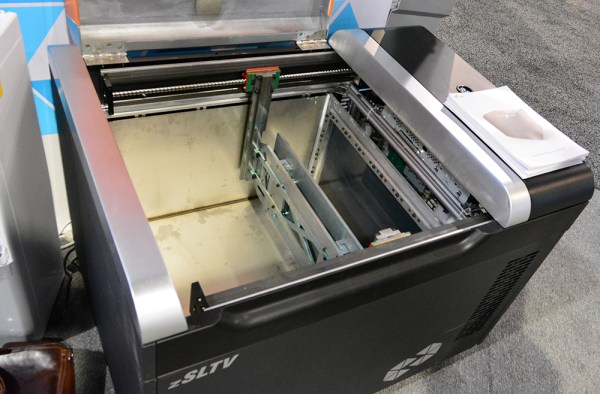
The UniZ zSLTV is a gigantic box, a little more than one meter wide, and a little less than one meter tall and deep. Open the lid, and you see a gigantic resin printer turned on its side. The idea here is to fill a gigantic tank with resin, (the build volume is 521 x 293 x 600 mm) and use it as a fairly standard UV LED / LCD resin printer. The only real difference between this machine and any other resin printer is that the part is always submerged in resin.

It’s something we’ve never seen before, and it will be available ‘soon’. The price for this huge machine is in the ballpark of $10,000.

Custom Zynq/CMOS Camera Unlocks Astrophotography

Around here we love technology for its own sake. But we have to admit, most people are interested in applications–what can the technology do? Those people often have the best projects. After all, there’s only so many blinking LED projects you can look at before you want something more.

[Landingfield] is interested in astrophotography. He was dismayed at the cost of commercial camera sensors suitable for work like this, so he decided he would create his own. Although he started thinking about it a few years ago, he started earnestly in early 2016.

The project uses a Nikon sensor and a Xilinx Zynq CPU/FPGA. The idea is the set up and control the CMOS sensor with the CPU side of the Zynq chip, then receive and process the data from the sensor using the FPGA side before dumping it into memory and letting the CPU take over again. The project stalled for a bit due to a bug in the vendor’s tools. The posts describe the problem which might be handy if you are doing something similar. There’s still work to go, but the device has taken images that should appear on the same blog soon.

Continue reading “Custom Zynq/CMOS Camera Unlocks Astrophotography”

Scissor Lift Shoes May Be OSHA Compliant

It’s been said that necessity is the mother of all invention. This was probably the fundamental principle behind the show “Inspector Gadget”, a story about a police agent who has literally any technology at his grasp whenever he needs it. Although the Inspector’s gadgets get him into trouble more often than not (his niece Penny usually solves the actual crimes), the Inspector-inspired shoes that [Make it Extreme] built are a little bit more useful than whatever the Inspector happens to have up his sleeve (or pant leg, as the case may be).

If a fabrication tour de force, [Make it Extreme] built their own “Go Go Gadget Legs”, a set of pneumatically controlled stilts that allow the wearer to increase their height significantly at the push of a button. We often see drywall contractors wearing stilts of a similar height, but haven’t seen any that are able to raise and lower the wearer at will. The team built the legs from scratch, machining almost every component (including the air pistons) from stock metal. After some controls were added and some testing was done, the team found that raising one foot at a time was the safer route, although both can be raised for a more impressive-looking demonstration that is likely to throw the wearer off balance.

The quality of this build and the polish of the final product are incredibly high. If you have your own machine shop at home this sort of project might be within your reach (pun intended). If all you have on hand is a welder, though, you might be able to put together one of [Make it Extreme]’s other famous builds: a beer gun.

Continue reading “Scissor Lift Shoes May Be OSHA Compliant”

Tracking Planes With An ESP8266

While there are apps that will display plane locations, [squix] wanted to build a dedicated device for plane spotting. The ESP8266 PlaneSpotter Color is a standalone device that displays a live map with plane data on a color TFT screen. This device expands on his PlaneSpotter project, adding a color display and mapping functions.

First up, the device needs to know where planes are. The ADS-B data that is transmitted from planes contains useful data including altitude, velocity, position, and an identifier unique to the aircraft. While commercial services exist for getting this data, the PlaneSpotter uses ADS-B Exchange. You can set up a Raspberry Pi to record this data, and provide it to ADS-B Exchange.

With the plane data being received from the ADS-B Exchange API, it’s time to draw to the screen. The JPEGDecoder fork for ESP8266 is used for drawing images, which are fetched from the MapQuest API as JPEGs.

Finally, geolocation is needed to determine where in the world the PlaneSpotter is. Rather than adding a GPS module, [squix] went with a cheap solution: WiFi geolocation. This uses identifying information and signal strengths from nearby WiFi access points to determine location. This project uses a public API by [Alexander Mylnikov], which returns a JSON object with longitude and latitude.

This project demonstrates what the ESP8266 is capable of, and brings together some neat techniques. If you’re looking to geolocate or display maps on an ESP8266, the code is available on Github.

Continue reading “Tracking Planes With An ESP8266”

The Poynting Vector Antenna

Radio amateurs are inventive people, and though not all of them choose to follow it there is a healthy culture of buildng radio equipment among them. In particular the field of antennas is where you’ll find a lot of their work, because the barrier to entry can be as low as the cost of a reel of wire.

Over the years a number of innovative antenna designs have come from radio amateurs’ experimentation, and it’s one of the more recent we’d like to share with you today following a [Southgate ARC] story about a book describing its theory (Here’s an Amazon link to the book itself). The Poynting Vector antenna has been one of those novel designs on the fringes for a while now, it has been variously described as the “Super-T”, or the “flute”. Its party piece is tiny dimensions, a fraction of the size of a conventional dipole, and it achieves that by the interaction between a magnetic field across the plates of a capacitor in a tuned circuit and the electric field between a very short pair of dipole radiators. The trade-off is that it has an extremely high Q and thus a narrow bandwidth, and since its feeder can become part of its resonant circuit it is notoriously difficult to match to a transmitter. [Alan MacDonald, VE3TET] and [Paul Birke, VE3PVB] have a detailed page on the development of their Poynting antenna which takes the reader through the details of its theory and the development of their practical version.

In the roof space above the room in which this is being written there hangs a traditional dipole for the 20m amateur band. Though it is a very effective antenna given that it is made from a couple of pieces of wire and a ferrite core it takes most of the length of the space, and as we’re sure Hackaday readers with callsigns will agree a relatively tiny alternative is always very welcome.

If antennas are a mystery to you then we’d suggest you read an introduction to antenna basics to get you started.

Amstrad On An FPGA

If you are from the United States and of a certain age, it is very likely you owned some form of Commodore computer. Outside the US, that same demographic was likely to own an Amstrad. The Z80-based computers were well known for game playing. [Freemac] implemented a working Amstrad CPC6128 using a Xilinx FPGA on a NEXYS2 demo board.

The wiki posting is a bit long, but it covers how to duplicate the feat, and also gives technical details about the design. It also outlines the development process used ranging from starting with a simple Z80 emulation and moving on to more sophisticated attempts. You can see a video of the device below.

Continue reading “Amstrad On An FPGA”

Keep An Old Real Time Clock Module Ticking

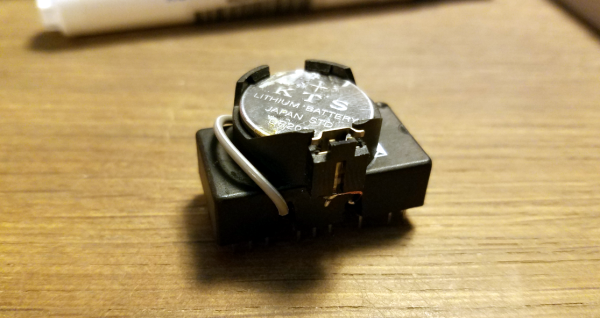
Sometimes we run into real problems restoring old machines. [RedruM69] recently ran into a system with a dead Real Time Clock (RTC) module. These modules were used on computers and all sorts of other equipment, storing time, date, and 100 or so bytes of battery backed SRAM (before the days of cheap, plentiful flash memory). Often an external coin cell would supply power to the module. In some cases though, cost savings would take over, and the battery would be incorporated into the module. Such is the case with many Dallas Semiconductor models, and the benchmarq bq3287 module [RedruM69] was working with. If we’re reading the date code right, the module was produced in mid 1995 so we’re well past the advertised 10 year battery life.

Apparently Texas Instruments is the current owner of this design, and they even have a datasheet online. (PDF link). It turns out that the bq3287 is a descendant of the bq3285, except that the battery pin is internally disconnected. For most people this would mean a search for a compatible replacement. An industrious hacker might even whip up something compatible from modern components. Not [RedruM69] though. He broke out his Dremel tool and cut into the potted case. Exposing the internal connections above pins 16 and 20 allowed him to solder two wires on. Connecting these wires to an external coin cell brought the module back to life.

[RedruM69] isn’t the first one to perform this hack. Sun computers kept their MAC address in chips like this. When the battery went dead, the computer was off the network. Hackers have been cutting the modules open and adding batteries for years. You could always forgo RTC modules completely and use the power grid as your timebase.