Build A Calculator, 1974 Style

Last month we touched upon the world of 1970s calculators with a teardown of a vintage Sinclair, and in the follow-up were sent an interesting link: a review of a classic Sinclair calculator kit from [John Boxall]. It’s a few years old now, from 2013, but since it passed us by at the time and there was clearly some interest in our recent teardown, it’s presented here for your interest.

It seems odd in 2017 that a calculator might be sold as a kit, but when you consider that in the early 1970s it would have represented an extremely expensive luxury purchase it makes some sense that electronics enthusiasts who were handy with a soldering iron might consider the cost saving of self-assembly to be worthwhile. The £24.95 price tag sounds pretty reasonable but translates to nearly £245 ($320) in today’s terms so was hardly cheap. The calculator in question is a Sinclair Cambridge, the arithmetic-only predecessor to the Sinclair Scientific we tore down, and judging by the date code on its display driver chip it dates from September 1974.

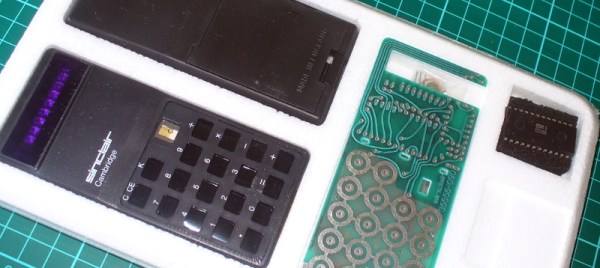
As a rare eBay find that had sat in storage for so long it was clear that some of the parts had suffered a little during the intervening years. The discrete components were replaced with modern equivalents, including a missing 1N914 diode, and the display was secured in its flush-fitting well in the board with wire links. The General Instrument calculator chip differs from the Texas Instruments part used in the Scientific, but otherwise the two calculators share many similarities. A full set of the notoriously fragile Sinclair battery clips are in place, with luck they’ll resist the urge to snap. A particularly neat touch is the inclusion of a length of solder and some solder wick, what seems straightforward to eyes used to surface-mount must have been impossibly fiddly to those brought up soldering tube bases.

The build raises an interesting question: is it sacrilege to take a rare survivor like this kit, and assemble it? Would you do it? We’d hesitate, maybe. But having done so it makes for a fascinating extra look at a Sinclair Cambridge, so is definitely worth a read. If you want to see the calculator in action he’s posted a video which we’ve put below the break, and if you need more detail including full-resolution pictures of the kit manual, he’s put up a Flickr gallery.

Continue reading “Build A Calculator, 1974 Style”

Roll Your Own JBC Soldering Station

[Marco Reps] was soldering some boards with a lot of thermal mass and found his usual soldering iron was not up to the task. He noticed some professional JBC soldering stations that he liked, but he didn’t like the price. Even an entry-level JBC station is about $500 and they go up from there. He decided to build his own, but it did take awhile to complete. You can see two videos about the project, below.

How can you build your own soldering station and still claim it is a JBC? [Marco] noticed that the real performance of the iron came from the tip — what JBC calls a cartridge. In addition, the handle provides good ergonomics. You can buy the tips and handles from JBC for considerably less than a complete station. You just have to add the electronics to make it all work.

Continue reading “Roll Your Own JBC Soldering Station”

3D Printed Hovercraft Takes To The Air

Instructables user [John_Hagy] and some classmates built an RC hovercraft as their final project in the Robotics Education Lab at NC State University. It’s a foam slab with a Hovership H2204X 2300Kv brushless motor inflating a skirt made out of ripstop nylon. Nylon is great here because it has a low friction coefficient and is nonporous to keep the air in. A second motor propels the craft, with a servo turning the whole motor assembly to steer. The team designed and 3D-printed fan holders which also help channel the air to where it’s supposed to go. Control is via a typical radio-control transmitter and receiver combo.

The project writeup includes a lot of fun detail like previous versions of the hovercraft as well as the research they undertook to learn how to configure the craft — clearly it’s their final paper put on the internet, and well done guys.

Needless to say, we at Hackaday can’t get enough of this sort of thing, as evidenced by this cool-looking hovercraft, this hovercraft made on a budget and this solar-powered ‘craft.

Trainspotting With Junk, For Science

[Douglas] hometown Goshen, Indiana takes the state’s motto ‘The Crossroads of America’ seriously, at least when it comes to trains. The city is the meeting point of three heavily frequented railroad tracks that cross near the center of town, resulting in a car-traffic nightmare. When everybody agrees that a situation is bad, it is time to quantify exactly how bad it is. [Douglas] stepped up for this task and delivered.

High tech train counting equipment

He describes himself as cheap, and the gear he used to analyze the railroad traffic at a crossing visible from his home certainly fits the bill: a decades-old webcam, a scratched telephoto lens and a laptop with a damaged hinge.

With the hardware in place, the next step was to write the software to count and time passing trains. Doing this in stable conditions with reasonable equipment would pose no problem to any modern image processing library, but challenged with variable lighting and poor image quality, [Douglas] needed another solution.

Instead of looking for actual trains, [Douglas] decided to watch the crossing signals. His program crops the webcam image and then compares the average brightness of the left and right halves to detect blinking. This rudimentary solution is robust enough to handle low light conditions as well as morning glare and passing cars.

The rest is verifying the data, making it fit for processing, and then combining it with publicly available data on car traffic at the affected intersections to estimate impact. The next council meeting will find [Douglas] well prepared. Traffic issues are a great field for citizen science as shown in Stuttgart earlier. If the idea of bolting old lenses to webcams intrigues you, we got you covered as well.

Hackaday Prize Entry: A Mess Of VGA On A Breadboard

Before all our video games came over the Intertubes, before they were on CDs, and before they were on cartridges, video games were all discrete logic. Pong was the first and you can build that out of several dozen logic chips. The great [Woz] famously built Breakout out of 44 simple chips.

For [Marcel]’s entry to the Hackaday Prize, he’s taking the single board microprocessor-less computer to the next level. He’s building a multi-Megahertz 64-color computer on a breadboard. What’s the capacitance of a breadboard? Just ask [Marcel].

The design of this disintegrated computer has just about everything you could want in a discrete CPU. There is no microcontroller or complex chips like the 74181 ALU, there’s pipelining with sometimes two instructions per clock, decoding with diodes, and a 60 Hz, 64 color VGA output and four sound channels. There’s only about 40 TTL chips on this board.

The project logs for this Hackaday Prize entry are a treat in themsleves, ranging from topics to the implementation of NES controllers to getting rid of the breadboard and turning this computer into something like a vintage game system, but with a custom CPU and instruction set. It’s an amazing build, and an awesome project for the Hackaday Prize.

Continue reading “Hackaday Prize Entry: A Mess Of VGA On A Breadboard”

Sferics, Whistlers, And The Dawn Chorus: Listening To Earth Music On VLF

We live in an electromagnetic soup, bombarded by wavelengths from DC to daylight and beyond. A lot of it is of our own making, especially further up the spectrum where wavelengths are short enough for the bandwidth needed for things like WiFi and cell phones. But long before humans figured out how to make their own electromagnetic ripples, the Earth was singing songs at the low end of the spectrum. The very low frequency (VLF) band abounds with interesting natural emissions, and listening to these Earth sounds can be quite a treat.

Continue reading “Sferics, Whistlers, And The Dawn Chorus: Listening To Earth Music On VLF”

Evil Hotspot Costume Makes Valuable Connections

This year for Hallowe’en, [Scott] went out dressed as a Comcast xfinity hotspot. Funny, yes, but there’s a deeper meaning here. [Scott] really went as a walking PSA that illustrates the dangers of making assumptions about the relative safety of WiFi networks based solely on their broadcast names.

[Scott] could have gone chaotic evil with this setup, but he didn’t. No one could actually get on the Internet through him. Inside the “hotspot” are a Wi-Fi adapter and a Pi Zero running a captive portal. It broadcasts the default ‘XFINITY’ and ‘xfinitywifi’ SSIDs, plus a bunch of other common network names. Whenever anyone tries to connect, or worse, their phone automatically connects, they’ll hear a sad tuba cadence. This comes courtesy of a multi-sound effects box that’s controlled by the Pi through a relay board.

Meanwhile, the mark’s device is redirected to an internally-hosted “xfinity” login page. Anyone who actually goes on to enter their login credentials is treated to a classic horror film scream sample while the evil hotspot quietly stores their name and password and displays them on an e-ink display for all to see — a walking e-ink wall of sheep. Check out the demo after the break.

[Scott]’s evil hotspot is powered by a huge battery that can run it for 24 hours. Here’s a wind- and solar-powered WAP we covered several years ago.

Continue reading “Evil Hotspot Costume Makes Valuable Connections”