Ask Hackaday: Prove Santa Exists

There is no question, that Santa Claus exists. He’s real, with the sleigh, the beard, and the reindeer and everything. He distributes gifts to billions of children in an evening, squeezes down a billion chimneys without getting that stylish red outfit dirty, and gets back home to the North Pole before sunrise. What more proof do you need, after all the missile defence folks track his progress over the icy wastes every Christmas Eve!

Well, the previous paragraph is the story you’ll get from the average youngster in countries where St. Nick is a cultural fixture, and who are we to disabuse them of this notion. Certainly not [Dave Barrett], who has the task of coming up with some ideas for a Santa Proof Of Existence for a kids’ Christmas party. In a previous year he’s thrilled them with a view of the sleigh taking off (in reality a remote-controlled model rocket launch complete with fake air traffic control clearance for Santa via CB radio), but this year the party isn’t somewhere with the space to do that trick. Instead he has the task of maintaining the illusion in those young minds for another year, with only a modest suburban plot in which to do it.

How would you prove Santa’s existence for the credulous young party-goers, using the finest technological marvels available to the Hackaday community? Perhaps you might create the illusion of boots crunching in the snow outside, or maybe the not-so-distant sound of reindeer. We suggest a Santa-Pede won’t cut it, and neither will hiring the beardy member of your hackspace as a stand-in. Kids aren’t that stupid!

What do you think? Go nuts in the comments.

Santa image: Jonathan Lindberg [Public domain].

Feed Your Cat The Modern Way

Feeding the cat should be a moment of magic, in which you bond with your adorable pet as she rubs seductively against your ankles. As you place the saucer of tender and moist meaty chunks on the floor, she bounds the length of your kitchen, excited expression on her little kitty face, and tail in the air.

If Hackaday made television adverts for cat food, we’d have it nailed. But our everyday reality involves the cute-as-heck Hackaday moggy turning into a persistent little pest when she decides it’s feeding time. [ThinkSilicon]’s friends had exactly this problem, with their furry friend’s preferred timing coming early in the morning. His solution? An automated cat feeder (translated) that dispenses kibbles from a hopper into the lucky mouser’s feeding dish.

The mechanical part of this endeavour is pretty straightforward, a servo moves a sliding piece of plywood with a hole cut in it across the bottom of a hopper full of cat food. Move the slide, dispense food down a chute to the waiting happy cat. Behind the scenes is an ESP8266 and a NodeMCU web service, through which feeding time can be either scheduled, or dispensed at will.

A happy cat means a happy owner, especially in the very early morning. Until that is the newly-sated creature decides to spread the love, jumping onto the owner’s bed in thanks and breathing cat-food-breath into their face. You really do have to love ’em!

We’ve shown you many cat food related projects in the past, including this Arduino take on the same idea. But why take the effort to trigger it yourself, when the cat can do it for you.

Never Let Your Christmas Tree Run Dry, With Added Ultrasound

Winter in the parts of the Northern Hemisphere for which observing Christmas includes bringing half a forest into the house should really be divided into two seasons. No-spruce-needles-in-the-carpet season, and spruce-needles-doggedly-clinging-to-the-carpet season. Evergreen trees were not designed for indoor use, and for a hapless householder to stand any chance of keeping those needles on the branches there has to be a significant amount of attention paid to the level of the water keeping the tree hydrated.

[Evan] has paid that attention to the problem of Christmas tree hydration, and to address the shortcomings of earlier designs has come up with a low water warning using an ultrasonic rangefinder. Where previous sensor attempts based on conductive probes succumbed to corrosion or dirt build-up, this one has no contact between sensor and water.

Behind the rangefinder is a CHIP board, whose software sends a text message to his phone when the water level gets a bit low. All the software is available in the linked GitHub page, so should you wish to make your tree safe from thirst, you too can give it a try.

SMS texts are a good way to alert a tree owner, but we quite like the sensor that used the tree lights instead.

Bluetooth Speaker In A Bag

[VanTourist] — irked by what he sees as complicated project videos — has demonstrated that you can build a high quality, multi-function Bluetooth speaker inside three hours.

Using simple hand tools — primarily a crimper, wire stripper, razor cutter and some glue — he’s packed this repurposed GoPro accessory bag with quite a bit of tech. The main components are a Bluetooth amplifier with a spiffy knob, and a pair of 15W speakers, but he’s also added a 1W LED flashlight, 1A and 2.1A charging ports, a battery charge monitor display, and pilot cover toggle switches for style points. Despite all that crammed into the bag, there’s still a bit of room left to pack in a few possessions! You can check out the build pictures here, or the video after the break.

Continue reading “Bluetooth Speaker In A Bag”

A Wireless Webcam Without A Cumbersome Cloud Service

After a friend bought a nannycam that required the use of a cloud service to make the device useful,  [Martin Caarels] thought to himself — as he puts it — ”I can probably do this with a Raspberry Pi!

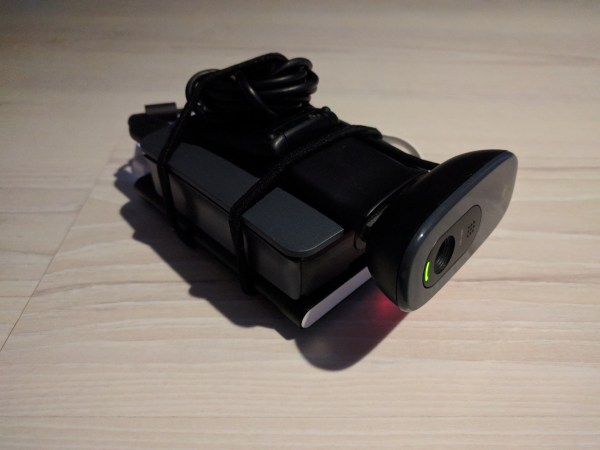
Altogether, [Caarels] gathered together a 4000mAh battery, a Raspberry Pi 3 with a micro SD card for storage, a Logitech c270 webcam, and the critical component to bind this project together: an elastic band. Once he had downloaded and set up Raspbian Stretch Lite on the SD card, he popped it into the Pi and connected it to the network via a cable. From there, he had to ssh into the Pi to get its IP so he could have it hop onto the WiFi.

Now that he effectively had a wireless webcam, it was time to turn it into a proper security camera.

Continue reading “A Wireless Webcam Without A Cumbersome Cloud Service”

Restoring A Piece Of Musical History

Every restoration project involves various levels of grit, determination, gumption and doggedness. But [Darren Glen]’s restoration of a Jupiter-8 is an absolute labor of love. The Jupiter-8,  launched by Roland in 1981, was their flagship “polyphonic analog subtractive” synthesizer and was used by many legendary acts of the ’80’s. The synthesizer was rugged — built to withstand the rigors of travelling everywhere that the bands took it. More importantly, it could produce a wide range of sounds that came from dedicated and independent controllers. These, plus a host of other desirable features, makes the synth highly coveted even today and the rare ones that surface for sale can be quite expensive.

The back story of how he came in possession of this coveted, albeit non-functioning, piece of history is a good read. But the part that makes us all interested is the meticulous restoration that he is carrying out. There is a lot of useful information that he shares which could be handy if you are planning any restoration project of your own.

When he first turned it on, all he got was an “8” on the display — which seemed like an error code. From then onward, he has been carefully stripping away each part and slowly bringing it back to life. All of the linear slide potentiometers and slide switches were de-soldered, dis-assembled, cleaned of rust and the carbon tracks and contacts cleaned with special spray — making them almost as good as new. The transformer and its mounting brackets received a similar treatment of rust cleaning and fresh paint. All of the other internal metal parts, such as the chassis, were restored in a similar fashion.

White plastic buttons and knobs which were faded, were brightened up by spraying them with a generous dose of hydrogen peroxide hair spray, putting them in Ziploc bags and letting them bake in sunlight for a day. [Darren] was satisfied enough with this process and gave the same treatment to all the other colored buttons too, with good results. The other set of plastic parts – the keyboard keys, were cleaned and polished with a scratch and blemish polish cream, and replacements were ordered out from a specialist supplier for the few that were damaged beyond repair.

But by far the greatest challenge for [Darren] has been resurrecting the top metal cover. It was badly rusted and had to be completely stripped of all paint. Repainting it the right shade was relatively easy, but applying the legend and decals took him to every screen printer in town, none of whom could manage the job. He lucked out by locating a screen printer who specialized in custom automotive work and managed to do a pretty good job with the decal work.

The Z80 microprocessor had lost all its magic smoke, so [Darren] has ordered an original Zilog replacement which will hopefully clear the error he noticed when it was first turned on. He’s slowly working his way through all the issues, and it is still work in progress, but we look forward to when it’s all done and dusted. A fully functional, restored Roland Jupiter-8 — one of the first 500 that were built back in 1981 — resurrected with a lot of TLC.

A big shout out to [Tim Trzepacz] for bringing this project to our notice.

Driver Board Makes Nixie Projects Easier Than Ever

We know, we know — yet another Nixie clock. But really, this one has a neat trick: an easy to use, feature packed driver for Nixies that makes good-looking projects a snap.

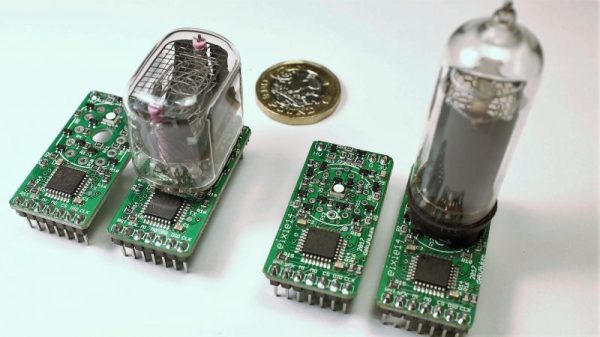
As cool as Nixies are — we’ll admit that to a certain degree, familiarity breeds contempt — they can be tricky to integrate. [dekuNukem] notes that aside from the high voltages, laying hands on vintage driver chips like the 7441 can be challenging and expensive. The problem was solved with about $3 worth of parts, including an STM32 microcontroller and some high-voltage transistors. The PCBs come in two flavors, one for the IN-12 and one for the IN-14, and connections for the SPI interface and both high- and low-voltage supplies are brought out to header pins. That makes the module easy to plug into a motherboard or riser card. The driver supports overdriving to accommodate poisoned cathodes, 127 brightness levels for smooth dimming, and a fully adjustable RBG backlight under the tube. See the boards in action in the video below, which features a nicely styled, high-accuracy clock.

From Nixie tachs to Nixie IoT clocks, [dekuNukem]’s boards should make creative Nixie projects even easier. But if you’re trying to drive a Nixie Darth Vader, you’re probably on your own.