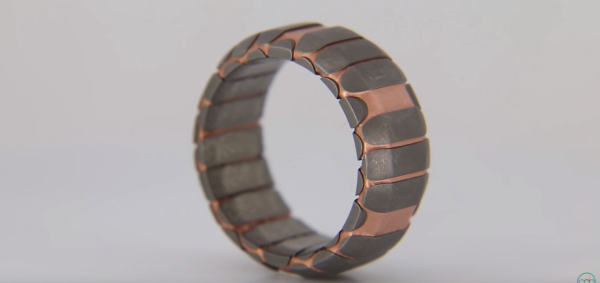
Superconducting wire has been around for decades now. Typically it is a thick wire made up of strands of titanium and niobium encased in copper. Used sections of this wire show up on the open market from time to time. [Patrick] got ahold of some, and with his buddies at the waterjet channel, they cut it into slices. It was then over to the lathe to shape the ring.
Once the basic shape was created, [Patrick] placed the ring in ferric chloride solution — yes the same stuff we use to etch PC boards. The ferric chloride etched away just a bit of the copper, making the titanium niobium sections stand out. A trip through the rock tumbler put the final finish on the ring. [Patrick] left the ring in bare metal, though we would probably add an epoxy or similar coating to keep the copper from oxidizing.
[Patrick] is selling these rings on his website, though at $700 each, they’re not cheap. Time to hit up the auction sites and find some superconducting wire sections of our own!
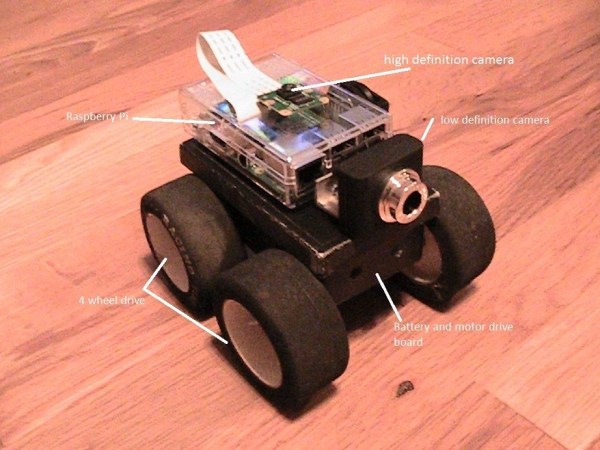
Why bother crawling into that tiny sewer tunnel and getting coated in Cthulhu knows what — not to mention possibly getting stuck — when you can roll a robot in there instead? That’s what InspectorBot does. It’s [Dennis]’ entry for The Hackaday Prize and a finalist for our Best Product competition.
InspectorBot is a low-profile rover designed to check out the dark recesses of sewers, crawlspaces, and other icky places where humans either won’t fit or don’t want to go. Armed with a Raspberry Pi computer, it sports a high-definition camera pointed up and a regular webcam pointing forward for navigation. It uses point-to-point WiFi for communication and rocks all-wheel drive controlled by a pair of L293D motor drivers.
This seems like fertile ground for us. Pipe-crawlers, chimney-climbers, crawlspace-slitherers all sound like they’d be helpful, particularly in conjunction with some kind of computer vision that allowed the robot to notice problems even when the operator does not. Right now, [Dennis] has the chassis rolling and most of the current work is focused on software. Both cameras are now working, allowing the InspectorBot to send forward-looking and upward-looking video back to the operator at the same time. This, alone, is a great advancement of the current crop of Raspberry Pi rovers and adds a lot of functionality to an easy-to-build platform.
So I made an awful, kludgey, “there I fixed it” level repair, and I need to come clean. This is really a case of an ill-advised ground.
My thirteen-year-old daughter asked for help repairing her Macbook charging cable. Macbook chargers really aren’t meant to flex around a lot, and if you’re the kind of person who uses the laptop on, well, the lap, with the charger in, it’s gonna flex. Sooner or later the insulation around the plug housing, where it plugs into the laptop, cracks and the strands of wire can be seen. This type of cable consists of an insulated lead wire surrounded by a stranded ground wire. The problem with this configuration is that the stranded ground also gets flexed until it breaks, one strand at a time, until the cable stops working.
So it was with my daughter’s Macbook cable. I didn’t have the money to buy her a new one, and I figured we could repair the break. We busted out her WLC100 and sat down to get our solder on. She started off working while I supervised, then I took over later on.
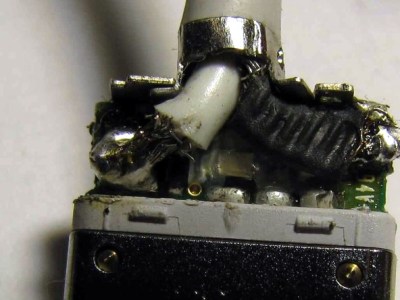
We began by using an Xacto to cut away enough insulation to expose about half an inch of the stranded wire. We pulled the wire away from the insulated lead wire and twisted it into a single stranded wire parallel to the lead wire. Grabbing for the iron, we tinned the ground and soldered a length of 22-gauge solid wire to it. The way the ground connects to the plug is by passing through a conductive ring. My idea was to solder the other end of the 22-gauge wire to the metal ring. Here’s where things started to go wrong. This is, by the way, the part where I took over so you can blame me and not my kid.
My daughter was using the WLC100’s default tip. I should have grabbed my own iron, a WES51, or at least swapped in its ninja-sharp tip. The WLC100’s default tip is a big fat wedge and it was too big to put next to the plug, and the conductive ring quickly got covered in melted plastic and I couldn’t solder anything to it. Worse, I had accidentally burned through the insulation protecting the lead wire, and had to cover it in electrical tape.
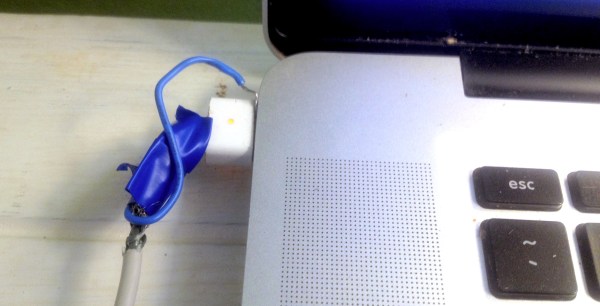
What now? We were left with not being able to use the cable at all. One option was to wait until the goop had cooled and burnish it clean with a Dremel, then attempt to re-solder using an appropriate tip. However, that sounded like a lot of work. The solid wire was still securely soldered to the ground, so instead of trying to attach it to the cable side of the plug, I could connect it to the computer side, by shoving it into the socket alongside the plug. The business end of the plug has a big silver ground surrounding small gold positive leads, and touching the ground with the wire should work just fine, right?
It did. The computer charged up as happy as you’d like. And yet, I was left with the distinct feeling the solution could have been, I don’t know, cleaner. Certainly, the iFixit route shown here comes out much cleaner by sliding off the housing, clipping the damaged wire, and beginning anew. Clean as this is, it’s just waiting to happen the same way again.
So, brethren and sistren, lay on with brickbats and tell what I did wrong. What approaches have you used to fix cables broken where they meet the plug housing, and how do you improve the situation for the future?
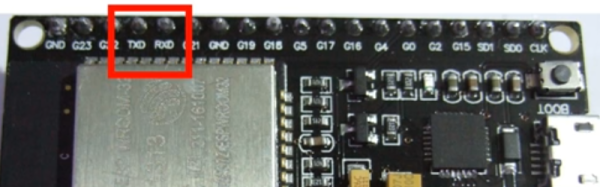
If you use the Arduino IDE to program the ESP32, you might be interested in [Andreas Spiess’] latest video (see below). In it, he shows an example of using all three ESP32 UARTs from an Arduino program. He calls the third port “secret” although that’s really a misnomer. However, it does require a quick patch to the Arduino library to make it work.
Just gaining access to the additional UARTs isn’t hard. You simply use one of the additional serial port objects available. However, enabling UART 1 causes the ESP32 to crash! The reason is that by default, UART 1 uses the same pins as the ESP32 flash memory.
Luckily, the chip has a matrix switch that can put nearly any logical I/O pin on any physical I/O pin. [Andreas] shows how to modify the code, so that UART 1 maps to unused pins, which makes everything work. it is a simple change, replacing two parameters to a call that — among other things — maps the I/O pins. You could use the technique to relocate the UARTs to other places if you choose.
If you want to learn more about the ESP32, we covered a good set of tutorials for you to check out. Or if you just want a quick overview, you can start here.
In The Martian we saw what kind of hacking was needed to stay alive for a relatively short while on Mars, but what if you were trying to live there permanently? Mars’ hostile environment would affect your house, your transportation, even how you communicate. So here’s a fun thought experiment about how you’d live on Mars as part of a larger community.
Not Your Normal House
Mars One living units under regolith, Source video
Radiation on Mars comes from solar particle events (SPE) and galactic cosmic radiation (GCR). Mars One, the organization planning one-way trips to Mars talks about covering their habitats in several meters of regolith, a fancy word for the miscellaneous rocky material covering the bedrock. Five meters provides the same protection as the Earth’s atmosphere — around 1,000 g/cm2 of shielding. A paper from the NASA Langley Research Center says that the largest reduction comes from the top 15 to 20 cm of regolith. And so our Mars house will have an underlying structure but the radiation protection will come from somewhere between 20 cm to a few meters of regolith. Effectively, people will be living underground.
On Earth, producing water and air for your house is not something you think of doing, let alone disposing of exhaled CO2. But Mars houses will need systems for this and more.
One of the most popular uses for the Raspberry Pi in a commercial setting is video walls, digital signage, and media players. Chances are, you’ve probably seen a display or other glowing rectangle displaying an advertisement or tweets, powered by a Raspberry Pi. [Florian] has been working on a project called info-beamer for just this use case, and now he has something spectacular. He can display a video on multiple monitors using multiple Pis, and the configuration is as simple as taking a picture with your phone.
[Florian] created the info-beamer package for the Pi for video playback (including multiple videos at the same time), displaying public transit information, a twitter wall, or a conference information system. A while back, [Florian] was showing off his work on reddit when he got a suggestion for auto-configuration of multiple screens. A few days later, everything worked.
Right now, the process of configuring screens involves displaying fiducials on each display, taking a picture from with your phone and the web interface, and letting the server do a little number crunching. Less than a minute after [Florian] took a picture of all the screens, a movie was playing across three weirdly oriented displays.
Below, you can check out the video of [Florian] configuring three Pis and displays to show a single video, followed by a German language presentation going over the highlights of info-beamer.
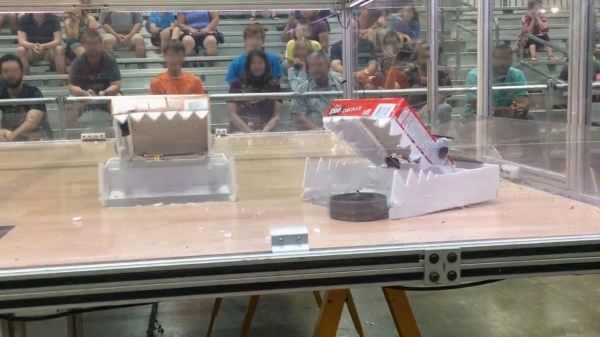
The battle’s are done and the results are in — [AltaPowderDog]’s, aka [Carter Hurd], cardboard and foam armor, lightweight Krave robot beat its metal cousins in 2016 and fared well in 2017. How did a cardboard Krave cereal box and foam board robot do that you ask? The cardboard and foam outer structure was sliced, smashed and generally eaten while the delicate electronics, motors and wheels remained buried safely inside.
We covered the making of his 2016 version but didn’t follow-up with how it fared in that year’s Illinois Bot Brawl competition. As you can see in the exciting first video below, despite suffering repeated severe damage to its armor, it won first place in the 1 lb Antweight category!
Battery and RC receiver
Wheels, motors and speed controller
Finished Krave robot
For 2017 he made another one but managed to halve the weight — and so he made two of them! By starting them both within a twelve-inch by twelve-inch area, they were allowed to fight as a team. How did he make it lighter? Partly it was done by doing away with the ability to lift the metal lip in front, the wheels were reduced from four to two, and a smaller servo was used for opening and closing the mouth. The full build video is shown below along with a video of the 2017 battles wherein he won seventh place.