Hackaday Prize Entry: Zappotron Super Sequencer

If you fancy a go at circuit bending, where do you start? Perhaps you find a discarded musical toy at a junk sale and have a poke around, maybe you find the timing circuit and pull it a little to produce a pitch bend. Add a few wires, see what interesting things you can do connecting point A to point B, that kind of thing.

Many of us have spent an entertaining afternoon playing in this way, though it’s probable few of us have achieved much of note. [Russell Kramer] however must have persevered to become a circuit bender par excellence, as his latest project is one of the most accomplished circuit bending projects we’ve seen.

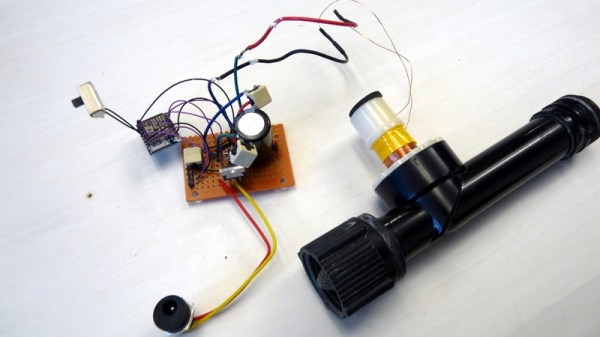
Zappotron Super Sequencer is an analog sequencer. Except that sentence simply doesn’t convey what it really is, it’s an analog sequencer with four sound sources: two tape decks, a 4046 oscillator, and a circuit-bent spelling tutor toy, and its sequencer component is controlled with a Nintendo light gun and a CRT screen.

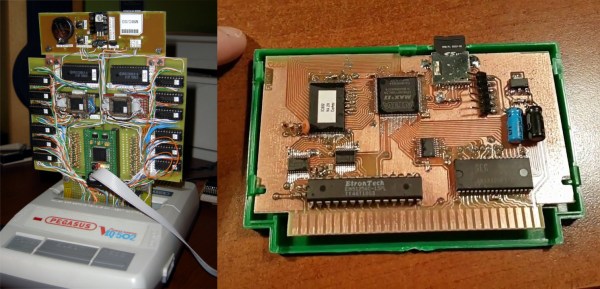
You might be thinking that you could do all that with relative ease on a modern single board computer, but what makes this project so special is that he’s achieved it using only logic chips and diode logic gates, not a microprocessor in sight save for the one in the spelling toy. The build log goes through all the circuitry in detail, and we have to tell you it’s a work of art that demonstrated his mastery of both analog circuitry and digital logic.

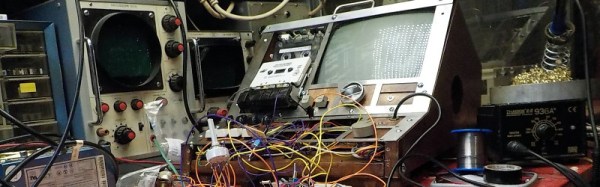
To cap it all off he’s mounted it in a gloriously retro console, complete with retro embossed labeling. This is a high-quality item that we’d suggest you take a while to read about in detail. He’s posted a video demonstration if you’d like to see it in action, we’ve posted it below the break.

Continue reading “Hackaday Prize Entry: Zappotron Super Sequencer”

Heat Shrink Tubing And The Chemistry Behind Its Magic

There’s a lot to be said in favor of getting kids involved in hacking as young as possible, but there is one thing about working in electronics that I believe is best left as a mystery until at least the teenage years — hide the shrink tube. Teach them to breadboard, have them learn resistor color codes and Ohm’s Law, and even teach them to solder. But don’t you dare let them near the heat shrink tubing. Foolishly reveal that magical stuff to kids, and if there’s a heat source anywhere nearby I guarantee they’ll blow through your entire stock of the expensive stuff the minute you turn your back. Ask me how I know.

I jest, but only partly. There really is something fun about applying heat shrink tubing, and there’s no denying how satisfying a termination can be when it’s hermetically sealed inside that little piece of inexplicably expensive tubing. But how does the stuff even work in the first place?

Continue reading “Heat Shrink Tubing And The Chemistry Behind Its Magic”

FPGA Emulates NES Cart; Prototype So Cyberpunk

By now, most of us have had some experience getting ROMs from classic video games to run on new hardware. Whether that’s just on a personal computer with the keyboard as a controller, or if it’s a more refined RetrioPie in a custom-built cabinet, it has become relatively mainstream. What isn’t mainstream, however, is building custom hardware that can run classic video games on the original console (translated). The finished project looks amazing, but the prototype blows us away with it’s beauty and complexity.

[phanick]’s project is a cartridge that is able to run games on the Polish Famicon clone called the Pegasus. The games are stored on an SD card but rather than run in an emulator, an FPGA loads the ROMs and presents the data through the normal edge-connector in the cartridge slot of the console. The game is played from the retro hardware itself. It takes a few seconds to load in each ROM, but after that the Pegasus can’t tell any difference between this and an original cartridge.

The original prototype shown here was built back in 2012. Since then it’s been through a few iterations that have reduced the size. PCBs were designed and built in-house, and the latest revision also includes a 3D-printed case that is closer to the size of the original Famicon cartridges.

Even if you don’t have an interest in classic video games or emulation, the video below is worth checking out. (Be sure to turn on the subtitles if you don’t speak Polish.) [phanick] has put in a huge amount of time getting all of the details exactly right, and the level of polish shows in the final product. In fact, we’ve featured him before for building his own Famicom clone.

Continue reading “FPGA Emulates NES Cart; Prototype So Cyberpunk”

Say It With Me: Root-Mean-Square

If you measure a DC voltage, and want to get some idea of how “big” it is over time, it’s pretty easy: just take a number of measurements and take the average. If you’re interested in the average power over the same timeframe, it’s likely to be pretty close (though not identical) to the same answer you’d get if you calculated the power using the average voltage instead of calculating instantaneous power and averaging. DC voltages don’t move around that much.

Try the same trick with an AC voltage, and you get zero, or something nearby. Why? With an AC waveform, the positive voltage excursions cancel out the negative ones. You’d get the same result if the flip were switched off. Clearly, a simple average isn’t capturing what we think of as “size” in an AC waveform; we need a new concept of “size”. Enter root-mean-square (RMS) voltage.

To calculate the RMS voltage, you take a number of voltage readings, square them, add them all together, and then divide by the number of entries in the average before taking the square root: \sqrt{\frac{1}{n} \left(v_1^2 + v_2^2 +...+ v_n^2\right)} . The rationale behind this strange averaging procedure is that the resulting number can be used in calculating average power for AC waveforms through simple multiplication as you would for DC voltages. If that answer isn’t entirely satisfying to you, read on. Hopefully we’ll help it make a little more sense.

Continue reading “Say It With Me: Root-Mean-Square”

Google Calendar Interface For Your Internet Of Lawns

If you live somewhere where summers are hot and dry, you can instantly tell which homes don’t have automatic sprinklers installed. Or they may have them installed, but like the blinking “12:00” on that VCR of yore, the owners may not have mastered the art of programming the controller. To be fair, the UI on most residential irrigation controllers is a bit wanting, which is the rationale behind letting Google Calendar tell your sprinklers when it’s time to water.

Granted, someone who is mystified by setting a digital clock is not likely to pull off [ClemRz]’s build. It’s still pretty simple stuff, though, centered around an ESP8266 as it is. And calling the result an “irrigation system” is a little bit of a stretch, given that it could only support a single zone with a solenoid valve harvested from a defunct sprinkler timer. But as a proof-of-concept, or to water a small area, it hits all the marks. The ESP8266 drives the latching solenoid valve through an H-bridge chip after reading your Google Calendar and looking for upcoming events to open or close the valve. The Google Script and the ESP8266 code default to failsafe so that a mistake doesn’t leave the valve open and run up your water bill or drain your well.

It’s easy to see how this can be expanded to control a multi-zone irrigation system and support a smartphone UI for instant control of the valves. Overrides based on weather forecasts would be a nice feature too. Or you could just read the soil moisture levels directly with backscatter sensors.

Defeat The Markup: Iphone Built By Cruising Shenzhen

[Scotty Allen] from Strange Parts, has just concluded a three month journey of what clearly is one of the most interesting Shenzhen market projects we have seen in a while. We have all heard amazing tales, pertaining the versatility of these Chinese markets and the multitude of parts, tools and expertise available at your disposal. But how far can you really go and what’s the most outrageous project can you complete if you so wished? To answer this question, [Scotty] decided to source and assemble his own Iphone 6S, right down to the component level!

The journey began by acquiring the vehemently advertised, uni-body aluminium back, that clearly does not command the same level of regard on these Chinese markets when compared to Apple’s advertisements. [Scotty’s] vlog shows a vast amount of such backings tossed as piles in the streets of Shenzhen. After buying the right one, he needed to get it laser etched with all the relevant US variant markings. This is obviously not a problem when the etching shop is conveniently situated a stones throw away, rather simplistically beneath a deck of stairs.

Next came the screen assembly, which to stay true to the original cause was purchased individually in the form of a digitizer, the LCD, back-light and later casually assembled in another shop, quicker than it would take you to put on that clean room Coverall, you thought was needed to complete such a job.

[Scotty] reports that sourcing and assembling the Logic board proved to be the hardest part of this challenge. Even though, he successfully  purchased an unpopulated PCB and all the Silicon; soldering them successfully proved to be a dead end and instead for now, he purchased a used Logic board. We feel this should be absolutely conquerable if you possessed the right tools and experience.

All the other bolts and whistles were acquired as separate components and the final result is largely indistinguishable from the genuine article, but costs only $300. This is not surprising as Apple’s notorious markup has been previously uncovered in various teardowns.

Check out [Scotty’s] full video that includes a lot of insight into these enigmatic Shenzhen Markets. We sure loved every bit of it. Now that’s one way get a bargain!

Continue reading “Defeat The Markup: Iphone Built By Cruising Shenzhen”

4.4 GHz Frequency Synthesis Made Easy

How hard is it to create a synthesizer to generate frequencies between 35 MHz to 4.4 GHz? [OpenTechLab] noticed a rash of boards based on the ADF4351 that could do just that priced at under $30. He decided to get one and try it out and you can find his video results below.

At that price point, he didn’t expect much from it, but he did want to experiment with it to see if he could use it as an inexpensive piece of test gear. The video is quite comprehensive (and weighs in at nearly an hour and a half). It covers not just the device from a software and output perspective but also talks about the theory behind these devices.  [OpenTechLab] even sniffed the USB connection to find the protocol used to talk to the device. He wasn’t overly impressed with the performance of the board but was happy enough with the results at the price and he plans to make some projects with it.

Continue reading “4.4 GHz Frequency Synthesis Made Easy”