Turning The Beaglebone On A Chip Into A 3D Printer Controller

It’s understood that 3D printers and CNC machines need to control motors, but there are a few other niceties that are always good to have. It would be great if the controller board ran Linux, had support for a nice display, and had some sort of networking. The usual way of going about this is either driving a CNC machine from a desktop, or by adding a Raspberry Pi to a 3D printer.

The best solution to this problem is to just drive everything from a BeagleBone. This will give you Linux, and with a few motor drivers you can have access to the fancy PRUs in the BeagleBone giving you fast precise control. For the last few years, the Replicape has been the board you need to plug a BeagleBone into a few motors. Now, there’s a better, cheaper solution. At the Midwest RepRap Festival this weekend, [Elias Bakken] has unveiled the Revolve, a single board that combines Octavo Systems’ OSD3358 ‘BeagleBone On A Chip’ with silent TMC2130 motor drivers from Trinamic. It’s an all-in-one 3D printer controller board that runs Linux.

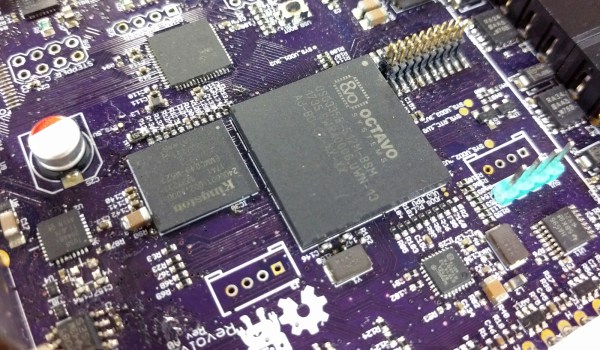
The specs for the Revolve are more or less exactly what you would expect for a BeagleBone with a 3D printer controller. The main chip is the Octavo Systems OSB3358, there are six TMC2130 stepper drivers from Trinamic connected directly to the PRUs, 4 GB of eMMC, 4 USB host ports, 10/100 Ethernet, 1080p HDMI out, and enough headers for all the weird and wonderful 3D printers out there. The software is based on Redeem, a daemon that simply turns G-code into spinning motors and switching MOSFETs.

The price hasn’t been set, but [Elias] expects it to be somewhere north of $100, and a bit south of $150. That’s not bad for a board that effectively does everything from online printer monitoring to real-time motion control. There’s no date for the release of this board, but as with most things involving 3D printer, the best place to check for updates is Google+.

Iron Man Mask With A HUD!

At some point, a child will inevitably dream of being a superhero. Not all children get the chance to see that dream made manifest, but a few take that destiny into their own hands. Redditor [Lord_of_Bone] — seizing at that goal — has built himself an Iron Man mask with an integrated HUD!

Relying on a conceptually similar project he’d previously built, much of the code was rehashed for this ‘Mark II’ version. Pieces of a smartphone holo pyramid act as projection surfaces — using a lens to focus the image to be viewed at such close distances — and a pair of OLED screens displaying the information. It’s a happy bonus that the lack of backlight results in only the text showing in the user’s field of view.

Instead of speaking with J.A.R.V.I.S., [Lord_of_Bone] is using a Raspberry Pi Zero W as the mask’s brain. Working past some I2C troubles between the OLED screens and an Enviro pHat required a whipped-up veroboard and a bit of hardware hacking. Cramming everything into the mask was no easy task — using Blutack and Sugru to bind them in the limited space — but the pHat had to be surface-mounted in the open anyways for atmospheric and light data.

Continue reading “Iron Man Mask With A HUD!”

Quantum Electric Material Borrows From Japanese Basketweaving

Kagome is a pattern used to weave baskets from bamboo strips. The pattern is a symmetrical pattern of interlaced triangles that share corners. Scientists from MIT, Harvard, and Lawrence Berkeley National Laboratory have produced a kagome metal and found that it has exotic quantum properties.

Their paper, published in Nature (paywall), reports that the crystal made from layers of iron and tin atoms, causes electrons to flow in strange ways. The electrons bend into tight circular paths and flow along the edges without losing energy.

Continue reading “Quantum Electric Material Borrows From Japanese Basketweaving”

Arbor Press Modded For Applying Specific Force

Arbor presses are simple and effective tools made for a particular task: exerting force in a specific spot. A 1-ton arbor press fits on a desktop and is very affordable, but doesn’t offer a lot of particularly fine control over the ram beyond lowering and raising it. [concreted0g] got to thinking about ways to gain more control and knowledge about the amount of force being applied, and made a simple modification to combine his press with a torque wrench.

He removed the spindle which raises and lowers the ram, and drilled and tapped it to fit a bolt. Now, by attaching a torque wrench to the bolt and using the wrench as the handle for lowering the ram, he can take advantage of the wrench’s ability to break at set amounts of force. As a result, he has a repeatable way to accurately apply specific amounts of force with a tool that usually lacks this ability. It looks like this mod is limited to lower forces only (too much could shear off the bolt head, after all) but it combines two tools in an unusual way to gain an ability that didn’t exist before, which is great to see. Mods and presses seem to go very well together; don’t miss this DIY thermal insert add-on for an arbor press, and 3D printed dies for a press brake turned out to be remarkably durable and versatile, not to mention economical.

Great Emergency Lights From Not-So-Great UPS

We know your shame. Like you, we wanted to save some scratch and bought the bottom-of-the-range UPS, only to discover that it is no use to man or beast as it lacks the power to perform any reasonable task. It’s now sitting in a corner, to gather dust as its batteries deteriorate.

Not so fast with the UPS abandonment! [rue_mohr] came up with a modification for a small APC UPS that turned it into something a little more useful. Removing the mains inverter from the picture with a few displaced wires and PCB mod, the UPS is now a 12V battery with a mains charger and power outage detection built-in. In this state it’s the perfect power pack for some 12V LED strips used for emergency lighting. There is a handy 3D print that fits the rear socket cut-outs on the US version of the device and provides apertures  for a pair of DC power jacks.

This is a relatively simple hack, but we like it for taking the focus away from the obvious part of the UPS, its mains inverter, and turning to the batteries as the main event. It’s a relatively tiny device, but in the past we’ve featured a UPS at the other end of the scale being used for power back-up to a whole house. Meanwhile we’d like to take a leaf from the [BOFH]’s book, and recommend that the most important piece of infrastructure requiring a UPS is the sysadmin’s coffee machine.

Let There Be Light Rings!

[Brandon Rice] is at it again — this time to level-up your photography and video production skills with a diffused light ring.

Inspired into creating more video content, he wanted to forgo the price tag associated with consumer lighting rigs. A 19″ diameter ring fit his requirements, but since the only laser cutter he had access to was limited to 12″x14″, he was forced to assemble it in pieces. As he screwed it together, he hid the M6 screws by pointing them ‘forwards,’ to be hidden underneath the diffusing vellum material. Liberal application of hot glue has kept the arched vellum and the LED strips in place with only a nominal number of burned fingers.

Continue reading “Let There Be Light Rings!”

Hands On With Filament Splicing Robots

The future of 3D printing, it seems, is in multimaterial filament printers. The Prusa I3 multimaterial upgrade exists, and this weekend at MRRF E3D announced their amazing multihead printer. Multimaterial printing will get you mechanical parts with the properties you want, like wheels with grippy treads and strong hubs. It will give you easily removable support material. The most popular use, though, is bound to be multicolor prints. It’s easier to do, as you’re really only working with either ABS or PLA, and if you’re really clever, you can squeeze everything through a single nozzle.

While there are some very ingenious ways of printing in multiple colors of filament, one technique that hasn’t gotten a lot of attention is automated filament splicing. With this, a piece of software analyzes a model, and combines multiple spools of filament into one long strand. A machine that’s getting a lot of attention is the Palette+ from Mosaic Manufacturing. There were a few of these on hand at this weekend’s Midwest RepRap Festival, and here anyone could get a hands-on with this machine without spending $800.

When it comes to multicolor and multimaterial prints, the first question that comes to mind is the toolchain and the process of turning an STL file into a physical object. The Palette+ uses a piece of software called Chroma that takes STL files as its input. Each color in the object to be printed is actually a separate STL file, combined on Chroma’s build platform. The Charmander print shown above is actually four different prints; the white eyes are one STL, the orange body is a second, the yellow belly is a third, and the red flame on the tail is a fourth STL. In the Chroma app, these STLs are assembled, colors are assigned, and a file generated that’s stored on an SD card and shoved in the Palette robot. The Palette then assembles a custom length of filament with the right colors in the right places. Combine this with some G-code from your favorite slicer, and you have everything you need for multicolor printing with the printer you already own.

The results are fantastic, and the best I’ve ever seen from a multicolor filament-based printer, whether it’s a dual-extrusion head, Prusa’s Multimaterial upgrade, or a bizarre machine with multiple toolheads.

Of course, there are downsides. Because the Palette is designed for single-extruder printers, you’re not going to be able to combine ABS and PLA filament. Combining fancy engineering plastics and colorful PLA is right out. This is a machine that can only use one type of plastic at a time.

That said, we’re getting very, very close to an era of true multicolor printing. Of course, this machine costs as much as a good 3D printer, but if you just want to print some colorful blobs of plastic, I haven’t seen anything better.