Coming Back To Curving Bullets

What do you do when you have time, thousands of dollars worth of magnets, and you love Mythbusters? Science. At least, science with a flair for the dramatics. The myth that a magnetic wristwatch with today’s technology can stop, or even redirect, a bullet is firmly busted. The crew at [K&J Magnetics] wanted to take their own stab at the myth and they took liberties.

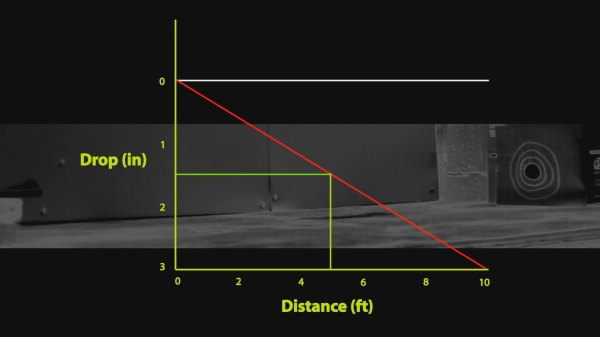
Despite the results of the show, a single magnet was able to measurably alter the path of a projectile. This won’t evolve into any life-saving technology because the gun is replaced with an underpowered BB gun shooting a steel BB. The original myth assumes a firearm shooting lead at full speed. This shouldn’t come as any surprise but it does tell us how far the parameters have to be perverted to magnetically steer a bullet. The blog goes over all the necessary compromises they had to endure in order to curve a bullet magnetically and their results video can be seen below the break.

Here we talk about shooting airplane guns so they don’t get mislead after leaving the barrel, and some more fun weaponry from minds under Churchill’s discretion.

Continue reading “Coming Back To Curving Bullets”

Fail Of The Week: Never Trust A Regulator Module

[Ryan Wamsley] has spent a lot of time over the past few months working on a new project, the Ultimate LoRa backplane. This is as its name suggests designed for LoRa wireless gateways, and packs in all the features he’d like to see in a LoRa expansion for the Nano Pi Duo.

His design features a three-terminal regulator, and in the quest for a bit more power efficiency he did what no doubt many of you will have done, and gave one of those little switching regulator modules in a three-terminal footprint a go. As part of his testing he inadvertently touched the regulator, and was instantly rewarded with a puff of smoke from his Nano Pi Duo. As it turned out, the regulator was susceptible to electrical noise, and had a fault condition in which its input voltage was routed directly to its output. As a result, a component in the single board computer received way more than its fair share, and burned out.

If there is a moral to be extracted from this story, it is to never fully trust a cheap drop-in module to behave exactly as its manufacturer claims. [Ryan]’s LoRa board lives to fight another day, but the smoke could so easily have come from more components.

So that’s the Fail of The Week part of this write-up complete, but it would be incomplete without the corresponding massive win that is [Ryan]’s LoRa board itself. Make sure to take a look at it, it’s a design into which a lot of attention to detail has been put.

A Lesson In K40 Laser Repair

The K40 laser cutter has become ubiquitous in hackerspaces and well-equipped home workshops over the past few years, as a relatively inexpensive introduction to laser cutting and a machine that is readily hackable. Tokyo Hackerspace have one, but sadly their laser tube failed after relatively little use. Replacing a laser tube might be a routine component change for some readers, but it’s still worth looking at in some detail.

Their tube had failed at its output lens cooling cap, a component that is glued onto the end of the tube rather than bonded, and which had snapped off. There had been no mechanical stress upon it, but it was found  that the arrangement of their cooling system caused it to drain between uses and thus air bubbles could accumulate. The resulting cooling inefficiency caused enough thermal stress for the bond between the tube and the end piece to fail.

The in-depth analysis of what caused the failure and step-by-step description of the procedure should be of interest to any K40 owner. Little things such as ensuring that the tube is rotated to the right angle for all air bubbles to make their way out of it, or making sure that when the pump is switched off the water isn’t all pulled out of it by gravity seem obvious, but these are traps that will have caught more than one K40 owner.

We’ve covered many K40 stories over the years, but a good place to start for the novice might be this commissioning story, or even this tale of a hackerspace’s modifications to their model.

Marvel At Soviet-era Smart Display’s Tiny Size

The Soviet-era 490IP1 LED. The digit is a mere 2.5 mm in height. Pictured with the Texas Instruments TIL306. [image: industrialalchemy.org]
It’s easy to assume that older components will be less integrated and bulkier than we might otherwise expect. Then something seems ahead of its time, like the teeny-tiny 490IP1 LED which was produced in the former Soviet Union. [AnubisTTP] obtained and shared images of this tiny integrated single digit LED display in which the number measures a scant 2.5 mm tall; in production it was made easier to read with an external bubble lens magnifier clipped to the outside. The red brick the 490IP1 is pictured with is the Texas Instruments TIL306, a relatively normal sized DIP component with similar functionality.

The 490IP1 is called an intelligent LED display because the package contains a decade counter and driver circuitry for the integrated seven-segment LED digit, complete with a carry signal that meant multiple displays could be chained together. It is notable not just due to its size, but because the glass cover makes it easy to see the die inside, as well as the wire-bonded pads.

It’s always fascinating to see glimpses of the development path that display technologies took. It’s easy to take a lot of it for granted today, but back before technology was where it is now, all sorts of things were tried. Examples we’ve seen in the past include the fantastic (and enormous) Eidophor projector which worked by drawing images onto a rotating disk of oil with an electron gun. On the smaller end of things, the Sphericular display used optics and image masks to wring a compact 0-9 numerical display out of only a few lamps at the back of a box.

Japanese Fire-Fighting Dragon Rides Water Jets

If you are building a robot to fight fires, why not use the water that you are fighting fires with to propel your robot? That seems to be the idea behind the Dragon Fire Fighting robot built by [Professor Satoshi Tadokoro], and his team at Tadohoku University. Their dragon robot is raised by the same directed jets of water that are used to stop the fire.

The three-meter robot also uses these jets of water to steer, moving the dragon’s head by firing water jets at angles. I’m not sure how practical it really is, though: the jets that the robot uses to steer could do as much damage as the fire itself if it wasn’t used carefully. The idea is to attach it to the end of a ladder or crane used by firefighters, so it can explore a building on fire without anyone having to step inside.

The robot was built as part of the Tough Robotics Challenge, a program that is looking to build robots that can help in disasters. Japan is one of the most disaster-prone places on the planet, thanks to earthquakes, nuclear meltdowns, and Godzilla attacks, so the program is looking to build robots that can help out. Some of the concepts they are looking at include cyborg animals, a listening drone that can help find survivors after a disaster using a sensitive microphone array and a serpentine robot that can map pipes and underground structures.

[Via TechXplore and Qes]


Continue reading “Japanese Fire-Fighting Dragon Rides Water Jets”

Framed Raspberry Pi Keeps Tabs On Spotify

Perhaps you’ve noticed, but we here at Hackaday have a slight obsession with the over-engineered. One could fairly say there’s a linear relationship between how likely we are to feature a project and how needlessly complex it is. That said, it isn’t as if we are unable to appreciate a minimalist approach. Taking the scenic route can be a lot of fun, but sometimes it’s nice to just get where you’re going before you run out of gas.

This very slick Spotify “Now Playing” display created by [Jon Ashcroft] is a perfect example of that principle. The hardware is so straightforward that it’s barely worth mentioning: a Raspberry Pi with a small HDMI display, tucked neatly into a photo frame. Nothing to get too excited about there. The real hook with this particular project is the software.

[Jon] is a web developer by trade, so it’s natural he would approach his personal projects with that same mentality. Rather than one of the “usual suspects” for a Pi project like Python, he wrote his software in ES6; which the Pi is running through Chromium in kiosk mode (full screen web content, no top bar). For those of you who aren’t keeping up on web languages, ES6 is short for EcmaScript 6: a new version of the standard on which JavaScript is based. It’s a bit heavier on resources than is strictly necessary, but it works well enough in the end.

Using Spotify’s excellent API, his software pulls down the current track information and stores it locally. It does this every ~4 seconds, checking to see if the track has changed. [Jon] isn’t thrilled with this brute force method, but it works for now. It displays the current playing song and artist, and uses a library called node-vibrant to extract a dominant color from the album art and use that to create a complementary background color. Very slick.

[Jon] provides all of his source code and made it easy to connect to your own Spotify account, so don’t be surprised if you see this running on a “Magic Mirror” near you soon.

This Is An Inordinate Amount Of Switches

How do you start a good habit? As a blogger, someone who spends a spectacular amount of time on Twitter, and a Thought Leader Life Coach, I can tell you: the best way to start a good habit is by doing it every day. [Arduino Enigma] has just the solution to procrastination, laziness, or whatever else is stopping you from forming a good habit. It’s a good habit tracker, and far too many switches on a single PCB.

The inspiration for this build comes from the master of shitty robots, [Simone Giertz], who built something containing 365 switches and 12 LEDs. The idea is simple: every day, [Simone] would do 10 minutes of yoga and 10 minutes of meditation, then flip a switch. At the end of the month, an LED would light up. Do it every day for a year, and all the lights are on, hopefully beginning a new, good habit.

[Simone]’s version is rather large, and quite possibly used panel-mount switches. Where there’s a will, there’s someone able to make a PCB, so [Arduino Enigma] whipped up a board with 365 switches, 12 resistors, and 12 LEDs.

The circuit for this good habit tracker is extremely simple. It’s simply power going into 30, 31, or 28 switches in series, one after the other. At the end of the month, the LED lights up.

Is it complicated? No, but that’s not exactly the point. We’re hacking behavior here and not electrons, although this is a great example of how PCBs can be simultaneously far too complicated and far too simple.