A Raspberry Pi Terminal Fit For Fallout 76

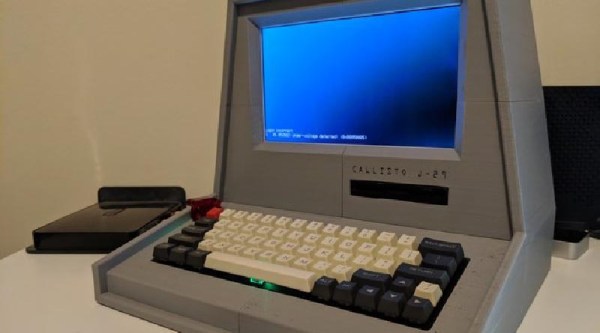
The Fallout series of video games provide a wonderful alternative history that answers the question of what might have happened had the microchip never been invented. Yes, most things run on tubes, and apparently you can implement an AI that passes a Turing test in tubes (does the Turing test apply if you’re comparing it against NPCs?). Of course, as with all of computer history, the coolest parts of Fallout are the computer terminals, so [Pigeonaut] decided to build one. All the files are available, and if you have a Pi sitting around this is a good weekend project.

This terminal has a host of features that are well-suited for the modern vault dweller. Of note, the entire case is 3D printed, in multiple pieces. Sure, considering the display is an LCD it’s a tiny bit thick, but you don’t get the Atomic age aesthetic without a big CRT, do you? The keyboard is a standard, off-the-shelf mechanical keyboard for clicky goodness with vintage-style keycaps. There’s a 3.5″ USB floppy drive, because there’s nothing that will survive a nuclear holocaust like magnetic media. The rest of the build is a Raspberry Pi 3B+, which is more than enough compute power to open a door shaped like a gear.

As for what you would do with a retro-inspired Pi terminal, well, it would make a good computer for the workbench, and since the case is already designed for a 3.5″ drive, you could use this to archive some old media. If there’s one thing the apocalypse tells us, it’s that these old terminals will still be kicking after a few hundred years.

Whirling Sawblades Turn Foam Packaging Into Wall Insulation

If you’re like us, the expanded polystyrene (EPS) foam inserts that protect many packages these days are a source of mixed feeling. On the one hand, we’re glad that stuff arrives intact thanks to the molded foam inserts. But it seems so wasteful, especially when chucking it in the garbage can. If only it could be effectively recycled.

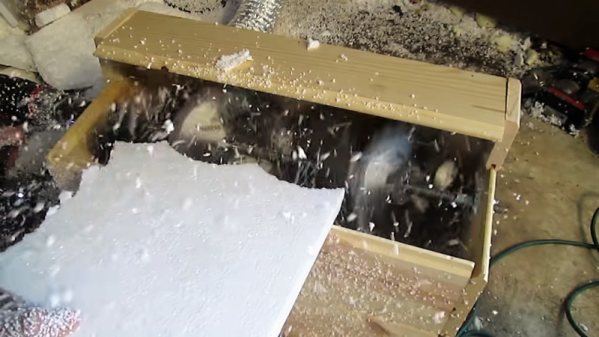
It turns out that it can be, if you equip yourself with this spinning “sawblades of doom” EPS recycler. It comes by way of [HowToLou], who was looking for a way to insulate a wall on the cheap. Almost all commercially available insulating materials – fiberglass batts, blown-in cellulose, expanding polyisocyanurate – are pretty pricey. Foam packing pieces are pretty easy to come by, though, and usually free for the taking. [Lou]’s method of turning them into insulation is a box containing four circular saw blades mounted to a piece of threaded rod and spun by a cordless drill. The blades are mounted askew on the rod for better reduction of the foam; [Lou] chose to use wire to hold the blades down, while we’d have printed up some slanted arbors and bolted the blades down more firmly. A chicken wire prefilter keeps the big chunks from clogging a blower made from an old bathroom exhaust fan, which does a great job of filling the wall cavities with pulverized EPS nuggets. The video below has all the details.

Honestly, the box is a little scary, and we have doubts that [Lou] will be able to get enough foam to finish the job, but it’s still a clever little hack. Grinding things up seems to be a theme for him; check out his leaf collector or his apple cider press.

Continue reading “Whirling Sawblades Turn Foam Packaging Into Wall Insulation”

An Improved Bed And Custom Wasteboard For A CNC Router

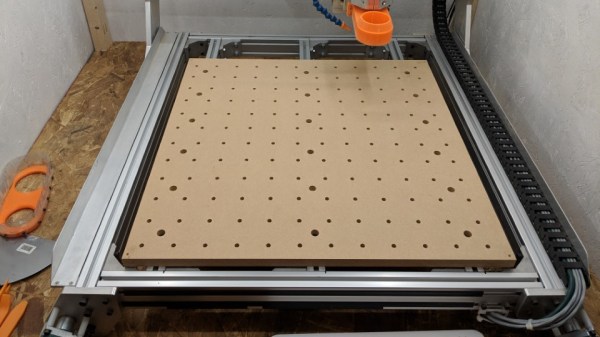
[Adam Haile] has been spending some time improving his CNC router and his latest change is a custom wasteboard with improved bed support. Not only does the MDF wasteboard have plenty of threaded inserts to make for easy clamping solutions, but [Adam] replaced the frame underneath the board with a new set of aluminum extrusions to provide better support. Originally, there was only support for the edges of the wasteboard, which allowed the middle to sag. While researching the machine’s specs, he was able to recognize and order the exact extrusions he needed from Misumi and construct an improved bed to go with the new board. Should you wish to make your own version, [Adam] provides all the part numbers and CAD files required.

Embedded below is a video showing the machine drilling the holes, followed by surfacing the entire board so that it is flat. Since the bolt heads are well below the surface of the board, and the threaded inserts for the holes are on the bottom, there’s no worry of the tool hitting anything it shouldn’t during this process.

Continue reading “An Improved Bed And Custom Wasteboard For A CNC Router”

A Classy USB Knob For The Discerning Computerist

The keyboard and mouse are great, we’re big fans. But for some tasks, such as seeking around in audio and video files, a rotary encoder is a more intuitive way to get the job done. [VincentMakes] liked the idea of having a knob he could turn to adjust his system volume or move forward and backwards through a stream in VLC, but he also wanted to be able to repeatedly enter keyboard commands with it; something commercial offerings apparently weren’t able to do.

So he decided to build his own USB knob that not only looks fantastic, but offers the features he couldn’t find anywhere else. It’s another project which proves that DIY projects don’t have to look DIY. In fact, they can often give their commercial counterparts a run for their money. But this “Infinity USB Knob” isn’t just a pretty face, it allows the user to do some very interesting things such as quickly undo and redo changes to see how they compare.

As you might imagine, the electronics for this project aren’t terribly complex. The main components are the Adafruit Trinket M0 microcontroller and the EC11 rotary encoder itself. To provide nice visual feedback he added in a NeoPixel ring, but that’s not strictly necessary if you’re trying to rig this up yourself. Though we have to say the lighting effects are a big part of what makes this build look so good.

Though certainly not the only part. The aluminum enclosure, combined with the home theater style knob on the encoder, really give the finished product a professional look. We especially like his method of drilling out the top of the case and filling in the holes with epoxy to create easy and durable LED diffusers. Something to keep in mind for your next control panel build, perhaps.

[VincentMakes] has done an excellent job of documenting the hardware and software sides of this build on Hackaday.io, and gives the reader enough information that replicating this project should be pretty straightforward for anyone who’s interested. While we’ve seen several rotary encoder peripherals for the computer in the past, we have to admit this is one of the most compelling yet from a visual and usability standpoint. If this build doesn’t make you consider adding a USB knob to your arsenal, nothing will.

Continue reading “A Classy USB Knob For The Discerning Computerist”

DIY Six Channel Arduino RC Transmitter

It’s wasn’t so long ago that RC transmitters, at least ones worth owning, were expensive pieces of gear. Even more recently than that, the idea of an RC transmitter running an open source firmware would have been considered a pipe dream. Yet today buying cheap imported transmitters and flashing a community developed firmware (if it didn’t come with it pre-installed to begin with) is common place. It’s not much of a stretch to say we’re currently in the “Golden Age” of hobby RC transmitters.

But what if even cheap hardware running customizable software isn’t enough? What if you want to take it to the next level? In that case, [Electronoobs] has an Arduino powered RC transmitter with your name on it. But this is no scrap of protoboard with a couple of cheap joysticks on it, though he has made one of those too. The goal of this build was for it to look and perform as professional as possible while remaining within the hobbyist’s capabilities. The final product probably won’t be winning any design awards, but it’s still an impressive demonstration of what the individual hacker and maker can pull off today with the incredible technology we have access to.

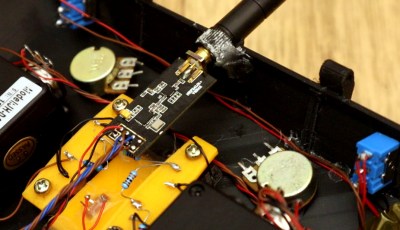
So what goes into this homebrew radio control system? Inside the back panel [Electronoobs] mounted the batteries, charging module, and the voltage regulator which steps the battery voltage down to the 3.3 V required to drive the rest of the transmitter’s electronics. On the flip side there’s an Arduino Nano, an NRF24 module, and an OLED display. Finally we have an assortment of switches, buttons, potentiometers, and two very nice looking JH-D202X-R2 joysticks for user input.

As you might have guessed, building your own transmitter means building your own receiver as well. Unfortunately you won’t be able to bind your existing RC vehicles to this radio, but since the receiver side is no more complicated than another Arduino Nano and NRF24 module, it shouldn’t be hard to adapt them if you were so inclined.

Low-cost consumer RC transmitters can be something of a mixed bag. There are some surprisingly decent options out there, but it’s not a huge surprise that hackers are interested in just spinning up their own versions either.
Continue reading “DIY Six Channel Arduino RC Transmitter”

Ask Hackaday: How Do You Draw Schematics?

The lingua franca of electronic design is the schematic. I can pick up a datasheet written in Chinese (a language I do not read or speak) and usually get a half-decent idea of what the part is all about from the drawings. Unfortunately, even as my design experience has grown over the years, I haven’t quite learned to think in schematics — I need to see it on paper (or on a screen) to analyze a circuit. Whether it’s literally on the back of an envelope or sketched in the condensation on the shower stall, actually drawing a design or idea makes a huge difference in being able to understand it. And, if you’ve ever tried to explain a circuit without a schematic — in an on-line forum or over the phone, for instance — you know how difficult it is.

So, given the importance of the schematic for design and communication, you’d think choosing a tool to draw them would be an easy task. Not so. There are dozens of choices, from dedicated schematic drawing programs to using the schematic-capture facilities of simulation or PCB design tools, or even old-fashioned pencil-and-paper and its modern equivalents. Each one has its pros and cons, and may be better suited to one specific application, but you have to choose something.

So, readers of Hackaday, what do you use to convey your electronic design ideas to the world?

Continue reading “Ask Hackaday: How Do You Draw Schematics?”

This Weekend: Vintage Computer Festival Pacific Northwest

The most iconic parts of computer history come alive next weekend in Seattle during the Vintage Computer Festival Pacific Northwest. It’s all happening March 23rd and 24th at the Living Computers Museum+Labs.

VCF celebrates the great hardware that has sprung up during the technological march of the last fifty years. The VCF series has been around for many years with events in Mountain View, CA and Wall, NJ, but this one is new. VCF Pacific Northwest was founded in 2018 and Hackaday’s own Dan Maloney had a great time at the inaugural event.

Keeping vintage computers running is a trick in itself and this where you can meet those who have made it a mission and a hobby as they set up exhibit tables and show off the rare, exotic, and of course nostalgic equipment. There are exhibits with  PDP-8 PDP-10, and an emulated PDP-6 (because only 23 were sold and none remain). You’ll find a Gigatron TTL computer, several flavors of Atari, and some slightly newer equipment like the Indego RISC-based workstation. There are exhibits on recreating classic computers, and buidling your own single-board computers from open source designs. The event is being held in a museum and this gives you the opportunity to check out their collection.

This year’s lineup of speakers is amazing. Joe Decuir will be speaking on Saturday morning. His long list of inventions and contributions to computing (and video gaming) make it hard to decide what to mention first. He’s well known for his time at Atari, but also developed the Amiga, and worked on USB and a laundry list of other standards.

Hackaday is once again proud to be a sponsor of VCF Pacific Northwest, VCF East, and VCF West.