Get Coding With This Atari 2600 Development Suite

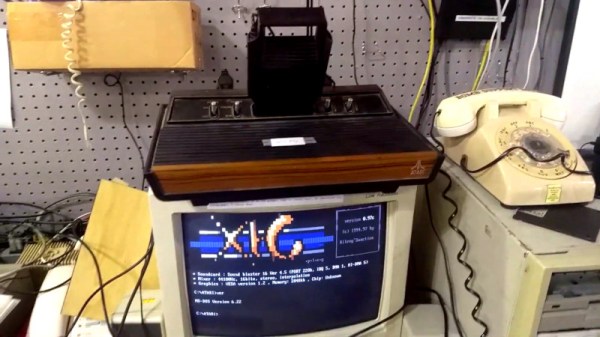
Sometimes the urge strikes to get busy coding for an old retro system, but unfortunately the bar to entry can be high. There’s a need to find a workable compiler, let alone trying to figure out how to load code onto original vintage hardware. It doesn’t have to be so hard, though. The team at [HeatSync Labs] built an Atari 2600 development station so hackerspace members can simply rock up and get to work.

With this rig, development is a multi-step process. A paper manual is on hand to provide detail of how to code for the Atari. An IBM PC is then on hand to allow the budding developer to code in assembly. This text file is then compiled into an Atari ROM, which is then passed through a special utility to convert it to an audio file. This is to allow it to be used with a Starpath Supercharger, which allows games to be loaded onto the Atari via cassette tape, or in this case, raw digital audio. By playing the audio file on the PC, connected to the Supercharger cartridge, it’s possible to run arbitrary code on the Atari 2600.

Programming in 6502 assembly isn’t the easiest mountain to climb for an absolute novice, but experienced coders will likely appreciate the no-fuss development environment. It makes for an easy gateway into the world of retro console programming, and there’s nothing like the fun of seeing your code running on original hardware.

We love a good story of retro development – like this tale of fixing a 37-year-old bug in an Apple II game. Video after the break.

Continue reading “Get Coding With This Atari 2600 Development Suite”

Mechanical Integration With KiCad

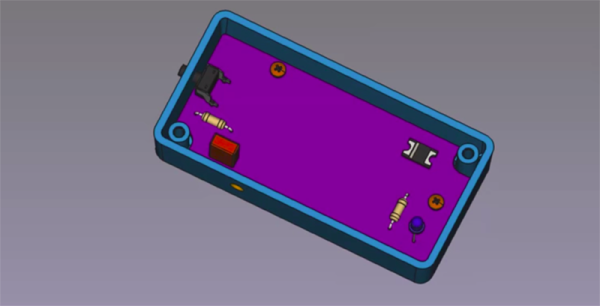
Eagle and Fusion are getting all the respect for integrating electronic and mechanical design, but what about KiCad? Are there any tools out there that allow you to easily build an enclosure for your next printed circuit board? [Maurice] has one solution, and it seamlessly synchronizes KiCad and FreeCAD. KiCad will give you the board, FreeCAD will give you the enclosure, and together you have full ECAD and MCAD synchronization.

This trick comes in the form of a FreeCAD macro (on the Github, with a bunch of documentation) that loads a KiCad board and components into FreeCAD and export them as a STEP file. You can align the KiCad board in FreeCAD, convert STEPs to VRMLs, check interference and collision, and create an enclosure around a KiCad board.

KiCad has gotten some really great visualization tools over the past few years, and we would be remiss if we didn’t mention it’s one of the best ways to visualize a completed circuit board before heading to production. Taking that leap from electronic CAD to mechanical CAD is still something that’s relatively rare in the KiCad ecosystem, and more tools to make this happen is always wanted.

Steel-Reinforced 3D Prints

Continuing on the never-ending adventure of how to make a 3D print stronger, [Brauns CNC] is coming at us with a new technique that involves steel-reinforced 3D printed parts.

We’ve seen plenty of methods to create stronger 3D prints, from using carbon fiber filament to simply printing the part in a way that the layers of the print are orthogonal to the direction of force. We’ve even seen casting carbon fiber bars into 3D prints, but of course that will only work with straight parts. [Brauns]’ technique uses steel wire, embedded into the print itself, and from some testing there’s about a 50% increase in strength of the part.

The process of embedding a steel cable into a 3D printed part is simply taking apart the model and putting a channel in for the cable. At a specific layer height, the printer is stopped, the steel cable is embedded with the help of a soldering iron, and the printer continues doing its thing.

There’s a slight amount of Gcode hacking to make this happen, and the process of embedding a steel cable into a print is a bit finicky. Still, if you want stronger 3D prints, there are worse ways to do it, and certainly less effective ways of doing it. You can check out the video for this technique below.

Continue reading “Steel-Reinforced 3D Prints”

JigFab Makes Woodworking Easier

Woodworking is an age-old craft that requires creativity and skill to get the best results. Experienced hands get the best results, while the new builder may struggle to confidently produce even basic pieces. JigFab is here to level the playing field somewhat.

Much of the skill in woodworking comes with mastering the various joints and techniques required to hold a piece together. Cutting these joints often requires specialized tools and equipment – ideally, some sort of jig. These jigs can be difficult to build in themselves, and that’s where JigFab shines.

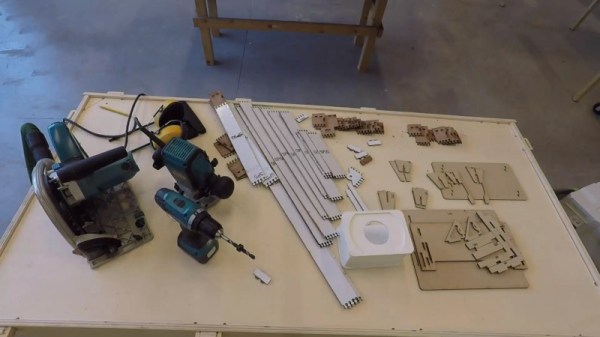
The workflow is straightforward and quite modern. A piece is designed in Autodesk Fusion 360. Various joints can then be defined in the model between individual parts. JigFab then generates a series of laser cut constraints that can be used with power tools to easily and accurately cut the necessary parts to build the final piece.

It’s an impressive technology which could rapidly speed the workflow of anyone experimenting with woodwork and design. There’s even smart choices, like having a toolkit of standard predefined elements that reduce laser cutting time when producing new constraints. If you’re eager to get stuck in to woodwork, but don’t know where to start, don’t worry – we’ve got a primer for that. Video after the break.

Continue reading “JigFab Makes Woodworking Easier”

Power Stacker, A Modular Battery Bank

Many of us will own a lithium-ion power pack or two, usually a brick containing a few 18650 cylindrical cells and a 5 V converter for USB charging a cellphone. They’re an extremely useful item to have in your carry-around, for a bit of extra battery life when your day’s Hackaday reading has provided a worthy use for most of your charge. These pack are though by their very nature inflexible, no matter how many cells you own, the pack will only ever contain the number with which it was shipped. Worse, when those cells are discharged or even  reach the end of their lives, they can’t be swapped for fresh ones. [Isaacporras] has a solution for these problems which he calls the Power Stacker, a modular battery pack system.

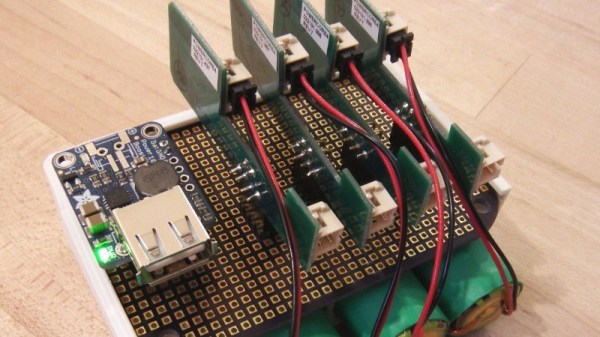
At its heart is the Maxim MAX8903 lithium-ion charge controller chip, of which one is provided for each cell. A single cell and MAX8903 with a DC to DC converter for 5 V output makes for the simplest configuration, and he has a backplane allowing multiple boards to be connected and sharing the same charge and output buses.

An infinitely configurable battery bank sounds great. It’s looking for crowdfunding backing, and for that it has an explanatory video which you can see below. Meanwhile if you’d  like to try for yourself you can find the necessary files on the hackaday.io page linked above.

Continue reading “Power Stacker, A Modular Battery Bank”

Hack My House: UL Certification And Turning The Lights On With An ESP8266

It’s hard to imagine a smart house without smart lighting. Maybe it’s laziness, but the ability to turn a light on or off without walking over to the switch is a must-have, particularly once the lap is occupied by a sleeping infant. It’s tempting to just stuff a relay in the electrical boxes and control them with a Raspberry Pi or micro-controller GPIO. While tempting, get it wrong and you have a real fire hazard. A better option is one of the integrated WiFi switches. Sonoff is probably the most well known brand, producing a whole line of devices based on the ESP8266. These devices are powered from mains power and connect to your network via WiFi. One disadvantage of Sonoff devices is they only work when connected to Sonoff’s cloud.

Light switches locked in to a cloud provider are simply not acceptable. Enter Tasmota, which we’ve covered before. Tasmota is an open source firmware, designed specifically for Sonoff switches, but supporting a wide range of ESP8266 based devices. Tasmota doesn’t connect to any cloud providers unless you tell it to, and can be completely controlled from within a local network.

Certifications, Liability, and More

We’re well acquainted with some of the pitfalls of imported electronics, but one of the lesser known problems is the lack of certification. In the United States, there are several nationally recognized testing laboratories: Underwriters Laboratories (UL) and Intertek (ETL) are the most prominent. Many  imported electronic devices, including Sonoff devices, do not have either of these certifications. The problem with this is liability, should the worst ever happen and an electrical fire break out. The Internet abounds with various opinions on the importance of the certification — a missing certification mark is somewhere between meaningless and a total hazard. The most common claim is that a house fire combined with non-certified equipment installed would result in an insurance company refusing to pay.

Rather than just repeat this surely sage advice from the Internet, I asked my insurance agent about uncertified equipment in the case of a fire. I discovered that insurance agencies avoid giving definite answers about claim payments. The response that came back was “it depends”: homeowner’s insurance covers events that are accidental and sudden. If a homeowner was aware that they were using uncertified equipment, then it could be categorized as “not an accident”. So far, the myth seems plausible. The final answer from the insurance agency: it’s possible that a non UL-certified device could result in denial of payment on a claim, but it depends on the policy and other details– why take the risk? Certification marks make insurance companies happier.

I also talked to my city’s electrical inspector about the issue. He commented that non-certified equipment is a violation of electrical code when it is hard-wired into a house. He echoed the warning that an insurance company could refuse to pay, but added that in the case of injury, there could be even further liability issues. I’ve opted to use certified equipment in my house. You’ll have to make your own decision about what equipment you’re willing to use.

There are some devices on Amazon that claim to have certification, but searching the certification database leads me to believe that not all of those claims are valid. If in doubt, there is a searchable UL database, as well as a searchable Intertek database.
Continue reading “Hack My House: UL Certification And Turning The Lights On With An ESP8266”

KiCad And FreeCAD Hack Chat

Join us Wednesday at noon Pacific time for the KiCad and FreeCAD Hack Chat led by Anool Mahidharia!

The inaugural KiCon conference is kicking off this Friday in Chicago, and KiCad aficionados from all over the world are gathering to discuss anything and everything about the cross-platform, open-source electronic design automation platform. As you’d expect, Hackaday will have a presence at the conference, including a meet and greet after party. There’ll also be talks by a couple of our writers, including Anool Mahidharia, who’ll be taking time out of his trip to the States to drop by the Hack Chat with a preview of his talk, entitled “Fast 3D Model Creation with FreeCAD”.

Join us for the KiCad and FreeCAD Hack Chat this week with your questions about KiCad and FreeCAD. If you’ve got some expertise with electronic design tools, make sure you come by and contribute to the discussion too — we’d love to hear your insights. And as always, you can get your questions queued up by leaving a comment on the KiCad and FreeCAD Hack Chat event page and we’ll put them on the list for the Hack Chat discussion.

join-hack-chatOur Hack Chats are live community events in the Hackaday.io Hack Chat group messaging. This week we’ll be sitting down on Wednesday, April 24, at noon, Pacific time. If time zones have got you down, we have a handy time zone converter.

Click that speech bubble to the right, and you’ll be taken directly to the Hack Chat group on Hackaday.io. You don’t have to wait until Wednesday; join whenever you want and you can see what the community is talking about.