We will admit it: mostly when we see a homebrew CPU design on an FPGA, it is a simple design that wouldn’t raise any eyebrows in the 1970s or 1980s. Not so with [Henry Wong’s] design, though. His x86-like design does superscalar out-of-order execution, just like big commercial modern CPUs. Of course [Henry] designs CPU architectures for Intel, so that’s not surprising. You can see a very detailed talk on the design in the video, below. You can also read the entire thesis project.
[Henry] starts out with a description of FPGAs and soft processors. He also covers the use of multiple instruction issue to increase the virtual clock rate of a CPU. In other words, if a 100 MHz CPU can do one instruction at a time, it won’t be any faster — in theory — than a 50 MHz CPU that can do two instructions at once. Of course, trying to do two at once has some overhead, so that won’t be completely true.
When we recently discussed the skills that we might wish to impart upon a youngster, one of those discussed was the ability to speak more than one language. If any demonstration were required as to why that might be the case, it comes today in [Byfeel]’s Notif’Heure, an ESP8266-powered clock and display (French-language, Google Translate link). If we only watch for English-language projects, we miss much of the picture.
The project began life in April 2018 (Google Translate link) and has since speedily progressed through many software versions to the current v3.2. In hardware terms it’s pretty simple: an ESP8266 development board drives a set of LED matrix displays. In the software though it has the primary function of an NTP-synchronised clock, there is also support for notification display and integration with the Jeedom home automation package.
We’ve featured innumerable ESP8266 clocks over the years, but surprisingly this is the first one with Jeedom integration. With so many to choose from it’s difficult to pick examples to show you, so perhaps it’s time to go to the truly ridiculous with this twelve-ESP monster.
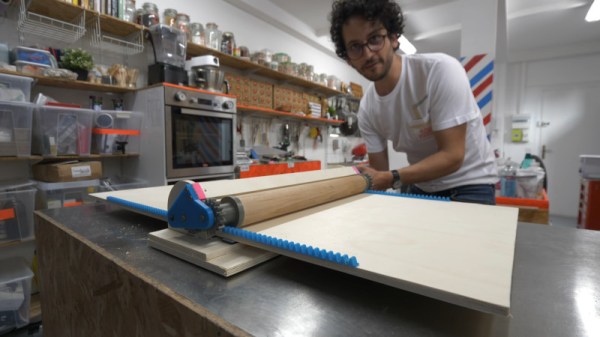
Baking is a wonderful pastime, as much an art as a science. [Alex] pursues the craft with plenty of vigor, and had built his very own dough sheeter to assist in his work. Unfortunately, the design had several flaws, and came out of a recent move rather the worse for wear. Growing tired of having to deal with dough of inconsistent thickness, he went back to the drawing board to whip up a new version (Youtube link, embedded below).
The new model improves significantly over the predecessor, by directly addressing the engineering pitfalls of the first design.
The core of the machine is a moving platform combined with a rolling pin, that can be set to a desired height to roll the dough into a set thickness. This is key to baking top-notch croissants, which [Alex] takes very seriously. His initial model used a table leg for a rolling pin, fitted with a threaded rod down the centre. This had significant issues with both runout, and uneven diameter across its length. Additionally, its frame had not held up after a recent move, and [Alex] was keen to start again.
The new model starts with attention paid to the basic engineering issues. The table leg is replaced with a professional-grade rolling pin, fitted with 3D-printed gears that accurately align the axis of rotation to the centre of the pin. A rack and pinion drive is also added to move the dough platform. Finally, a locking pin system is used to set the desired height of the dough.
It’s a useful project for the keen baker, and one that leans heavily on additive manufacturing methods. Producing such a tool in the years before 3D printers would have required significant effort to produce the required gears and mating components, so it’s impressive to see how easily something like this can come together these days. A hacker mindset can always be handy for baking – don’t forget, you can improve your bread crusts with steam! Video after the break.
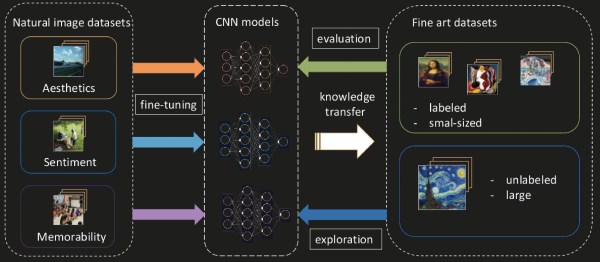
In 2019, using AI to evaluate artwork is finally more productive than foolish. We all hope that someday soon our Roomba will judge our living habits and give unsolicited advice on how we could spruce things up with a few pictures and some natural light. There is already an extensive amount of Deep Learning dedicated to photo recognition but a team in Croatia is adapting them for use on fine art. It makes sense that everything is geared toward cameras since most of us have a vast photographic portfolio but fine art takes longer to render. Even so, the collection on Wikiart.org is vast and already a hotbed for computer classification work, so they set to work there.
As they modify existing convolutional neural networks, they check themselves by comparing results with human ratings to keep what works and discard what flops. Fortunately, fine art has a lot of existing studies and commentary, whereas the majority of photographs in the public domain have nothing more than a file name and maybe some EXIF data. The difference here is that photograph-parsing AI can say, “That is a STOP sign,” while the fine art AI can say, “That is a memorable painting of a sign.” Continue reading “AI And Art Appreciation”→
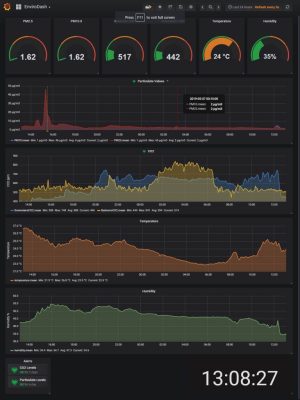
Commuting through the urban sprawl of a 21st century city brings exposure to significant quantities of pollution. For a Medway Makers member that meant the Isle of Dogs, London, and a drive through the Blackwall Tunnel under the Thames. When you can taste the pollution in the air it’s evident that this isn’t the best environment to be in, but just how bad is it? Time to put together an environmental monitoring and recording rig.
Into the build went an ESP32 module, an SPS30 particulate sensor, an MH-Z19 CO₂ sensor, an HTU21D temperature and humidity sensor, and a uBlox NEO 6M GPS module. The eventual plan is to add an SD card for data logging, but in the absence of that it connects to a Raspberry Pi running Grafana over InfluxDB for data analysis. The result provides a surprising insight into the environmental quality of not just a commute but of indoor life. We’re sorry to say that they don’t seem to have posted any of the code involved onto the Medway Makers writeup, though we hope that’s an oversight they’ll rectify by the time this has gone live.
Hackers have a multitude of skills, many are well-versed in the ways of all things that blink and flash. These abilities have often be applied to the field of jewelry and human adornment, and many LEDs have been employed in this work. [Deshipu] has been attempting something a touch different however, by constructing a tiny TFT pendant.
The basic idea is not dissimilar from those USB photo keychains of recent history. A SAMD21 Cortex M0+ serves as the brains of the operation, with the tiny microcontroller being soldered to a custom PCB that makes up the body of the pendant. A ST7735S TFT LCD screen is then attached to act as the display. Charging and delivery of images is done over USB, which can be handled natively by the SAMD21.
Currently, the pendant is capable of displaying 16-color BMPs, with the intention to create a converter for animated GIFs in the pipeline. Potential upgrades also involve creating a larger battery pack to sit behind the wearer’s neck, as currently the device has just 8 mAh to work with.
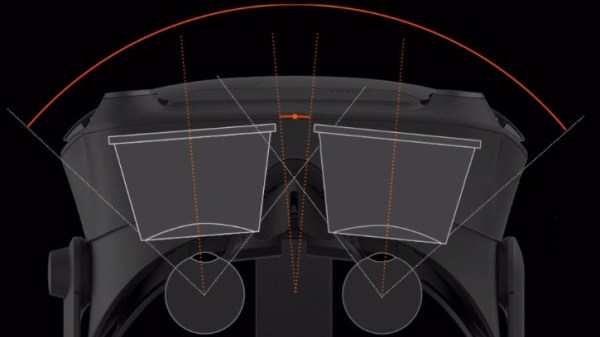
VR headsets have been seeing new life for a few years now, and when it comes to head-mounted displays, the field of view (FOV) is one of the specs everyone’s keen to discover. Valve Software have published a highly technical yet accessibly-presented document that explains why Field of View (FOV) is a complex thing when it pertains to head-mounted displays. FOV is relatively simple when it comes to things such as cameras, but it gets much more complicated and hard to define or measure easily when it comes to using lenses to put images right up next to eyeballs.
Simulation of how FOV can be affected by eye relief [Source: Valve Software]The document goes into some useful detail about head-mounted displays in general, the design trade-offs, and naturally talks about the brand-new Valve Index VR headset in particular. The Index uses proprietary lenses combined with a slight outward cant to each eye’s display, and they explain precisely what benefits are gained from each design point. Eye relief (distance from eye to lens), lens shape and mounting (limiting how close the eye can physically get), and adjustability (because faces and eyes come in different configurations) all have a role to play. It’s a situation where every millimeter matters.
If there’s one main point Valve is trying to make with this document, it’s summed up as “it’s really hard to use a single number to effectively describe the field of view of an HMD.” They plan to publish additional information on the topics of modding as well as optics, so keep an eye out on their Valve Index Deep Dive publication list.


 Commuting through the urban sprawl of a 21st century city brings exposure to significant quantities of pollution. For a Medway Makers member that meant the Isle of Dogs, London, and a drive through the Blackwall Tunnel under the Thames. When you can taste the pollution in the air it’s evident that this isn’t the best environment to be in, but just how bad is it? Time to put together