Raspberry Pi Plays A MIDI Tune Wherever You May Roam

MIDI controller keyboards are great because they let you control any synthesizer you plug them into. The only downside: you need a synthesizer to turn MIDI notes into actual sounds, slightly complicating some summer night campfire serenading. Not for [Geordie] though, who decided to build the nanoPi, a portable, MIDI instrument housing a Raspberry Pi.

Using a Korg nanoKEY2 USB MIDI controller as base for the device, [Geordie] took it apart and added a Raspberry Pi Zero W, a power bank to, well, power it, and a USB hub to connect a likewise added USB audio interface, as well as the controller itself. As the nanoKEY2 has a naturally slim shape, none of this would ever fit in it, so he designed and 3D printed a frame to extend its height. Rather than wiring everything up internally, he decided to route the power and data cable to the outside and connect them back to the device itself, allowing him to use both the power bank and the controller itself separately if needed.

On the software side, the Pi is running your common open source software synthesizer, Fluidsynth. To control Fluidsynth itself — for example to change the instrument — [Geordie] actually uses the Termius SSH client on his phone, allowing him also to shut down the Pi that way. While Fluidsynth’s built-in MIDI router could alternatively remap the nanoKEY2’s additional buttons, it appears the functionality is limited to messages of the same type, so the buttons’ Control Change messages couldn’t be remapped to the required Program Change messages. Well, there’s always the option to fit some extra buttons if needed. Or maybe you could do something clever in software.

As you may have noticed, the nanoPi doesn’t include any speaker — and considering its size, that’s probably for the best. So while it’s not a fully standalone instrument, it’s a nice, compact device to use with your headphones anywhere you go. And thanks to its flexible wiring, you could also attach any other USB MIDI controller to it, such as this little woodwind one, or the one that plays every pop song ever.

Continue reading “Raspberry Pi Plays A MIDI Tune Wherever You May Roam”

A Look Behind The Canvas Of The “60 Billion Lights” Project

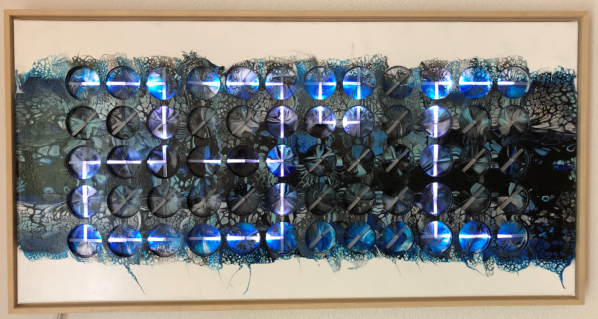
In May of this year, [Erich Styger] shows his project called “60 Billion Lights” off to the world.  Now he has published an update on the making of this impressive work of art. As a quick recap, “60 Billion Lights” is a canvas art piece, which has 60 dual shaft stepper motors integrated into it. Each stepper motor has forty 24-bit RGB LEDs, making for a total of 60 billion position and light combinations on the entire canvas.

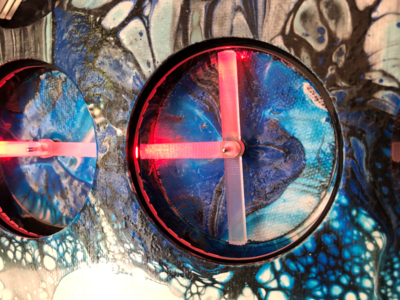
With the dual shaft stepper motors, one can control the position of laser-cut acrylic rods inside each of the forty depressions that make up a unit. Each unit has its WS2812B LEDs positioned around the inside edge.

As the embedded video (after the break) shows, it can be used to create a wide variety of effects. The whole of it is driven by 15 controller boards that run FreeRTOS on an NXP LPC845 (Cortex-M0+), connected via RS-485.

In the ‘Making Of’ video (embedded after the break) and article, more details are shown of the individual components, including the dual shaft stepper motors, stepper motor PCBs, the LED ring PCBs, and countless images of the construction, painting and assembly.

If the original article gave one the impression that this was an easy project, it is this behind the scenes look that gives one a good impression of the full scale. From the countless PCBs, controller boards, wiring, programming to the assembly and testing. Not to mention the painting of the canvas itself, which is an original work.
Continue reading “A Look Behind The Canvas Of The “60 Billion Lights” Project”

The Simplest Microwave Receiver

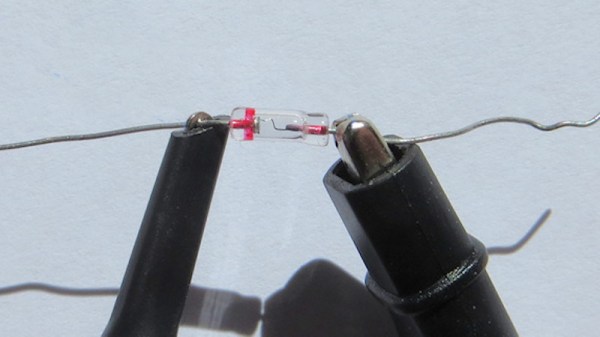
We are used to microwave receivers requiring complex chipsets and exacting PCB layouts, but as [CHZ-soft] has shown, it does not always have to be that way. With nothing more complex than a germanium point-contact diode and an oscilloscope, you can quickly, easily, and cheaply resolve microwave signals, as we are shown with a 2.4GHz wireless mouse.

Of course, there’s nothing new here, what we’re being shown is the very simplest incarnation of a crystal set. It’s a wideband device, with only the length of the wires providing any sort of resonance, but surprisingly with the addition of a very selective cavity resonator it can be turned into a useful receiver. Perhaps the most interesting take-away is that the germanium point-contact diode — once a ubiquitous component — has almost entirely disappeared. In most applications it has been supplanted by the Schottky diode, but even those usually don’t quite possess the speed in the point contact’s home ground of radio detection. This is a shame, because there are still some bench-level projects for which they are rather useful.

So if you have a point contact diode and AM radio doesn’t attract, give it a go as a microwave detector. And if the point contact diode has attracted your interest then you may want to read our piece on Rufus Turner, who brought us its archetype, the 1N34A.

Via Hacker News.

Hackaday Links Column Banner

Hackaday Links: June 7, 2020

For many of us who were in college at the time, the 1989 release of Will Wright’s classic SimCity sounded the death knell of our GPAs. Being able to create virtual worlds and then smite them with a tornado or a kaiju attack was the stuff of a procrastinator’s dreams. We always liked the industrial side of the game best, and took great pains in laying out the factory zones, power plants, and seaports. Those of a similar bent will be happy to know that Maxis, the studio behind the game, had a business simulations division, and one of their products was a complete refinery simulator the studio built for Chevron called, unsurprisingly, SimRefinery. The game, which bears a striking resemblance to SimCity, has been recovered and is now available for download, which means endless procrastination by playing virtual petrochemical engineer is only a mouse click away.

Speaking of time wasters, we stumbled upon another simulation this week that sucked away a couple of hours of productivity. As RTL-SDR.com reports, YouTuber called Information Zulu has a 24/7 live stream showing arrivals and departures at Los Angeles International Airport. That may sound boring, but the cameras used to watch the runways are virtual, and the planes are animated based on ADS-B data being scooped up by an RTL-SDR dongle. We pinged Information Zulu and asked for a rundown of the gear behind the system, but never heard back. If we do, we’ll post a full article on what we learned, because the level of detail is amazing. The arriving and departing planes sport the correct livery for the airline, the current weather conditions are shown, taxiing is shown in real time, and there’s even an audio feed from air traffic control.

If you’re looking to gain back a little of the productivity lost to the last two items, Digi-Key might be able to help with their new PCB Builder service. All you have to do is upload your gerbers and select your materials, and they’ll give you options for a bunch of different quick-turn fabrication houses. Looks mighty convenient.

Steve Mould dropped a video this week about vibration analysis. That might not sound very exciting, but the fascinating bit is how companies are now using motion amplification video techniques to show how and where industrial equipment is moving, even if those motions are too subtle to be seen by the naked eye. It’s frankly terrifying to see how pipes flex and tanks expand and contract, and how pumps and motors move relative to each other. The technique used is similar to the way a person’s pulse can be detected on a video by the subtle color change as blood rushes into capillaries. We’d love to see someone tackle a homebrew version of this so we can all see what’s going on around us.

And finally, we want to remind everyone that the Hackaday Prize is back, and that you should get your entries going. What’s new this year is the Dream Team challenges, where four worthy non-profits organizations will each assemble a three-person team to work on a specific pain-point in their process. The application deadline has been extended to June 9, and there are two $3,000 microgrants, one in June and one in July, for each team member. So look through the design briefs and see if your skills match their needs.

Build This Cyberdeck In A Cave With A Box Of Scraps

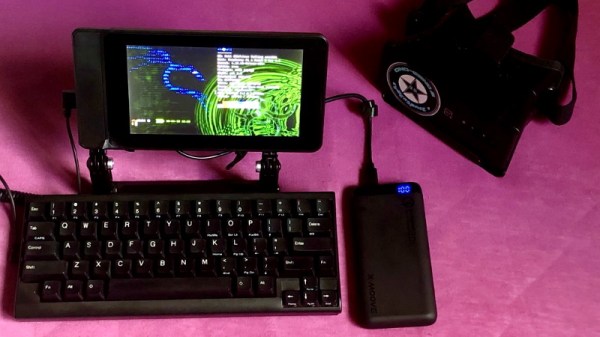
Desktop 3D printing has been a big enabler for the cyberdeck community, as it’s allowed individuals to create unique frames and enclosures which would have been far more difficult and time consuming to produce using traditional methods. But what if you don’t have access to a well-stocked workspace, and need to do your building with the bare minimum of equipment? In that case, [ALX] recently put together a minimalistic design that can be assembled with off-the-shelf components and basic tools.

It’s the ideal cyberdeck for the neophyte, as all the parts are widely available and relatively inexpensive. While it might not be a customized as something with a fully 3D printed frame, we think it nails the look and utility that are the hallmarks of a proper deck.

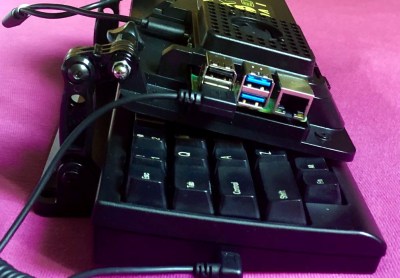
The key to this build is the SmartiPi Touch case, which puts the Raspberry Pi and touch screen on a hinged panel. These hinges happen to be compatible with GoPro-style mounts, so with a few extension pieces, the panel can be lifted up high enough that it can be folded over the keyboard. The base of the SmartPi Touch case is then attached to the bottom of the keyboard with nothing more exotic than double-sided tape. Here [ALX] is using a Happy Hacking KeyBoard Lite 2, but you could substitute it with whatever you have handy.

On the other hand, if 3D printing out the frame isn’t a problem for you, this miniature cyberdeck we covered recently could be a great alternative if you’re looking to get started in the burgeoning world of bespoke mobile computers.

Adjustable Jig Eases PCB Stencil Alignment Process

PCB stencils make application of solder paste a snap, but there’s a long, fussy way to go before the paste goes on. You’ve got to come up with some way to accurately align the stencil over the board, which more often than not involves a jury-rigged setup using tape and old PCBs, along with a fair amount of finesse and a dollop of luck.

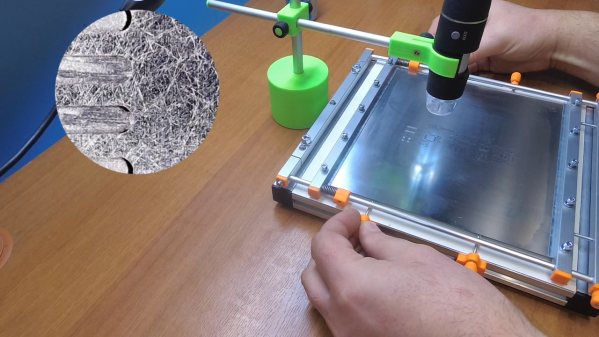
Luckily, [Valera Perinski] has come up with a better way to deal with stencils. The Stencil Printer is a flexible, adjustable alignment jig that reduces the amount of tedious adjustment needed to get things just so. The jig is built mostly from aluminum extrusions and 3D-printed parts, along with a bunch of off-the-shelf hardware. The mechanism has a hinged frame that holds the stencil in a fixed position above a platen, upon which rests the target PCB. The board is held in place by clamps that ride on threaded rods; with the stencil flipped down over the board, the user can finely adjust the relative positions of the board and the stencil, resulting in perfect alignment. The video below is mainly a construction montage, but if you skip to about the 29:00 mark, you’ll see the jig put through its paces.

Granted, such a tool is a lot more work than tape and spare PCBs, but if you do a lot of SMD work, it may be worth the effort. It’s certainly less effort than a solder-paste dispensing robot.

Continue reading “Adjustable Jig Eases PCB Stencil Alignment Process”