Camcorder Viewfinder Converted To Diminutive Vector Display

We generally cast a skeptical eye at projects that claim some kind of superlative. If you go on about the “World’s Smallest” widget, the chances are pretty good that someone will point to a yet smaller version of the same thing. But in the case of what’s touted as “The world’s smallest vector monitor”, we’re willing to take that chance.

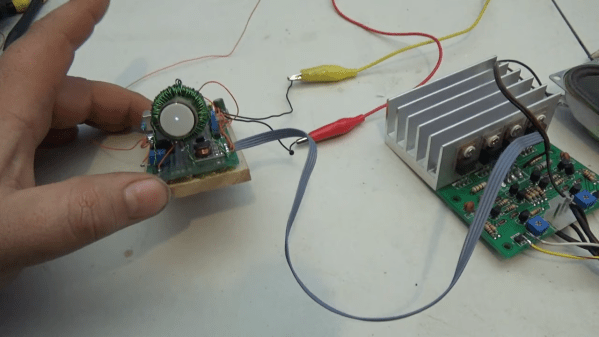
If you’ve seen any of [Arcade Jason]’s projects before, you’ll no doubt have noticed his abiding affection for vector displays. We’re OK with that; after all, many of the best machines from the Golden Age of arcade games such as Asteroids and Tempest were based on vector graphics. None so small as the current work, though, based as it is on the CRT from an old camcorder’s viewfinder. The tube appears to be about 3/4″ (19 mm) in diameter, and while it still had some of its original circuitry, the deflection coils had to be removed. In their place, [Jason] used a ferrite toroid with two windings, one for vertical and one for horizontal. Those were driven directly by a two-channel push-pull audio amplifier to make patterns on the screen. Skip to 15:30 in the video below to see the display playing [Jerobeam Fenderson]’s “Oscilloscope Music”.

As much as we’d love to see a tiny game of Battlezone played on the diminutive display, there’s only so much it can do. Maybe an analog version of this adorable digital oscilloscope would be possible?

Continue reading “Camcorder Viewfinder Converted To Diminutive Vector Display”

Particle Accelerators That Fit On A Chip

If you were asked to imagine a particle accelerator, you would probably picture a high-energy electron beam contained within a kilometers-long facility, manned by hundreds of engineers and researchers. You probably wouldn’t think of a chip smaller than a fingernail, yet that’s exactly what the SLAC National Accelerator Laboratory’s Accelerator on a Chip International Program (ACHIP) has accomplished.

The Stanford University team developed a device that uses lasers to accelerate electrons along etched channels on a silicon chip. The idea for a miniature accelerator has existed since the laser’s invention in 1960, but the requirement for a device to generate electrons made the early proof-of-concepts difficult to manufacture in bulk.

via Scientific American

The electromagnetic waves produced by lasers have much shorter wavelengths than the microwaves used in full-scale accelerators, allowing them to accelerate electrons in a far more confined space – channels can be shrunk to three one-thousandths of a millimeter wide. In order to couple the lasers and electrons properly, the light waves must push the particles in the correct direction with as much energy as possible. This also requires the device to generate electrons and transmit them via the proper channel. With an accelerator engraved in silicon, multiple components can fit on the same chip.

Within the latest prototype, a laser hits a grating from above the chip, directing the energy into a waveguide. The electromagnetic waves radiate out, moving with the waveguide until they reach an etched pattern that creates a focused electromagnetic field. As electrons move through the field, they accelerate and gain energy.

The results showed that the prototype could boost the electrons by 915 electron volts, equivalent to the electrons gaining 30 million electron volts over a meter. While the change is not on the scale of SLAC, it does scale up more easily since researchers can fit multiple accelerating paths onto future designs without the bulk of a full-scale accelerator. The chip exists as a single stage of the accelerator, allowing more researchers to conduct experiments without the need to reserve space in expensive full-scale particle accelerators.

Continue reading “Particle Accelerators That Fit On A Chip”

Make A Mean-Sounding Synth From Average Components

A while back, [lonesoulsurfer] stumbled upon a mind-blowing little DIY synth on YouTube and had to make one of his own. We don’t blame him one bit for that, ’cause we’ve been down that cavernous rabbit hole ourselves. You might want to build one too, after you hear the deliciously fat and guttural sounds waiting inside those chips and passives. Don’t say we didn’t warn you.

The main synth is built on five LM358 op-amps that route PWM through a pair of light-dependent resistors installed near the top. There are two more oscillators courtesy of a 40106 hex inverting Schmitt trigger, which leaves four more oscillators to play with should you take the plunge and build your own.

He didn’t just copy the guy’s schematic and call it good. He added [a 555-based arpeggiator that’s controlled with two homebrew optocouplers. These sound fancy and expensive, but can be bred easily at home by sealing an LED and an LDR inside a piece of black heat shrink tubing and applying a bit of PWM. With the flick of a toggle, he can bypass the momentary buttons and use the yellow knob at the top to sweep through the pitch range with a single input.

Although he doesn’t hold your hand through the build, [lonesoulsurfer] has plenty of nice, clear pictures of the process that nearly give a step-by-step guide. That plus the video demo and walk-through should get you well on your way to DIY synthville.

If this all seems very cool, but you’d really like to understand what’s happening as you descend into the rabbit hole, our own [Elliot Williams]’s Logic Noise series is an excellent start.

Continue reading “Make A Mean-Sounding Synth From Average Components”

A Slightly Bent ESP8266 Sensor Platform

The ability to get professionally manufactured PCBs, at least small ones, for dirt cheap has had a huge impact on the sort of projects we see around these parts. It’s getting to the point where experimenting with PCB enclosures is not only a way to make your next project stand out, but an economical choice.

Which is how this ESP8266 sensor gadget from [Josef Adamčík] got its unique “folded over” look. The top panel is where the microcontroller and headers for various sensors live, the bottom panel is home to the TP4056 USB charging module, and the center panel provides mechanical support as well as holds the single 18650 cell. Rather than close the whole thing up with a fourth panel, he decided to leave it open so the battery can easily be removed. Plus, of course, it looks cooler this way.

Could [Josef] have fit all his electronics on a single 100 x 100 PCB and then put the whole thing into a 3D printed enclosure? Well, sure. But that’s been done to death at this point, and besides, he was looking for an excuse to get more comfortable doing PCB design. We think it also makes for a considerably more visual appealing final product than simply taking the “normal” way out.

Currently [Josef] has an SHT21 humidity/temperature sensor and a BH1750 light sensor slotted into the headers on the top side of the device, but they could just as easily be swapped out with something else if you wanted to do something a bit more exciting. We notice that homebrew air quality monitors are becoming increasingly popular.

Building bespoke enclosures from PCBs is a fantastic trick that frankly we’d love to see more of. It’s somewhat of an artform in itself, but if you’re willing to put the effort in to do it right the results can be truly phenomenal.

Better Controls For Your Chromecast Through CEC

Modern home cinema equipment is well-equipped with features for interoperability and convenience, but in practice, competing standards and arcana can make it fall over. Sometimes, you’ve gotta do a little work on your own to glue it all together, and that’s what led [Victor] to develop a little utility of his own.

ChromecastControls is a tool that makes controlling your home cinema easier by improving Chromecast’s integration with the CEC features of HDMI. CEC, or Consumer Electronics Control, is a bidirectional serial bus that is integrated as a part of the HDMI standard. It’s designed to help TVs, audio systems, and other AV hardware to communicate, and allow the user to control an entire home cinema setup with a single remote. Common use cases are TVs that send shutdown commands to attached soundbars when switched off, or Blu-Ray players that switch the TV on to the correct output when the play button is pressed.

[Victor]’s tool allows Chromecast to pass volume commands to surround sound processors, something that normally requires the user to manually adjust their settings with a separate remote. It also sends shutdown commands to the attached TV when Chromecast goes into its idle state, saving energy. It relies on the PyChromecast library to intercept traffic on the network, and thus send the appropriate commands to other hardware. Simply running the code on a Raspberry Pi that’s hooked up to any HDMI port on a relevant device should enable the CEC commands to get through.

It’s a project that you might find handy, particularly if you’re sick of leaving your television on 24 hours a day because Chromecast never bothered to implement a simple CEC command on an idle timeout. CEC hacks have a long history, too – we’ve been covering them as far back as 2010!

A Vintage Phone In 2020

When we make a telephone call in 2020 it is most likely to be made using a smartphone over a cellular or IP-based connection rather than a traditional instrument on a pair of copper wires to an exchange. As we move inexorably towards a wireless world in which the telephone line serves only as a vehicle for broadband Internet, it’s easy to forget the last hundred years or more of telephone technology that led up to the present.

The iconic British telephone of the 1960s and 1970s, the GPO model 746. Mine is from 1971.
The iconic British telephone of the 1960s and 1970s, the GPO model 746. Mine is from 1971. (That isn’t my phone number)

In a manner of speaking though, your telephone wall socket hasn’t forgotten. If you like old phones, you can still have one, and picture yourself in a 1950s movie as you twirl the handset cord round your finger while you speak. Continue reading “A Vintage Phone In 2020”

A Replica From WarGames, But Not The One You Think

Remember the WOPR from WarGames? The fictional supercomputer that went toe-to-toe with Matthew Broderick and his acoustic coupler was like a love letter to the blinkenlight mainframes of yesteryear, and every hacker of a certain age has secretly yearned for their own scaled down model of it. Well…that’s not what this project is.

The [Unexpected Maker] is as much a WarGames fan as any of us, but he was more interested in recreating the red alphanumeric displays that ticked along as the WOPR was trying to brute force missile launch codes. These displays, complete with their thoroughly 1980s “computer” sound effects, were used to ratchet up the tension by showing how close the supercomputer was to kicking off World War III.

The display as it appeared in the film.

Of course, most us don’t have a missile silo to install his recreated display in. So when it’s not running through one of the randomized launch code decoding sequences, the display doubles as an NTP synchronized clock. With the retro fourteen segment LEDs glowing behind the smoked acrylic front panel, we think the clock itself is pretty slick even without the movie references.

Beyond the aforementioned LEDs, [Unexpected Maker] is using a ESP32 development board of his own design called the TinyPICO. An associated audio “Shield” with an integrated buzzer provides the appropriate bleeps and bloops as the display goes through the motions. Everything is held inside of an understated 3D printed enclosure that would look great on the wall or a desk.

Once you’ve got your launch code busting LED clock going in the corner, and your illuimated DEFCON display mounted on the wall, you’ll be well on the way to completing the WarGames playset we’ve been dreaming of since 1983. The only way to lose is to not play the game! (Or something like that…)

Continue reading “A Replica From WarGames, But Not The One You Think”