NASA is always keen to highlight the space agency’s many successes, and rightly so — those who pay for these expensive projects have a right to know what they’re getting for their money. And so the news was recently sprinkled with stories of the discovery of electron bursts beyond the edge of our solar system, caused by shock waves from coronal mass ejection (CME) from our Sun reflecting and accelerating electrons in interstellar plasmas. It’s a novel mechanism and an exciting discovery that changes a lot of assumptions about what happens out in the lonely space outside of the Sun’s influence.
The recent discovery is impressive in its own right, but it’s even more stunning when you dig into the details of how it was made: by the 43-year-old Voyager spacecraft, each now about 17 light-hours away from Earth, and each carrying an instrument so simple and efficient that they’re still working all after this time — and which very nearly were left out of the mission’s science payload.
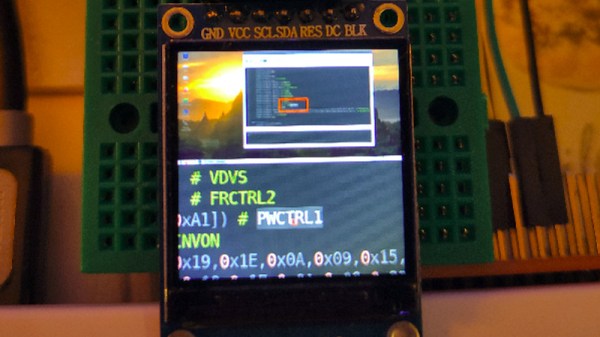
Since its debut back in 2012 there have been a variety of inventive displays used with the Raspberry Pi. Perhaps you remember the repurposed Motorola phone docks, or you have one of those little displays that plugs into the expansion port. Inevitably the smaller options become disappointing as desktop displays, because while the advert triumphantly shows them sporting a Raspberry Pi OS desktop the reality is almost unusable. Until now.
Unexpectedly its mode of operation is very accessible to the non-Linux guru, because it works through a Python script that takes screenshots of both areas and passes them as a composite to the display. An area the size of the magnified window is drawn around the mouse pointer, allowing it to be easily located on the tiny desktop. It relies on the main display being pushed to the HDMI output, so if the Pi is otherwise headless then its configuration has to be such that it forces HDMI use. The result isn’t something that would help you with the more demanding desktop tasks, but it provides a neat solution to being able to use a Pi desktop on a tiny screen.
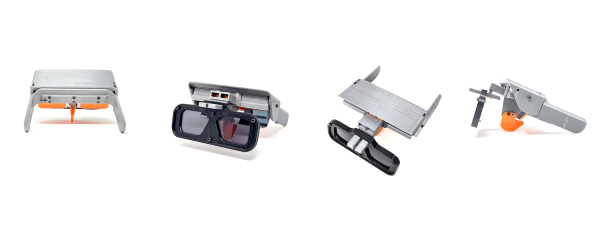
Augmented reality (AR) technology hasn’t enjoyed the same amount of attention as VR, and seriously lags in terms of open source development and accessibility. Frustrated by this, [Arnaud Atchimon] created CheApR, an open source, low cost AR headset that anyone can build at home and use as a platform for further development
[Arnaud] was impressed by the Tilt Five AR goggles, but the price of this cutting edge hardware simply put it out of reach of most people. Instead, he designed and built his own around a 3D printed frame, ESP32, cheap LCDs, and lenses from a pair of sunglasses. The electronics is packed horizontally in the top of the frame, with the displays pointed down into a pair of angled mirrors, which reflect the image onto the sunglasses lenses and into the user’s eyes. [Arnaud] tested a number of different lenses and found that a thin lens with a slight curve worked best. The ESP32 doesn’t actually run the main software, it just handles displaying the images on the LCDs. The images are sent from a computer running software written in Processing. Besides just displaying images, the software can also integrate inputs from a MPU6050 IMU and ESP32 camera module mounted on the goggles. This allows the images to shift perspective as the goggles move, and recognize faces and AR markers in the environment.
All the design files and software is available on GitHub, and we exited to see where this project goes. We’ve seen another pair of affordable augmented reality glasses that uses a smartphone as a display, but it seems the headset that was used are no longer available.
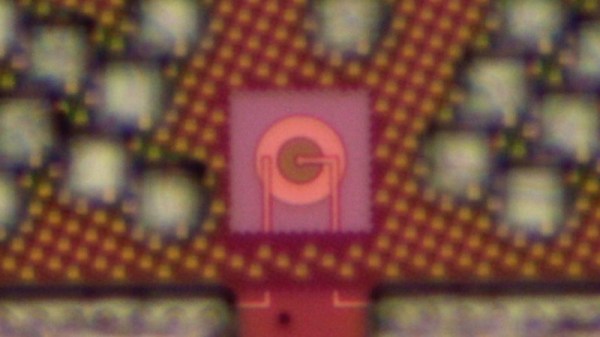
The LED is one of those fundamental building block components in electronics, something that’s been in the parts bin for decades. But while a simple LED costs pennies, that WS2812 or other fancy device is a bit expensive because internally it’s a hybrid of a silicon controller chip and several LEDs made from other semiconductor elements. Incorporating an LED on the same chip as its controller has remained something of a Holy Grail, and now an MIT team appear to have cracked it by demonstrating a CMOS device that integrates a practical silicon LED. It may not yet be ready for market but it already displays some interesting properties such as a very fast switching speed. Perhaps more importantly, further integration of what have traditionally been discrete components would have a huge impact on reducing manufacturing costs.
Anyone who has read up on the early history of LEDs will know that the path from the early-20th-century discoveries of semiconductor luminescence through the early commercial devices of the 1960s and up to the bright multi-hued devices of today has been a long one with many stages of the technology reaching the market. Thus these early experimental silicon LEDs produce light in the infrared spectrum often useful in producing sensors. Whether we’ll see an all-silicon Neopixel any time soon remains to be seen, but we can imagine that some sensors using LEDs could be incorporated on the same die as a microcontroller. It seems there’s plenty of potential for this invention.
This research was presented earlier this month at the IEDM Conference in a talk entitled Low Voltage, High Brightness CMOS LEDs. We were not able to find a published paper, we’d love read deeper so let us know in the comments below if you have info on when this will become available. In the meantime, anyone with any interest in LED technology should read about Oleg Losev, the inventor of the first practical LEDs.
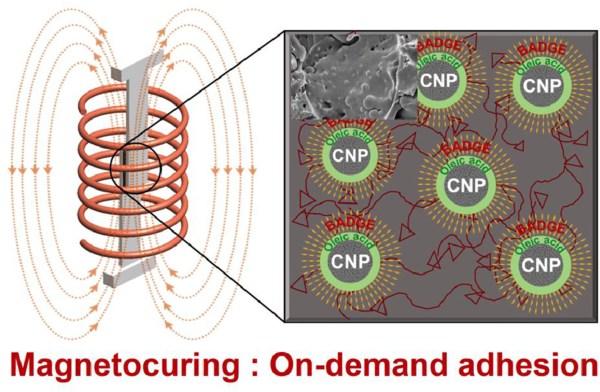
Who doesn’t love epoxy? Epoxy resins, also known as polyepoxides, are an essential adhesive in many applications, both industrially and at smaller scales. Many polyepoxides however require the application of heat (around 150 °C for most types) in order to cure (harden), which can be complicated when the resin is applied to or inside layers of temperature sensitive materials. Now researchers at Nanyang Technological University (NTU) in Singapore have found a way to heat up resins using an alternating magnetic field (PDF), so-called magnetocuring.
As detailed in the research article by R. Chaudhary et al., they used commercially available epoxy resin and added nano particles of a MnxZn1-xFe2O4 alloy. This mixture was exposed to an alternating magnetic field to induce currents in the nano particles and subsequently produce heat that served to raise the temperature of the surrounding resin to about 160 °C in five minutes, allowing the resin to cure. There is no risk of overheating, as the nano particles are engineered to reach their Curie temperature, at which point the magnetic field no longer affects them. The exact Curie temperature was tweaked by changing the amount of manganese and zinc in the alloy.
After trying out a number of different alloy formulations, they settled on Mn0.7Zn0.3Fe2O4 as the optimal formulation at which no resin scorching occurred. As with all research it’s hard to tell when (and if) it will make it into commercial applications, but if this type of technology works out we could soon be gluing parts together using epoxy resin and an EM field instead of fumbling with the joys of two-component epoxy.
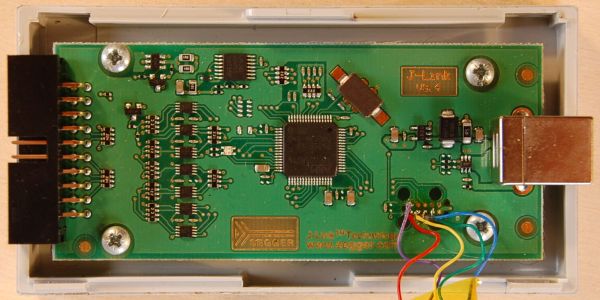
Last year [Emil] found themselves in the situation where a SEGGER J-link debug probe suddenly just stopped working. This was awkward not only because in-circuit debuggers are vital pieces of equipment in embedded firmware development, but also because they’re not that cheap. This led [Emil] to take the device apart to figure out what was wrong with it.
After checking voltages on the PCB, nothing obvious seemed wrong. The Tag-Connect style JTAG header on the PCB appeared to be a good second stop, requiring only a bit of work to reverse-engineer the exact pinout and hook up an ST-Link V2 in-circuit debugger to talk with the STM32F205RC MCU on the PCB. This led to the interesting discovery that apparently the MCU’s Flash ROM had seemingly lost the firmware data.
Fortunately [Emil] was able to flash back a version of the firmware which was available on the internet, allowing the J-Link device to work again. This was not the end of the story, however, as after this the SEGGER software was unable to update the firmware on the device, due to a missing bootloader that was not part of the firmware image.
Digging further into this, [Emil] found out a whole host of fascinating details about not only these SEGGER J-Link devices, but also the many clones that are out there, as well as the interesting ways that SEGGER makes people buy new versions of their debug probes.
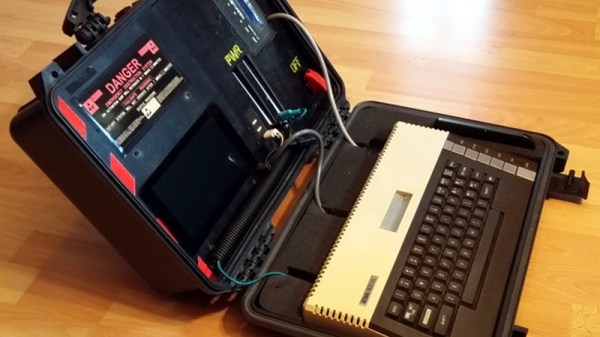
Sticking a Raspberry Pi in a Pelican-style case and calling it a cyberdeck has become something of a meme these days, and while we certainly don’t look down on such projects, we recognize they can get a bit repetitive. But we think this one is unique enough to get a pass. Sure [eizen6] mounted a Pi inside of a rugged waterproof case, but it’s simply serving as a display for the real star of the show: a vintage Atari 800XL computer.
The overall look of the build, from the stenciled Nostromo on the back to the self-destruct warning sticker over the display is a reference to Alien. Partly because both the film and the Atari 800 were released in 1979, but also because [eizen6] says this particular aesthetic is simply the way computers should look. The visual style is also meant to signify that the project embraces the old ways despite the sprinkling of modern technology.
A custom cable lets the 800XL run on USB power.
To that end, retro aficionados will be happy to hear that the Atari appears to be completely unmodified, with [eizen6] going as far as nestling the nearly 40 year old computer in foam rather than permanently mounting it to the case. The various cables for power, video, and data have all been terminated with the appropriate connectors as well, so everything can be easily unplugged should the 8-bit machine need to be returned to more pedestrian use.
In the top half of the case, [eizen6] has mounted the Raspberry Pi 3B+, a seven inch touch screen, a USB hub, and a SIO2SD that allows loading Atari disk images from an SD card. Using a USB capture device, video from the Atari can be shown on the Pi’s display with a simple VLC command. With a USB keyboard plugged into the hub, the Pi can be put to more advanced use should the need arise. It’s also worth noting that, thanks to a custom cable, the Atari is running off of a USB power bank. With a second USB power bank dedicated to running the Pi and its LCD display, this retro cyberdeck is fully mobile.