Simple AC Current Detector Built On A 9 Volt

When working around mains voltages, it can be useful to know whether a given circuit is live or not. While this can be done by direct connection with a multimeter, non-contact methods are available too. A great example is this simple wireless AC current detector from [NEW PEW].

The circuit is a simple one, and a classic. The spring from a ballpoint pen is soldered to the base of a BC547 transistor, and when held close enough to a conductor carrying AC power, a current is induced in the spring which is sufficient to turn the transistor on. The transistor then switches on a second BC547, which lights an LED. The whole circuit is built on top of a battery clip so it can be run straight from the top of a standard 9 volt battery.

It’s a circuit you’ll find all over the place, even built into many modern multimeters. It can be particularly useful to help avoid drilling through mains wires embedded in the walls of your home. Of course, if you’d like even more information about what’s lurking within your walls, consider this capacitive imaging hack. Video after the break.

Continue reading “Simple AC Current Detector Built On A 9 Volt”

How To Get Into Cars: Drifting Mods

Drifting is a hugely popular motorsport unlike any other, focusing on style and getting sideways rather than the pursuit of the fastest time between two points. It’s a challenge that places great demands on car and driver, and proper attention to setup to truly succeed. Here’s a guide to get your first drift build coming together.

Getting Sideways (And Back Again)

Drift cars are specialised beasts, and like any motorsport discipline, the demands of the sport shape the vehicle to suit. If you’re looking to drift, you’ll want to choose a project car with a front-engined, rear-wheel drive layout. While it’s somewhat possible to drift with other layouts, the act of kicking out the tail and holding a slide at speed is best achieved with the handling characteristics of such a vehicle. It all comes down to weight transfer and breaking traction at will. Of course, over the years, certain cars have become expensive on the second-hand market due to their drift prowess, so you may have to get creative if your first choice isn’t available at your budget. It pays to talk to the drifters down at your local track to get an idea of which cars in your area are the best bet for a drift build. Once you’ve got yourself a car, you can get down to installing mods!

Continue reading “How To Get Into Cars: Drifting Mods”

Xolography: A Method To Improve The Accuracy Of Volumetric 3D Printing

Over the past years, additive manufacturing (AM) has become a common tool for hackers and makers, with first FDM and now SLA 3D printers becoming affordable for the masses. While these machines are incredibly useful, they utilize a slow layer-by-layer approach to produce objects. A relatively new technology called Volumetric Additive Manufacturing (VAM) promises to change all that by printing the entire object in one go, and according to a recent article in Nature, it just got a big resolution boost.

The concept is similar to SLA printing, but instead of curing the resin by projecting a 2D image of the current layer into the container, VAM uses multiple lasers to create intersecting points within the liquid. After exposing the resin to this projection for several seconds, the 3D model is built all at once. Not only is this far faster, but it removes the need for support materials and even a traditional build plate is unnecessary.

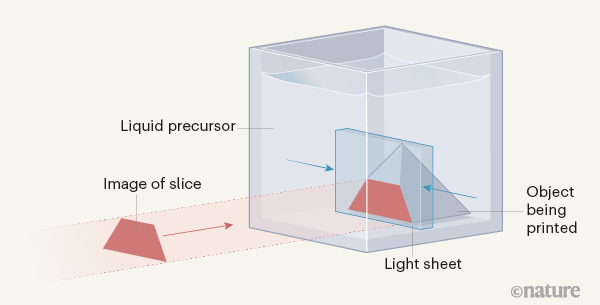
Visualization of the dual-color printing process as used by Regehly et al. (Credit: Nature)

Up till now the resolution and maximum object size of VAM has left a lot to be desired, but in this new research by Regehly et al. claim to have accomplished a feature resolution of ‘up to 25 micrometers’ and a solidification rate of ‘up to 55 cm3/s’. They used two crossing laser beams of different wavelengths, one to form the ‘light sheet’ (blue in the graphic) and a second beam (in red) to project the slide onto this light sheet. They refer to this technique as ‘xolography’, as a mesh-up of ‘holo’ (Greek for ‘whole’) and the ‘X’ shape formed by the crossing laser beams.

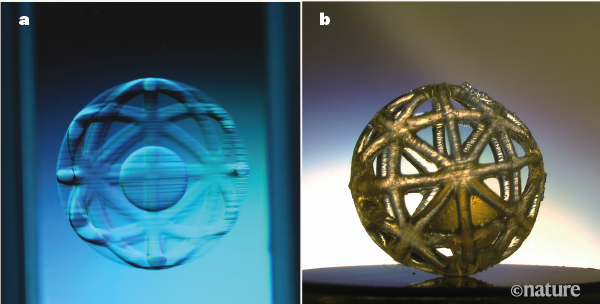
Key to making this work is the chemistry of the resin: the first wavelength excites the molecules called DCPI (Dual-Color Photo Initiators) that are dissolved in the resin. The second wavelength when hitting the same molecules initiates the resin polymerization process. The object pictured at the top of the page was a test print; producing such a design on a traditional 3D printer would have required a considerable amount of difficult to remove support material.

While this is obviously not a technology hobbyists will be using to replace their FDM and SLA printers with any time soon, there are still many companies and institutes working on various VAM technologies and approaches. As more and more of the complexities and challenges are dealt with, who knows when VAM may become a viable replacement for at least some SLA applications?

Thanks to [Qes] for the tip.

All The Good VR Ideas Were Dreamt Up In The 60s

Virtual reality has seen enormous progress in the past few years. Given its recent surges in development, it may come as a bit of a surprise to learn that the ideas underpinning what we now call VR were laid way back in the 60s. Not all of the imagined possibilities have come to pass, but we’ve learned plenty about what is (and isn’t) important for a compelling VR experience, and gained insights as to what might happen next.

If virtual reality’s best ideas came from the 60s, what were they, and how did they turn out?

Interaction and Simulation

First, I want to briefly cover two important precursors to what we think of as VR: interaction and simulation. Prior to the 1960s, state of the art examples for both were the Link Trainer and Sensorama.

The Link Trainer was an early kind of flight simulator, and its goal was to deliver realistic instrumentation and force feedback on aircraft flight controls. This allowed a student to safely gain an understanding of different flying conditions, despite not actually experiencing them. The Link Trainer did not simulate any other part of the flying experience, but its success showed how feedback and interactivity — even if artificial and limited in nature — could allow a person to gain a “feel” for forces that were not actually present.

Sensorama was a specialized pod that played short films in stereoscopic 3D while synchronized to fans, odor emitters, a motorized chair, and stereo sound. It was a serious effort at engaging a user’s senses in a way intended to simulate an environment. But being a pre-recorded experience, it was passive in nature, with no interactive elements.

Combining interaction with simulation effectively had to wait until the 60s, when the digital revolution and computers provided the right tools.

The Ultimate Display

In 1965 Ivan Sutherland, a computer scientist, authored an essay entitled The Ultimate Display (PDF) in which he laid out ideas far beyond what was possible with the technology of the time. One might expect The Ultimate Display to be a long document. It is not. It is barely two pages, and most of the first page is musings on burgeoning interactive computer input methods of the 60s.

The second part is where it gets interesting, as Sutherland shares the future he sees for computer-controlled output devices and describes an ideal “kinesthetic display” that served as many senses as possible. Sutherland saw the potential for computers to simulate ideas and output not just visual information, but to produce meaningful sound and touch output as well, all while accepting and incorporating a user’s input in a self-modifying feedback loop. This was forward-thinking stuff; recall that when this document was written, computers weren’t even generating meaningful sounds of any real complexity, let alone visual displays capable of arbitrary content. Continue reading “All The Good VR Ideas Were Dreamt Up In The 60s”

Tighten This Bolt In Any Direction You Want

Metal lathes are capable machines that played a large role in the industrial revolution, and an incredible tool to have at your disposal. But that doesn’t mean they can’t be used to have a little fun, as demonstrated by [Oleg Pevtsov] who made a bidirectional bolt as a machining exercise just because he could.

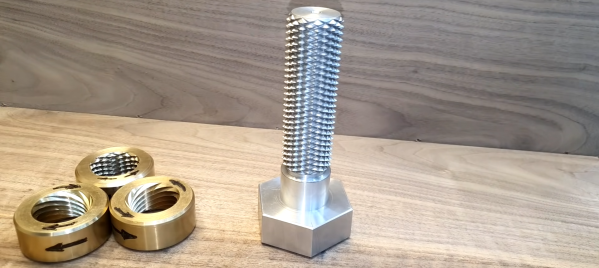
Both videos after the break are in Russian, but the video and auto generated subtitles are enough to get the main points across. The bolt is an M42 size with a 40 mm pitch, with grooves cut in both directions to allow left-handed and right-handed nuts to be threaded. The large pitch means that instead of a single continuous groove like a normal bolt, ten separate grooves need to be cut for each threading direction to cover the bolt surface. Since this was all machined on a manual lathe, a dial indicator was required to maintain accurate spacing. It took [Oleg] four painstaking attempts to get it right, but the end result looks very good. Instead of a fixed cutter, he used a trimming router mounted on a custom clamp.

[Oleg] also machined three different brass nuts to go on the bolt with a fixed cutter. First left-hand and right hand threaded nuts were made, followed by a bidirectional nut. Due to the large pitch and careful machining, all three nuts will spin down the bolt under the force of gravity alone. Although the bidirectional nut doesn’t move as smoothly as the other two, it can change rotation and translation direction at random.

While this is a one-of-a-kind fidget toy, have any of our readers seen a bidirectional bolt or lead screw in the wild? We can imagine that the ability to move two nuts in opposite directions on a single lead screw might have some practical applications.

It’s possible to make incredible parts on a manual lathe. A handbuilt V10 engine and a pneumatic hexacopter model are just two examples of what’s possible with enough skill, knowledge, and patience. Sadly it is a fading form of craftsmanship, rendered mostly obsolete outside of hobby projects by CNC machines.

Continue reading “Tighten This Bolt In Any Direction You Want”

Never Forget To Turn On The Cooker Hood Again

The cooker hood is a wonderful invention for removing excess fumes and steam from the kitchen. But like all electrically-powered devices, it only works when it is turned on. This was the problem facing [Peter], whose family are enthusiastic cooks who frequently forget to hit that switch. His solution? An automatic cooker hood switch that comes on when the cooker is in use, and stays on long enough afterwards to fully dissipate the fumes.

At its heart is a current transformer on the 3-phase stove power line, and we’re treated to a lesson in reading from these devices with an Arduino. They have a shunt resistor across which to produce a voltage, and their AC output is placed upon a reference DC voltage to supply the microcontroller pin. The impedance is quite high, so when the sensor had to be placed a distance from the microcontroller it necessitated an op-amp buffer. The readings then cause the Arduino to trigger a pair of relays to switch on or off the cooker hood. We can imagine that the family kitchen is thus a much pleasanter environment for it.

Cookers can also provide quite a hazard when they are left on. To that end, we’ve also featured a cooker alarm in the past.

Header image: Pbroks13, CC BY-SA 3.0.

ABS Mercedes Rims Push The Limits Of 3D Printing

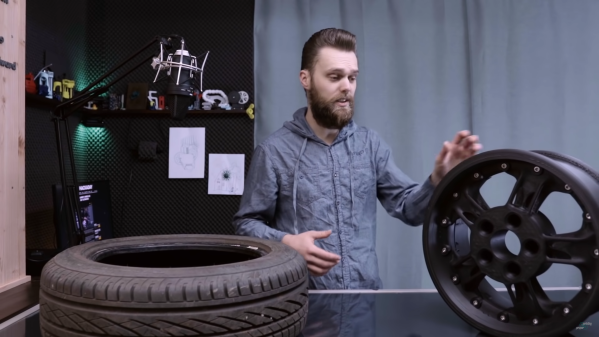
While we’re big believers in 3D printing here at Hackaday, there’s no denying that some things just aren’t meant to be printed. For example, most of us would agree that it’s not the first choice for making rims for a passenger car. We imagine that [Jón Schone] from Proper Printing probably feels the same way, but that didn’t stop him from trying to do it anyway.

A couple of months ago [Jón] got a test subject in the form of an older Mercedes with 19-inch rims. The first two challenges are bed size and warping, so he modified a Creality CR10 S5 with a heated chamber capable of reaching 70 °C to reduce warping with the ABS filament he intended to use. Another challenge is the amount of filament required for the print, especially since [Jón] wasn’t keen on babysitting the machine to replace the spool every so often. His attempt at building a filament joiner ultimately didn’t work out, so in the end he simply sourced the filament in bulk size rolls.

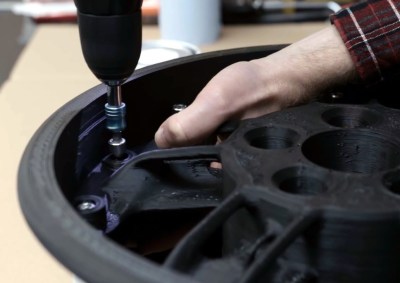
Bolts hold the two halves of the rim together.

Eventually [Jón] managed to print a complete rim in two halves, bolted together around its circumference. Unfortunately, even with the heated chamber, the parts still warped all around the edges. This left a gap at the seam, but to fit a tubeless tire, the rim had to be airtight. So the entire inside surface was painted to close any small gaps, and the larger gaps were filled with sealant.

In the end it was still unable to hold pressure with a tire mounted, so it was test fitted to the car just to see if it would carry the weight. This test also failed, splitting on the thinnest part of the rim. [Jón] has headed back to the drawing board to try again in 2021. We probably would have moved on by now, but you have to admire his tenacity. We hope to see success in the new year.

Printing large parts brings its own set of challenges, but if you stick to good old PLA it’s not too difficult. [Ivan Miranda] has made a name for himself with massive 3D printed projects like a ride-able tank, and also built a supersized 3D printer for future projects.

Continue reading “ABS Mercedes Rims Push The Limits Of 3D Printing”